Initiating a spark is a key indicator that an electrical arc has formed, and you can successfully join two pieces of metal together. In the process of arc welding, sparks are created when elements are burned at the electrode or weld puddle at very high temperatures to create your joined seam. If these sparks don’t occur, you will not be able to produce clean or stable welds.
This is what to do when your welder won’t spark:
| Reason Nr. | what to do when your welder won’t spark |
| 1 | clean metal contact areas |
| 2 | check work lead clamp |
| 3 | adjust wiring connection |
| 4 | check polarity |
- Make sure metal contact areas are clean
- Check work lead clamp location
- Adjust wiring connection to and in welder
- Examine polarity (negative and positive wire configuration)
There are multiple reasons that could be responsible for your welder not sparking, both issues with the connection to the workpiece, or with the welder itself. We will help you identify why your welder may not be sparking and the adjustments you can make to return your welder back into working (and sparking) condition.
Table of Contents
Why Won’t Your Welder Spark and What to Do
If your welder is not sparking, you will first want to look at the welding conditions and environment for the easiest fixes. If your welder still won’t spark, there may be problems with the welder itself.
These are the 5 most common reasons why your welder won’t spark:
- Metal connections areas are not clear or clean
- The work lead clamp is not properly connected
- Wire is faulty or rusted
- Welding drive roll tension needs adjustment
- Polarity connections need to be examined
There are a lot of reasons your welder may not be sparking, but fortunately, most of them are easy fixes. We’ll start at the top of the list as these are the simplest and work towards internal welder problems that could be resulting in no spark.
1. Connection Areas Need Cleaning
One of the most common reasons your welder won’t spark is because the connection points between the welder and the metal pieces are not clean or clear. This means that both the workpiece where you want to form an arc as well as the connection point for the work lead clamp need to be bare metal.
There are a variety of coatings that could be interfering with this bare metal connection and will need to be removed to prevent inference with arc and welding spark:
- Dirt and debris: Wipe all dirt away from metal pieces before use to ensure a proper connection between the workpiece and clamp area.
- Rust and corrosion: Rust can be incredibly preventative in creating a spark if on the metal piece. You can try and remove rust with sandpaper or an angle grinder. If this does not work, consider abrasive blasting and then wiping down with acetone or similar solutions. Flaking can also be rust related and should be removed. You can use a wire brush or similar abrasive tool to create a smooth surface.
- Paints and enamels: These coverings are particularly common when working with automotive work pieces. You will want to remove this coating from both the work piece and the clamp connections to ensure a strong electrical circuit. Sandpaper and angle grinders can be used to strip down to the bare metal. Heat and paint strippers may also be used, including acetone, but they must be cleared and dry before weld.
Not only will coatings on metal potentially prevent a spark, but if you are able to create an arc and weld, it may result in weaker or unattractive weld results. It is recommended to clean and prep the metal beforehand for best results, both in MIG welding and especially with TIG welding.
2. Work Lead Clamp Isn’t Properly Connected
After making sure that the work lead clamp surface area is clean from any debris, rust, or coating, it also needs to be checked for a proper connection. The clamp is an important safety feature to ensure a full electrical circuit that runs through the workpieces and welding machine without shocking the operator.
The circuit needs to be ‘grounded’ in order for the electricity to spark and create an arc upon the workpiece. Grounding refers to protecting operators and equipment nearby from electrical shock and danger. The electrode lead connects the machine to the electrode holder for welding operation while the work lead clamp is connected to the work piece to ensure a safe circuit.
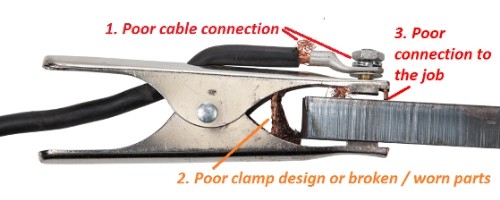
You will need to make sure that you connect the work lead to a bare metal surface on the workpiece, typically with a work lead clamp for the most secure connection. Not only should the clamp be placed firmly and securely onto the metal, but the connection from the clamp to the welding machine needs to have wires snugly attached and configured.
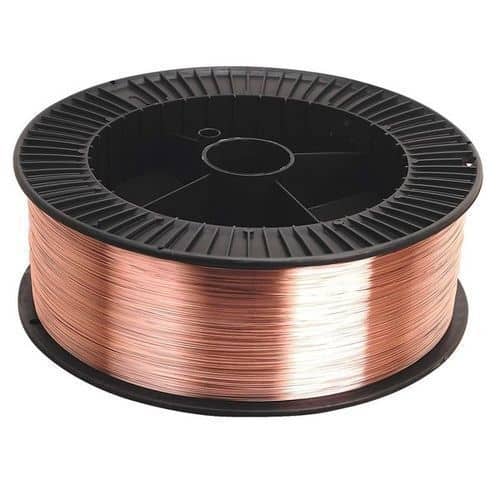
3. Welding Wire is Faulty or Rusty
Similar to the work surface, the welding wire itself needs to be clean and in good condition. If it is rusty or faulty, you will not be able to draw a spark. To troubleshoot this problem, you will want to examine the wire itself. If it appears to be dirty or rusted, you will want to wipe it down or use new wire if it looks damaged beyond repair.
If the surface of the wire is rusted, this can be difficult to salvage. Welding wire is sold in rolls and can be easily replaced without wasting a lot of material. You can try saving the old welding wire for other uses, but quality is important to ensure a proper weld and spark.
Consider storing your welder and the wire in a bag to keep out moisture that leads to rusting. You can also keep near a heat source (such as a lightbulb) to keep the wires free of moisture.
4. Welding Drive Roll Tension Needs Adjustment
In MIG welding, it is necessary to have a consistent feeding of wire through the torch. These movements are controlled by driver rollers at varying speeds. If you are not achieving a spark, it possible that the tension of these drive rolls within the welder is off. You can run into problems when the tension is both too tight and too loose.
- If the drive roll tension is too tight, the machine will be put under increased levels of stress and could cause damage to the wiring and machine.
- If too loose, the rollers may not be able to properly feed the wire or allow for consistency.

Tension impacts the speed at which the wire is fed, which will vary based on your application. A general rule for correct tension is that you can run it through the welding torch, and it will steadily form rings once bent.
You can see how to adjust your drive roll tension in the video below. Adjustments can be made to the tension in the welding machine with numbered knobs.
5.Look at Polarity Connection and Configuration
The final area you should consider looking at if the welder won’t spark is your polarity. Polarity is the electrical circuit created for a weld with a negative and positive pole connection. You can choose straight polarity (electrode negative for faster welds) or reverse polarity (electrode positive connections for deeper welds).
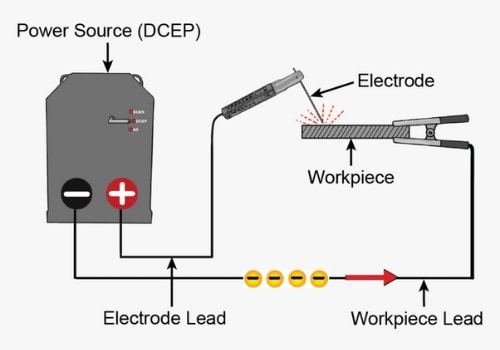
You can switch these two connections in an attempt to create a spark, but the most crucial element is to make sure the wiring for both is tightly connected within the welder itself. Straight polarity is used most commonly in TIG welding, while reverse polarity is designated for stick and MIG welding.
DC electrode negative machines are used for TIG and DC electrode positive machines are for stick and MIG. AC machines are reserved for working with aluminum. You should make sure all cables within the welder are securely fastened to channel energy from the welder to the workpiece.
When Your Welder Won’t Spark
Troubleshooting your welder by keeping your metal surfaces clean and ensuring the connections within the welder and to the workpieces are secure and adjusted properly will allow you to catch that spark to get your projects started.
Spark is crucial for arc creation and confirms the proper flow of electricity from machine to metal for consistent and steady work.
Recommended Reading
Can You Weld Over a Braze? 4 Reasons Why You Shouldn’t
Why Is Welding Galvanized Steel Dangerous?
Here are some of my favorite tools & equipment´s
Thank you for reading this article. I hope it helps you find the most recent and accurate information for your welding project. Here are some tools that I use daily and hope you´ll also find helpful.
There are affiliate links, so if you do decide to use any of them, I´ll earn a small commission. But in all honesty, these are the exact tools that I use and recommend to everyone, even my own family. (NO CRAP)
To see all my of most up-to-date recommendations, check out this resource that I made for you!