
Interested in welding basics for beginners’ guide? Or you just wanted to learn how to weld as a beginner?
What are the basic steps you need to know as a welding newbie? Well, I got you covered.
Welders are responsible for making, maintaining, and fixing all kinds of things in this world. Without them, we wouldn’t have cars, airplanes, supermarkets, and more!
So, whether you want to get into welding as a hobby, or plan to make a living out of it, this welding for beginner’s guide is the place to start.
Table of Contents
What Is Welding?
Welding is a type of fabrication process where at least two parts are joined by heat, pressure, or both.
This makes a sturdy join as soon as the parts cool.
As you may well know, welding is usually performed on metal and thermoplastics, but it’s used on wood too!
Once the join is complete, it is typically called a “weldment”. If you’re looking to get into the industry, this is a great bit of language to know so you can join in all the welding-related banter and industry speak.
The parts that are joined when welding is called “parent materials”.
The material added to ensure these parts can be joined is known as the “filler“ but can sometimes be referred to as the “consumable”.
You’re definitely going to come across these terms throughout your welding adventure.
It’s useful to note that some materials are deemed “unweldable”, while others require very specific processes or techniques to weld effectively.
What Is The Easiest Type of Welding to Learn as a Newbie?
MIG welding is the easiest type of welding beginners should start learning. Why? Because it uses a solid wire electrode fed through a weld gun.
There is no need to keep changing it out like in stick welding, nor do you need to worry too much about the shielding gas once everything is set up.
The introduction of this welding type has allowed everyone from hobbyists to professionals to weld amazingly well.
Of course, it’s not all fun and games; you will need to learn some basic skills. But, once you’ve mastered these, you can expect very high-quality joins.
It’s a great way to get into the hobby, but you might want to learn stick welding too as this is the most traditional form!
Welding Techniques and Basics Tips for Beginners
1. Choose the Right Welding Process
As a beginner, it’s crucial to choose a welding process that suits your skill level and project requirements. MIG welding is often recommended for beginners due to its ease of use and versatility. Stick welding is also beginner-friendly but can be more challenging to master. TIG welding, on the other hand, requires a higher skill level and is better suited for experienced welders.
2. Practice Proper Welding Posture
Maintaining a comfortable and stable posture is essential for producing consistent and high-quality welds. Ensure that your body is well-supported, and your arms are in a comfortable position to control the welding gun or electrode holder. Use a comfortable seat or welding stool when working on horizontal welds.
3. Master the Welding Techniques
Each welding process requires specific techniques to produce strong and visually appealing welds. Practice these techniques consistently to improve your welding skills:
- Travel speed: Maintain a consistent travel speed to ensure uniform weld appearance and penetration.
- Work angle: Hold the welding gun or electrode holder at the appropriate work angle for the specific welding process and joint configuration.
- Arc length: Keep the arc length consistent throughout the weld to maintain proper heat input and weld pool control.
4. Clean and Prepare the Material
Properly cleaning and preparing the material before welding is crucial for achieving strong and clean welds. Remove any dirt, grease, rust, or paint from the material using a wire brush, grinder, or chemical cleaner. Ensure that the edges of the material are clean and free of burrs for better fit-up and weld quality.
5. Practice on Scrap Metal
Before tackling actual projects, practice your welding techniques on scrap metal to build your skills and confidence. This will allow you to experiment with different welding settings, techniques, and positions without the pressure of working on a valuable piece.
Intermediate Welding Tips and Projects
6. Learn to Weld in Different Positions
Welding in various positions, such as vertical and overhead, is an essential skill for any aspiring welder. Practice welding in these positions to improve your overall welding abilities and versatility.
7. Study and Correct Welding Defects
Identify and correct common welding defects, such as porosity, undercut, and slag inclusions, to produce higher quality welds. Analyze your welding techniques and adjust your settings or approach accordingly to prevent these defects from occurring.
8. Experiment with Different Metals and Thicknesses
Expand your welding skills by working with various metals and thicknesses. This will help you become more versatile and better prepared for different welding projects.
9. Develop Your Own Welding Style
As you gain more experience, develop your own welding style that suits your preferences and produces consistent, high-quality welds.
10. Work on Practical Projects
Apply your welding skills to practical projects around your home or garage, such as repairing a trailer, building a workbench, or creating custom metal artwork.
Advanced Welding Skills and Certification
11. Learn Advanced Welding Techniques and Processes
Expand your welding repertoire by learning advanced techniques and processes, such as pipe welding, aluminum welding, and robotic welding.
12. Obtain Welding Certification
Pursue welding certification through a recognized organization, such as the American Welding Society (AWS), to demonstrate your skills and increase your employability.
13. Network with Other Welders and Professionals
Connect with other welders and professionals in the industry to learn from their experiences, share knowledge, and discover new opportunities.
14. Stay Updated on Industry Trends and Technologies
Keep yourself informed about the latest trends, technologies, and best practices in the welding industry by attending conferences, workshops, and webinars, or subscribing to industry publications and online forums.
15. Consider a Career in Welding
With the right skills and certification, a career in welding can be financially rewarding and provide numerous opportunities for growth and advancement.
How Long Does It Take to Learn Welding?
To tell you the truth, there are so many factors that come into play when answering this question since everyone is different.
If you know any welders personally, ask them how long it took them to learn.
Their answer is probably going to be along the lines of “I started X number of years ago, I’m not finished learning”.
While this might be them just staying humble, it’s a good enough answer for those who are truly passionate. However, we want to give you a more specific answer.
Depending on the type of welding process you want to learn, it’ll take around 100 hours to be proficient and confident.
Having said this, you can learn the basics of stick welding in about 10 hours if you’re super keen.
Stick Welding
Stick welding, otherwise known as SMAW, or Covered Electrode, is the most common type of arc welding used today.
Not to mention that it’s the traditional welding style! You are seriously diving into history when you decide to learn stick welding.
This kind of welding process uses a fixed-length electrode, plus a power source, to join tons of different metals.
The electrode’s core is a solid metal rod. But, surrounding it is a mixture of mineral compounds, metal powders, and a binding agent.
You don’t need to worry too much about the specifics of the coating.
I recently wrote a detailed article in which I highlighted all the advantages and potential of the stick welding process.
If you are interested in learning more about Stick or SMAW Welding, just follow the link below to find the ultimate guide you will ever need.
The rod is used to conduct the electricity to the arc and give the filler metal for the joint (if you’ve forgotten these terms, just have a quick look at the above section again and all will be revealed).
Each rod has different specifications, but we’ll look at that in-depth later on.
Stick Welding Basics: What You Need To Know
How to weld for beginners? Now, we have covered what stick welding is, but how do you actually do it? That’s the real question, right?
Well, no need to ponder that anymore, we are going to get into this straight away.
The main premise of stick welding is to create an arc between the metal electrode and your work metals.
To do this, the electricity has to flow from the welder and into the rod so that it melts and creates a weld pool.
In other words, it melts into a little puddle on your workpiece.
The coating on the electrode melts with the metal to ensure the weld pool isn’t contaminated from the elements, nor does it corrode.
If you’ve read up on other welding types (just scroll down a bit to take a look), you’ll quickly realize that this performs like shielding gas.
The flux (on the coating) forms slag over your weld bead. Once it has completely cooled, you need to chip it off since it’s no longer needed and is rather unsightly.
Not to mention that when you take beginner welding exams, you’ll be marked down if you keep it on.
Stick Welding: The Pros
Just like everything in life, there are pros and cons to smaw welding. We’ll take a little look at all of them so you can be well-prepared for what lies ahead.
Low Cost
The equipment you need for stick welding is rather simple. Therefore, you don’t need much capital to get started.
Shielding Gas? Nope!
Since the electrodes used in Smaw welding have their own shielding gas, you don’t need to lug loads of cylinders around with you.
Super Versatile
Welding different materials is important for many maintenance welders. Stick welding supports this. How? Because all you need to do is change the type of electrode you’re using and get to work!
It couldn’t be simpler than this, could it?
Can Be Done Outside
You won’t have any issues with winds up to 35mph (58kph) when you’re stick welding. But, if you choose to use MIG, you’re going to have problems with any amount of wind.
Disadvantages Of Stick Welding
Okay, it’s about time for the cons of stick welding process, we think!
Messier Than MIG or TIG
The arc of the stick weld produces a ton of sparks. If you are inside or cramped conditions, stick welding presents far more of a risk than MIG or TIG.
Produces Slag
Slag is the byproduct of the gas that the electrode emits to shield the arc from the environment.
Once you finish a weld, you have to remove the slag with a wire wheel, chipping hammer, or wire brush.
This can be quite a fire hazard. Plus, it requires extra cleanup time.
Need to Replace Electrodes
When welding large projects, it can be a pain to change the electrodes. Unfortunately, you can’t just keep going with the same one as it (quite literally) disappears.
Not Great for Thin Metals
Stick welding is too tough for sheet metals. It is almost guaranteed to burn straight through!
Is Stick Welding Stronger than MIG?
Both stick and MIG welding provide a high-quality weld finish (assuming that you finish the surface well). But, in terms of strength, they are pretty much equal.
The E70 wire used in MIG welding and the 7018 electrode used in stick welding have equal strength.
How can we say this for certain? Well, because both of them have a psi tensile strength of 70,000.
Usually, this will be stronger than the steel you are wanting to work with (although you should always check).
As far as everything else goes, stick and MIG welding has their own advantages and disadvantages.
If you’re looking for traditional styles, stick is the only way to go. However, MIG is wonderfully easy to learn so might be the best choice for beginners.
The Safety Equipment You Need for Stick Welding
The most crucial thing to consider when you are first starting with stick welding is safety.
As welding beginner you may just want to get stuck in right away, we urge you to acquire all the necessary safety equipment first.
First thing first, you need to read all the user manuals for your gear.
Whether it tells you how to properly secure your helmet or how to set up your welder appropriately, you need to read it.
Then, consider all the different bits and pieces necessary to protect you from heat, sparks, and ultraviolet rays. This includes the following:
- Wearing long sleeves
- Wearing a fire-retardant welder’s apron
- Wearing safety glasses
- Wearing a welder’s helmet (preferably an auto-darkening one)
- Wearing heat-resistant gauntlets (i.e. long gloves)
I use the RAPICCA 16 Inches Leather welding Gloves.
Purchase: If you are interested in the RAPICCA 16 Inches Leather welding Gloves then just follow the link to Amazon where you can see current pricing.
Once you have acquired all of that PPE (personal protective equipment), it’s time to think about ventilation.
If you’re stick welding outside, this isn’t something you have to worry about.
However, for those in enclosed space, you need to deploy a mechanism that takes the toxic fumes away from you.
Stick Welding: The Must-Have Start-Up Equipment
It’s understandable to think that you need a bunch of equipment to start stick welding.
But, in reality, you don’t need too much to get into it! Other tools that will help make life easier, but for beginners, you can stick to this list and be just fine.
Multipurpose Welder
Purchasing a multipurpose welder means you can practice stick, TIG, and MIG welding with no issues.
It’s great for beginners, like yourself, who are trying to figure out which type is their favorite.
Ground Clamp
You need to plug this into the machine and then attach it to the section you’re welding.
It promotes both safety and stability.
Slag Removal
Whether you use a slag chip and hammer or a brush, you need some sort of tool to remove the protective coating on your finished weld bead.
Electrodes
There are so many different types of electrodes that you’ll need to be careful which ones you buy.
We’re going to help you choose the right ones in the next section!
Welding Magnets
Not only do these hold your piece in place, but they also allow you to create perfect right angles in your work.
Metal File
Angle grinders are great for larger parts, but a metal file is fantastic for cleaning up the final details.
Angle Grinder
Whether you need to cut metal or file it, you can do it all with an angle grinder.
They’re an absolute necessity.
I use the DEWALT Angle Grinder Tool, Paddle Switch, 4-1/2-Inch. This tool will never burn up when a heavy load is put on it.
It is affordable and it has a reliable dust ejection design system that sends the dust, grinding, and any hot debris away from the user’s hands or arms.
Purchase: If you are interested in the DEWALT Angle Grinder Tool, Paddle Switch, 4-1/2-Inch then just follow the link to Amazon where you can see current pricing.
Soapstone
When you need to mark up a project (which is likely to be all the time), soapstone is the only way to do it effectively.
What Is The Easiest Welding Rod to Use?
E7018 electrodes are one of the easiest welding rods to use. They contain a lot of powder and a very thick coating that minimizes the spatter.
Understandably, this is essential for beginners who may initially be pretty scared of sparks.
On top of this, they create a wonderfully smooth arc. Again, this is perfect for welding beginners since it’s hard to get to grips with the arc striking in the first place!
Not to mention that the E7018 electrodes can be used for so many different materials.
This includes carbon steel, low-alloy metals, high-steel metals, and more.
How to Choose the Right Electrode for Stick Welding
It is rather difficult to pick the right electrode but it’s essential to find the one that will definitely work for your project.
The most common electrodes used include the following:
| Mild steel types of welding rods | Application |
|---|---|
| 6010 | pipe welding and shipyards (deliver deep penetration) |
| 6011 | alternating or direct current |
| 6012 | general-purpose |
| 6013 | moderate penetration welding |
| 7018 | low to moderate carbon steel welding |
| 7024 | high-speed flat or horizontal welds |
For those of you who want to weld mild steel, you can choose E60 or E70 electrodes. But the 6013 option is best welding rod for beginners.
If you are interested in the best welding rod for beginners, then just follow the link to Amazon where you can see current pricing.
Having said this, the 7018 boasts amazing welding strength so you may decide to go for this one instead.
The way to ensure you choose the right one is to understand what the figures mean.
You’ll come across terms such as E6010, E7018, and more.
Here’s how the naming method works:
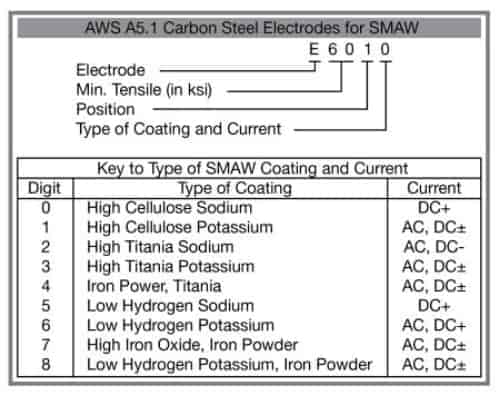
The 2 numbers at the beginning tell you the tensile strength. So, if an electrode starts with a 70, it’s 70,000 psi.
You must make sure that this number matches your base material, otherwise, your welding won’t go to plan.
The third number is the position you should use the electrode in:
- 1 means you can use it however you’d like
- 2 means you can weld in a flat position
The fourth number shows you the current that needs to be provided for the welding rod and its coating.
| Fourth Digit | Welding Current |
| 0 | DC (positive) |
| 1 | AC or DC (positive) |
| 2 | AC or DC (negative) |
| 3 | AC, DC (both positive and negative) |
| 4 | AC, DC (both positive and negative) |
| 8 | AC or DC (positive) |
Also, 7024 rods are typically used for high-speed flat or horizontal welds.
They’re particularly handy for applications that require a smooth finish with fine ripples.
| Electrode | Coating | Position | Current | Penetration | Tensile Strength |
| E-6010 | High Cellulose Sodium | All Positions | DCEP | Deep | 60,000 PSI |
| E-6011 | High Cellulose Potassium | All Positions | DCEP AC | Deep | 60,000 PSI |
| E-6012 | High Titania Sodium | All Positions | DCEP AC | Medium | 60,000 PSI |
| E-6013 | High Titania Potassium | All Positions | DCEP DCEN AC | Shallow | 60,000 PSI |
| E-7018 | Iron Powder Low Hydrogen | All Positions | DCEP AC | Shallow to Medium | 70,000 PSI |
Is It Okay to Hold the Electrode While Welding?
An electrode is always hot — or electrically hot, we should say — when your welder is switched on. This can be quite a risk.
However, it is possible to hold this while you’re welding, as long as you do so in the right conditions.
So, what are the right conditions? Let’s take a look.
Essentially, you just need to be wearing dry gloves that have no holes or tears.
You should never touch the electrode nor the metal on the electrode holder when your clothes are wet or your skin is bare.
The question that tends to follow this is “can you hold the workpiece then?”.
Honestly, that’s a great query! Don’t worry, it’s a short answer — yes, you can hold it. Of course, it needs to be grounded first.
Stick Welding: The Setup
The setup for stick welding is wonderfully simple since the equipment is straightforward. However, you do need to make sure that you use the right polarity for the electrode you’ve attached.
Just double-check to see whether you need to be utilizing AC, DC-, or DC+ before you begin your first weld.
Follow this step-by-step guide so you do everything correctly:
- Connect your welding rod holder to the welding power supply.
- Connect your ground clamp to the power supply too.
- Clamp the ground clamp to the metal you’re going to be welding.
- Put the electrode into the welding rod holder.
- Turn it on and you are ready to begin! Yep, it couldn’t be simpler, right?
Side Note: make sure you have all your safety gear on before doing this! It’s better to be prepared and safe than making a mistake and having to struggle through the consequences.
Stick Welding: Creating Your First Stick Weld
How to weld for beginners? Once you have completed the setup part of the process (and after reading the user manuals, of course) it’s about time you start to weld!
This is super exciting but also fairly nerve-racking.
Firstly, make certain that you have set everything up properly. Check as many times as you need to! It’s important to be confident in your setup before you start.
Then, find some random metal pieces to practice on. It’s unlikely that you will get it right the first time as everything involves a lot of patience and determination.
Not to mention that it requires a ton of skill that can only be gained from making mistakes!
We suggest that you start with a butt weld. It is a great way for you to get to grips with the basic techniques.
Striking the arc is arguably the hardest part to master! But, you must do.
Once the electrode is in the holder, strike the area where you would like to start welding like a match.
This creates the arc. From here, the electrode will start burning and a weld pool will be created in the joint.
Can I Run a Welder at Home?
Of course, the first thing you should consider before you start buying your welding equipment is whether or not your home set up can handle your welder’s current.
Remember to include the lights in your space when figuring it out though, otherwise, your breaker is going to become overloaded very quickly.
The good thing is that the lower voltage welders on the market are indeed designed to work in your home’s outlet.
However, if you have bought a higher voltage variant, it will (sadly) need a higher capacity plug.
Generally speaking, welders aimed at beginners (like the Millermatic 141 MIG welder) don’t need more than 120 volts.
What does this mean? Well, you can use the same socket you use for your kettle!
Purchase: If you are interested in the best welding machine for beginners, then just follow the link to Amazon where you can see current pricing.
MIG Welding
Okay, we have covered stick welding in lots of detail, so it’s only fair that we move onto MIG welding now.
Many welders state that this welding style is the easiest type to master for novices.
Not to mention that it is one of the most versatile and commonly used by professional welders.
Whether you are looking to get into the automotive construction industry or fancy doing a bit of container fabrication, MIG is definitely the way to go.
Without further ado, let’s get into the details, shall we?
MIG Welding: The Pros
There are so many advantages to MIG welding that it proved rather difficult to list them all.
But, we’ve done our best! And if these don’t encourage you to pick MIG, we don’t know what will.
The Weld Quality
Since there isn’t any slag involved, you won’t run the risk of getting slag caught inside your weld bead.
Thus, MIG welding allows you to produce high-quality welds extremely quickly because you don’t have to spend any time on slag removal.
It’s Easy
When compared with TIG or stick welding, MIG welding is incredibly easy to learn and increase competency with. This is likely due to the one-handed operation.
Long-Pass Welding
You can deposit a lot more filler with one pass with MIG welding than you can with a stick.
For a small weld, this may not be a good thing, but most of the time, you can’t go wrong with this efficiency!
It’s Super Quick
Thanks to the continuously-fed electrode, you don’t have to keep stopping while you’re welding, making it faster than any other welding style.
Penetration
With MIG, it’s easy to achieve good penetration and ensure a strong, yet smooth bead.
It’s Clean
To be honest, TIG is generally cleaner. But, MIG isn’t much dirtier. In any case, it’s positively gleaming when compared to stick welding!
Works With Lots of Metals and Alloys
Traditionally, MIG was used just for magnesium and aluminum. However, that means that it works for mild steel, stainless steel, and alloys too.
How Wide Should a Weld Bead Be?
If you are making a butt weld, you need to ensure 100% penetration. Generally speaking, you should be looking for a ⅛ inch weld bead here.
You can have the width of the bevel at the cap but typically, specifications call for a ⅛ inch.
Having said all of this, the WPS (otherwise known as the welding procedure specification) will state how wide a singular bead needs to be.
If you’re looking at pipes, the attached WPS may stat that any larger than .500 need to have a 3 bead cap, and the weave can’t be thicker than 2 times the thickness of the electrode.
At the end of the day, when you’re first starting out, you need to get as close to full penetration as possible. Just focus on that and the rest will follow, we promise.
MIG Welding Wire and Sizes
The wire is important in MIG welding. You need to ensure that you fit the wire properly into the welder. Otherwise, it won’t be able to feed through the gun and onto the joint.
The tricky part is that there are lots of different thicknesses.
Your welder might have come with flux-core wire but for MIG welding, you typically need a bigger version.
Take a look at the sizes below:
- 0.45-inch wire — this one is usually used for industrial welding. Why? Because the thickness is great for metals that are thicker than 0.25 inches.
- 0.35-inch wire — this one is fab for beginners. You can weld metals up to 0.25 inches thick.
- 0.30-inch wire — you can use this wire for welding metals up to 0.125 inches thick.
- 0.23-inch wire — this one is too thin for MIG welders and can only be used for metal sheets from 16 to 24 gauge.
Welding Gas Types
You have probably gathered by now that shielding gas is needed when you’re MIG welding.
Let’s take a look at the types of shielding gas as there are quite a few to choose between.
Pure Argon
Argon lets you achieve narrower penetration. If you plan to do a lot of butt or fillet welds, this is the way to go.
The arc is really smooth and somewhat fluid which is part of the reason why MIG is so easy for beginners.
While pure argon needs to be used for metals that are non-ferrous (magnesium, aluminum, titanium, etc.), you can use an argon mix for everything else.
It’s usually combined with oxygen, hydrogen, or helium.
Carbon Dioxide
This is the most common shielding gas. You can use it in its pure form without having to add an inert gas. Thanks to this, CO2 is great for keeping costs down.
Helium
Typically, helium is used for metals that are non-ferrous. However, you can use it on stainless steel too.
Thanks to its deep penetration capabilities, it is fantastic if you plan to weld a lot of thick pieces.
Are No Gas Welders Any Good?
No gas welders or gasless welders are fantastic for welding beginners!
You can get started as soon as you take it out of the box, without worrying whether your canisters are set up properly (which tends to be a big cause for concern with beginners).
Alongside this, it’s very easy to work outside on windy days with a no gas welder.
The wire contains flux which creates its own slag layer on the top of your weld bead. Therefore ensuring that the environment doesn’t corrode your weldment.
We strongly suggest purchasing one of these if you want to get started as quickly as possible!
MIG Welding: Porosity
Porosity is simply the presence of small holes or “divets” in the weld metal. You need to avoid this as much as possible since it can drastically weaken the weldment.
The question is, what causes porosity?
Well, the answer is rather straightforward. Generally speaking, porosity is caused by the shielding gas becoming frozen inside the weldment as it solidifies.
It takes a few different forms, including:
- Distributed — these are fine pores across and inside the weld bead. It means the weldment has absorbed hydrogen, oxygen, and nitrogen.
- Surface breaking pores — as the name suggests, these break the surface of the weld bead. They usually indicate that there will be distributed porosity underneath.
- Crater pipes — these are formed by the weld pool shrinking as it solidifies.
- Wormholes — these are elongated pores. On a radiograph, they appear to be a herringbone shape. They’re caused by a large amount of gas trapped in the weld melt.
Can You Weld Over a Bad Weld?
In a word, yes! Welding over a bad weld — or even a good weld sometimes — is extremely common.
Multi-pass welds are manufactured by doing exactly that! Not to mention that certain split tee connections and pipeline circumferential welds are done this way too.
However, it is important to realize that there are some concerns here.
One of the main worries is that there might be differences between the welding procedures of the bad weld and the new weld.
For example, if the heat is different, the cooling rate of the new weld would be different too, causing distortion.
Hydrogen control needs to be considered too. Some weld metal isn’t able to deal with hydrogen when it’s being welded over.
MIG Welding: The Basic Techniques
You can weld in two different ways when MIG welding. You can either push the gun or pull the gun.
For your convenience, we’ll take a look at both here so you can practice them and see which suits your welding style.
Pushing the Gun
As you may well imagine, this is where you push the gun ahead of the weld puddle.
This gives you far less penetration because of the arc force being in front of the puddle. However, it does give you a nice, flat bead.
Pulling the Gun
With this method, the gun points backward and you drag it away from the weld puddle. Here, you get deeper penetration and narrower bead.
How Can Higher Welding Speeds Help Control Distortion?
Welding involves a lot of heat but also a lot of cooling. This cycle gets pretty complicated here so we won’t go into it in too much detail. All you need to know is that time is of the essence.
Generally speaking, it’s preferable to finish your weld as soon as possible to stop distortion.
Otherwise, too much of the metal around the area will heat and, consequently, expand, causing issues.
Obviously, it takes time to become competent enough to weld quickly. But cranking up your speed will work wonders for controlling distortion.
It’s important to note, however, that there are plenty of other methods available to help prevent issues with your join and strengthen your weldment.
TIG Welding
Finally, we need to talk about TIG welding! It’s the last of the major styles of welding so we can’t just leave it out!
TIG welding is otherwise known as gas tungsten arc welding and was brought about in the 1930s for the aircraft industry.
Nowadays, almost anyone can buy the equipment and start learning (which is pretty cool in our opinion).
Amazingly, this style of welding can be used for more metals than even MIG welding! It’s probably unsurprising then that so many industries rely on this welding type.
Anyway, without wasting more of your time, we’ll jump straight into the specifics.
TIG Welding: The Basic Techniques
There are two different modes to do TIG welding — semi-automatic and automatic.
When using the automatic mode, you will need to program the rate of the gas flow, length of the arc, travel speed, and the position of the filler rod first.
Then, you step back and only get involved when it’s necessary to do so.
When using the semi-automatic mode, you control the electrode position and the tungsten electrode. However, you configure the current and gas flow settings beforehand.
Aside from that, you can perform TIG welding with ac and dc power.
You should ensure the current ranges between 15 and 350 amps, depending on the project you’re working on.
TIG Welding: How to Do It
How to TIG weld for beginners? While you might need to invest in proper tuition, here’s a little step-by-step guide to TIG welding that’ll be useful as you progress:
- Grab the electrode.
- Grind the tungsten rod to a point with an angle grinder.
- Put the electrode into the holder.
- Configure your TIG welder.
- Turn your shielding gas on.
- Make sure your clamps in place.
- Put all your safety gear on.
- Make sure everything is set up well.
- Weld! Hold the electrode off the metal, put your foot on the pedal to get a load of current and heat into the rod, starting the weld pool. Then, touch the rod in the pool. You’ve made a tack weld!
- Once you’ve tacked everything, you can draw the beads.
TIG Welding Essential Equipment
Just like stick welding, there are lots of equipment you could purchase.
But, to start with, your best option is to stick to the following:
- TIG welder — they tend to cost more than stick or MIG welders. But, there are certain models that you can find for under $1,000.
- A torch — depending on the types of jobs you plan to do, you will buy a different sized torch.
- Water cooling — put simply, a cooling system ensures that the torch won’t become too hot.
- DC suppression — when you’re TIG welding, oxides forming on the surface is a concerning subject. This is caused by the unforeseen conversion of AC to DC. Thus, the DC suppressor will combat this.
- Tungsten electrodes — these electrodes melt around 3000 degrees! As you may imagine, this makes them perfect for TIG welding. Not to mention that tungsten has wonderful conductivity.
- Gas nozzles — these are made from thermal-resistant material which ensures they can handle high temperatures.
- Gas lens — this ensures there is the least amount of turbulence in the gas flow. “Messy” flow can lead to lower quality welds.
Purchase: If you are interested in the best TIG welding machine, then just follow the link to Amazon where you can see current pricing.
Welding Scratch Start VS High-Frequency Start: What to Consider?
Scratch start is the traditional way of starting an arc. It isn’t very clean, and it’s really not very pretty either! How come?
Well, it’s all down to the fact that you have to literally flick melted metal across your workpiece until the arc starts up.
While it does work well with pretty much every DC stick welder, it has drawbacks.
The most important one being that it causes structural damage for your weld (at times) and it’s quite a hefty fire risk.
High-frequency start, on the other hand, is the most popular and modern method.
This ensures that the arc can ionize the air and make your welding process far quicker and a lot safer.
TIG Welding: The Tips, Tricks, And Other Bits
As a welding beginner you should start with a scrap bit of metal to practice. There are lots of functions and techniques involved with TIG welding so take your time to get to know them.
Alongside this, try to hold the torch at around 75 degrees to get decent penetration and bead formation.
Welding For Beginners FAQs
Let’s close out this page about welding for beginners with answers to some of your most frequently-asked questions about them!
Do Welders Use a Lot of Electricity?
Many welding beginners often ask themselves this question.
In fact, this question is subjective. Some people will tell you that they do use a lot of electricity, while others will say that running their welder doesn’t even make a dent in their energy bill. It really depends on who you ask.
Usually, they should only use around 3kWh but this depends on the make, model, and size of your welder.
In other words, it shouldn’t really make that much of an impact on your electricity bill (assuming, of course, that you use it for running appliances like refrigerators too).
We suggest you try it for a month and see how you go if you’re worried!
Can You Run a Welder Off an Inverter?
The simple answer is yes, you can run a welder off an inverter. However, the power from generators can become compromised quite easily.
This means that it’s more likely to cause harm to the components inside your welder. As you might imagine, this problem is more prominently seen in smaller welders.
There are ways you can make the whole setup safer. Just take a look at the following:
- Make sure the inverter is the right size. Consider the current draw and rated output.
- Buy a good quality generator. You get what you pay for after all!
How Do You Prevent Electric Shock When Welding?
Unfortunately, preventing electric shock is something you need to think about when you take up welding as a hobby. As you well know, it can cause severe injuries and possibly death.
Luckily, preventing this hazard is easy. Just run through this checklist below:
- Make sure your cables are in good condition
- Protect your cables from vehicles
- Ensure your rod holder is insulated
- Ensure your hands are protected when replacing the electrode
- Ground your workpiece
- Don’t dip hot electrode holders into water
- Wear the appropriate PPE (personal protective equipment) like boots, rubber pads, gauntlets, etc
- Avoid touching live parts of your work
- Turn off the welder when you’re not using it or when you take a break
If you are interested in welding gear or tools, then just follow the link to our recommendation page where you can see all welding accessories we love and use (NO CRAP)
References:
https://www.twi-global.com/technical-knowledge