Have you ever wondered how to adjust your auto darkening welding helmet? Few things are more important to welders than their welding helmet. That facemask is the only thing standing between you, sparks, and a world of scars and pain.
Safe welding means welding with a quality welding mask that can protect you against all the hazards that come with the job. That includes bright flashes. Welding flash is a serious condition that can temporarily rob welders of their sight and cause extreme discomfort in their eyes.
While it typically goes away after a few days, you don’t want to have to lose days’ worth of work or experience that pain in the first place.
How to adjust an auto-darkening welding helmet? Modern auto-darkening welding helmets come with controls that allow you to change between different shade settings without having to do a thing. The switch comes automatically while still allowing you the option of adjusting things on your own.
That means finding a welding helmet with a good visor, which in turn means finding one that boasts tinting that grows darker to deal with brighter flashes. On the one hand, these helmets typically do this automatically.
On the other hand, how to adjust an auto-darkening welding helmet remains a popular question among new welders, and one worth dealing with in detail.

Table of Contents
Passive Welding Helmets
Before we get into how to adjust an auto darkening welding helmet in proper, however, it is worth noting how their predecessors work.
True to their name, welding helmets change tinting levels passively insofar as they usually only have one setting, which was usually around shade number 10.
While that might save you the trouble of having to switch the shade to another level, it also took away that option entirely. That could be a problem if you needed a shade that offered more protection, or one with less tinting so you could see the item you were welding in a bit less dark of light.
In addition, changing between different darkness settings would mean stopping work and manually changing the shade installed on your helmet.
That could be incredibly tedious and time-consuming.
How to use an Auto-Darkening welding helmet >> Video
Controlling Your Helmet
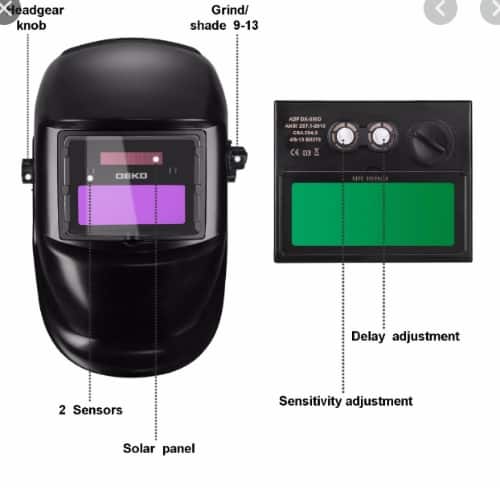
An auto darkening welding helmet typically changes according to three different settings:
| Nr. | Function |
|---|---|
| 1 | Light Sensitivity |
| 2 | Delay |
| 3 | Shade |
- Light Sensitivity: This refers to the sensitivity of the lenses and how much light they require to trigger the auto-darkening features. The stronger the source of light, the darker the lens will be.
- Delay: This refers to how long it takes before the sensors on the auto-darkening filter is triggered when the light hits them. Most auto-darkening helmets allow you to change the rate of delay, so you can choose when your visor darkens.
- Shade: This refers to how dark the lens becomes once the sensors are activated. Lens darkness is measured on a scale of 1 to 14, with 1 being the lightest and closest to a “natural” untinted setting, and 14 being the darkest.

What to Keep in Mind
Each of these three settings has a myriad of different factors to keep in mind when setting their auto darkening features up.
For example, when adjusting your helmet, you always want to make sure that you are doing so in a space that is clean and free of debris. The last thing you want is to have debris or dirt getting under your visor, cluttering your vision and possibly even getting in your eyes.
In addition, you’ll want to do some basic maintenance checks, such as making sure that it has enough batteries.
Once you have done this, you’ll want to inspect and adjust the light sensitivity with the knobs on your helmet. To do this in the most efficient manner possible, you’ll need to know the typical voltage and amperage level of your welding setup.

Finally, you’ll want to test everything to make sure that it works properly. You don’t want the first moment you realize your helmet isn’t darkening properly to be when there’s a bright welding flash while on the job.
Test everything and make sure that the welding mask darkens the proper amount and at the rate you prefer.
Part of this means evaluating the welding arc. If the arc is on the low side powerwise, your welding mask sensitivity should be low. Conversely, more powerful arcs require higher levels of tinting.
If you are a beginner welder, it is recommended that you use the darkest shade available to you to give you the best eye protection possible. As a beginner, you are bound to make mistakes, and the bright flashes that result from welding work can be more startling.
As such, you’ll want to make sure you have extra protection to keep you safe and put you at ease during the learning process.
On the other hand, you don’t want to overdo it with the darkness, either. Your welding helmet still needs to be light enough for you to see the material you are welding.
You should, thus, never lower the shade settings to a setting so dark as to limit your visibility.
Memory Capabilities
Many modern welding helmets have memory features that you can preset to darken or lighten in certain conditions.
This is obviously more advanced than a standard helmet, but can be quite useful for those who already know the conditions in which they will be welding and what type of darkness levels they like.
Read the Controls
Finally, you always need to be able to read your helmet’s controls. The adjustment knobs can be placed on the outer or inner part of the helmet, though the latter is more common in more modern designs as this placement keeps the controls safe while welding.
It is always a good idea to have something on hand such as a flashlight or LED screen with which you can read the controls. Newer helmets make use of LEDs and colored screens.
Welding helmets are an essential part of any welder’s arsenal. By knowing how to adjust an auto-darkening welding helmet and the ins and outs of how they work, you can protect and prepare yourself for your next big welding job.
Do Auto-Darkening Welding Helmets Wear Out?
Do auto-darkening welding helmets wear out? This depends on the type of helmet you have. There are several types of auto-darkening welding helmets. Some feature irreplaceable lithium batteries that last up to 7 years of continuous use and are quite affordable.
However, once the battery has worn off, the lens won’t work anymore, and the auto-darkening function won’t operate.
Some models feature replaceable lithium batteries with solar assist. These models are more value for money because the battery can be replaced whenever you feel that the lens isn’t working the way it should.
There are other factors that affect how efficient the auto-darkening welding helmet will be. These can be related to how it’s stored, how long it’s been used, and how often it’s used.
Helmets can be subject to rust if they’re not stored properly. If you’re not careful about how you use and store your helmet, it might crash or bend.
These amazing helmets allow you to work on your welded metal and guarantee excellent results without jeopardizing your vision. Unfortunately, you can’t expect your auto-darkening helmet to last forever, as it wears out with time and repeated use.
Auto-darkening welding helmets protect your eyes and skin from the flying sparks and hot debris that can accidentally get in contact with your face.
They also protect your vision from the ultraviolet and infrared rays produced by the arc when you’re welding different metals. Wearing helmets is essential for your safety on the job site, so you can focus on the metal you’re welding and can finish the job without any injury.
As the name suggests, this helmet will darken automatically when you start working. Once you’re done, the darkening lens goes back to light state.
With traditional helmets, you have to make sure that it has covered your face before welding. After you’re done, you can use the pivot, and lift the welding helmet, so you can take a look at your welded surface, and position yourself for the next weld.
Auto-darkening helmets overcome the shortcomings of traditional welding helmets because they allow you to have your full focus on the job at hand. They reduce discomfort, as you don’t have to flip the helmet up and down all day long.
Moreover, these helmets allow you to weld in restricted places where there’s no space to flip the traditional helmet up and down.
However, auto-darkening welding helmets don’t last forever. These helmets are more useful than the standard ones because each one features an electronic filter lens that is directly fitted on the helmet to help protect your vision as you’re focusing on the arc.
The lens automatically adjusts based on the arc produced, guaranteeing that you will be able to finish the job in excellent quality.
Conclusion
There are several tips that can help you make your auto-darkening helmet last longer.
- Clean it occasionally to prevent the accumulation of dust and grime.
- Make sure that you’ve stored it in a safe place to protect the lens from breaking.
- Keep the lens away from sharp objects that can damage it.
- Store your helmet in a dry cool place to protect it from rust and mold.
Here are some of my favorite tools & equipment´s
Thank you for reading this article. I hope it helps you find the most recent and accurate information for your welding project. Here are some tools that I use daily and hope you´ll also find helpful.
There are affiliate links, so if you do decide to use any of them, I´ll earn a small commission. But in all honesty, these are the exact tools that I use and recommend to everyone, even my own family. (NO CRAP)
To see all my of most up-to-date recommendations, check out this resource that I made for you!
Recommended Reading
Does Welding Hurt Your Eyes? How Can You Protect Your Eyes
Can You Look at the Sun or Eclipse with a Welding Helmet? Is It Dangerous?
How Long Does Welders Flash Burn Last? Symptoms and Treatments


