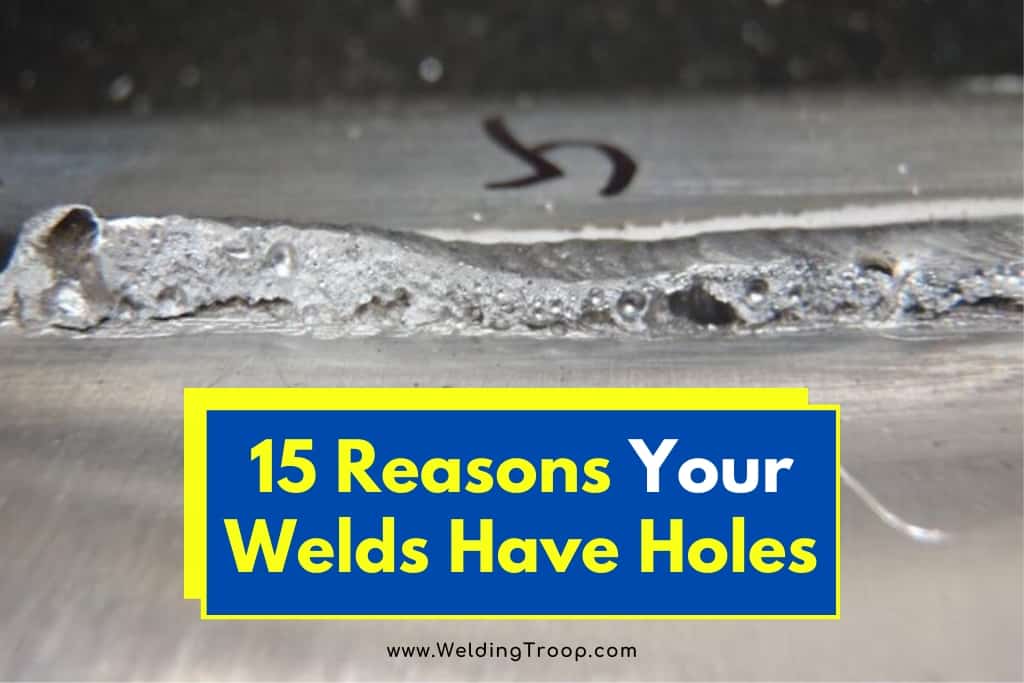
You’ve finished your welding project and are feeling pretty good about it. You decide to take one last at your handiwork before you submit it for inspection, but… Wait! Where’d those holes come from? Great. You grit your teeth, tamp down the strong urge to spew expletives, and start problem solving.
15 reasons your welds have holes. There can be several reasons those holes have appeared:
- You held the welding gun in one place too long or went too slow.
- There was glue, paint, grease, rust, or oil on your welding surface or in your filler material contaminating your workspace.
- There was a draft or moisture in your workspace.
- You used too much anti-splatter spray or gel.
- Your cylinder is out of gas.
- The weld joint is open at the base/root.
- You have a defective gas solenoid valve.
- Your gas hose is burnt, cut, contaminated, pinched, or crushed.
- You held the weld nozzle too far away from your subject.
- Your gas is contaminated.
- Your gas flow is too high.
- Your GMAW (Gas Metal Arc Welding) gun nozzle is plugged or restricted.
- You held your GMAW gun at too much of an angle.
- Your GMAW gun liner is contaminated.
- You have damaged O-ring seals on your GMAW gun whip.
This article will discuss each of these issues and will also provide some insight on how holes occur in TIG welding practices.
Table of Contents
Troubleshooting the Holes you Found in Your Weld
Now that you know there’s an issue with the weld, it’s time to figure out how, or why it happened.
1. Stayed too Long or Went too Slow
When you perform your weld, it’s important to go at a consistent speed and not too slow (but not too fast, either). When you hover over a spot for too long, you end up:
- With a convex-shaped weld bead.
- With a pool that is bubbling and causes porosity and/or breakage. It’s like cooking milk. When you heat milk, you usually don’t want it to boil because that scalds it. You want to have a nice welding pool, but you don’t want it boiling.
- Note: If you go too fast, you’ll end up with a thin weld that won’t hold.
Travel Speed and Weld Profiles >> Check out the video below
2. Contaminated Work Surface
You Had a Contaminated Work Surface or Your Filler Material Contained Contaminants
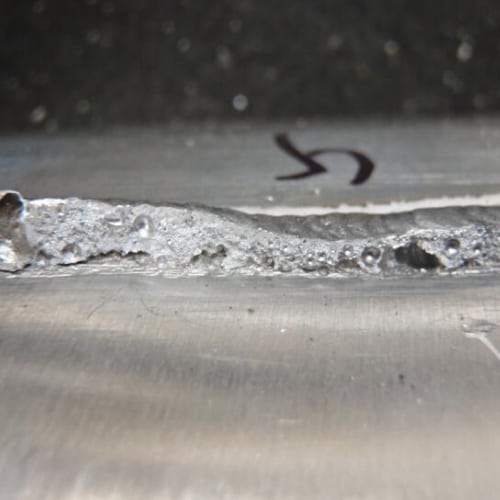
When your welding material is contaminated you can end up with hydrogen bubbles in your weld pool. When the weld solidifies, the hydrogen is released and gets trapped in the metal resulting in the holes.
To avoid this issue,
- Thoroughly clean the workpiece surface
- Degrease the workpiece surface
- Remove any surface coating to uncover bright, clean material
- Grind your workpiece to remove scale coatings
- A Breeze was Blowing, or the Morning Dew had Settled on Your Work
You’re working to be diligent about ventilation, so you have a ceiling or floor fan running. But… did you know that if that fan is even 25-feet away it can cause unmentionable problems with your shielding gas?
It’s true.
Any air movement that’s more than four-to-five miles per hour can impact your SMAW (shielding metal arc welding), or flux-cored arc welding processes (FCAW).
Related reading: Is it Safe to Weld in the Wind? Maximum Wind Velocity
To avoid this issue, shield your work and be aware of air movement from:
- An open door
- An outdoor breeze
- Ceiling or floor fans
- Even other machinery
3. Moisture
If you’re working in an area that’s prone to morning dew, or in temperatures below 50-degrees Fahrenheit, you could have a moisture issue.
To care for this:
- Thoroughly dry your work surface, and/or
- Preheat the metal you’re working on to eliminate any warming condensation that may form
- Whoa! Not So Much Product!
4. Anti-Splatter Spray
A little bit of anti-spatter compound, gel, or spray is helpful and can lead you to a wonderful end-result. That’s great.
Too much, though, ends up becoming one of those contaminants that turns into gas that causes you an entirely different set of problems instead of helping you avoid issues.
If you’re concerned about an ability to use anti-splatter product in moderation, it’s best to just not use any at all.
5. Running on Empty
If you’re experiencing holes in your welds, it’s possible that your gas canister has run out of gas. If this is the cause, you may feel a little bit silly, but know that you’re not alone. This happens to most welders at one time or another.
If you are uncertain how to evaluate how much gas your tank holds, here are some basic examples for fairly portable tanks:
| Tank Size (in Cubic Feet – cf) | Tank Size Name | Tank Capacity | Estimated Amount of Use Time |
|---|---|---|---|
| 20 | R | 21cf | 1-1.5 hours |
| 40 | RR | 44cf | 2-2.5 hours |
| 60 | Q1 | 65cf | 3-4 hours |
| 80 | Q | 83cf | 4-5 hours |
6. The Back Door is Open
If you haven’t completely finished your weld and there is an opening at the base or root, you can once again experience gases being released into your product.
This happens because air is easily absorbed into unprotected liquified metal.
To avoid this issue, make sure that you don’t rush too much – complete your weld from beginning to end.
7. The Solenoid Valve is Defective
In this case, the solenoid isn’t working properly and is impacting the delivery of the gas to the torch or the shielding gas.
If either the solenoid’s inner or outer coil is damaged it won’t trigger the valve the way you expect. The only thing to do in this case is to replace it.
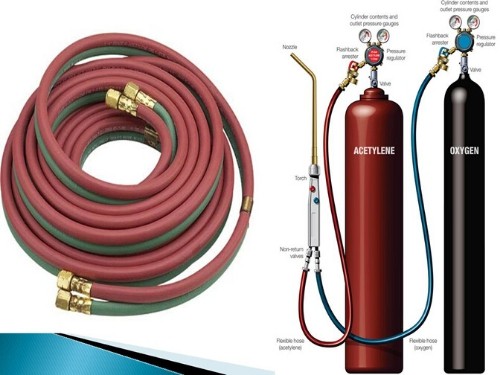
8. Your Hose is Defective
If the hose for your shielding gas is:
- Bent,
- Burned,
- Crushed,
- Cut,
- Kinked, or
- Torn
You can be sure that your gas delivery will not be at the level you expect it to be. Now you have the problem of having too little gas for your project.
Your hose could also be contaminated. There are several ways this could happen:
- It’s possible that the used hose you picked up from a buddy was used for a purpose other than welding. If that’s the case, there could be oil, paint, or any other number of contaminants still in there.
- Dust and/or debris may have collected in the hose while you had it in storage.
- If you live somewhere with a lot of spiders, bugs, and even scorpions, you could have “guests” in your hose that weren’t invited.
Hoses that are too long can also be problematic. Anything longer than 20-feet long is more likely to tangle, kink, or wrap around something else thereby impeding gas flow.
Related reading: When Welding, What Color is the Oxygen Hose?
9. Nozzle is too far: Come a Little Closer
If your weld nozzle is too far away from your weld puddle, your shielding gas that actually is getting to the weld area is negatively impacted. Too little, and/or atmospherically diluted shielding gas over your weld puddle results in poor quality of your weld.
In an ideal world, your TIG electrode tip will only be about ¼-inch away from the shield.
1o. Terrible Gas
It’s sad to say, but there are times when the gas you received is actually contaminated.
If you suspect this may be the issue, ask the supplier to certify the gas is correctly mixed for the region’s dew point.
11. Too Much Pressure
If you have your gas flow running too high, you are likely creating turbulence that is actually puling air into your weld zone rather than keeping it pure. The only time you’d want to even consider having your flow at a higher level is if you’re working with a shielding gas that has more than 50% helium content.
To avoid this issue, keep your flow at:
- 20 to 30 CFH (cubic feet per hour) for your GTAW (gas tungsten arc welding) torch, or
- 50 to 60 CFH for your GMAW torch.
- The Nozzle is Plugged
12. Gun Nozzle is plugged or restricted
It is possible that as you’ve been working some splatter has landed on your GMAW gun nozzle and it is now either plugged, or at a minimum, restricted. If this has happened, your shielding gas won’t work like you’d expect it to.
The restricted flow results in diminished flow and opens your work up to atmospheric disruption.
Another consequence of a plugged nozzle could be that your torch short circuits because it doesn’t have a clean flow.
To remove hardened spatter from your nozzle, it’s best to use:
- A file,
- Welding pliers, or
- A wire cleaning brush.
13. The Angle is too Steep
The steeper you hold your Gas Metal Arc Welding (GMAW), Flux-cored Arc Welding (FCAW), or Shielded Metal Arc Welding (SMAW – also known as stick welding) gun, the more distributed your gas flow will be.
With a wider spread, the flow actually ends up sucking in atmospheric elements opposite the nozzle from the back side of the welding process.
When you are perpendicular to the joint, you should only have a 5-percent to 15-percent angle. That’s barely a tilt in your wrist. This graph demonstrates how minimal these angles are in relation to a 90-degree position. It really only takes into consideration the natural angle of your wrist.

14. Bad GMAW Gun Liners
When you stop and think about the current that’s created, it makes sense that contaminants are attracted to the wire. You are using all kinds of materials that can end up contaminating your wire, and therefore your GMAW gun’s whip liner:
- Dirt/Dust,
- Grease,
- Grinding/Sanding Dust,
- Oil, or even
- Pollen.
There are two types of wire that seem to be more susceptible to this issue than others:
- High-Nickel-Alloy Wires
- Stainless Steel Wires
To clean your gun’s liner, you can use a can of compressed air and blow short bursts through your liner. This should get rid of any residual contaminants.
15. Oh-Oh… Damaged O-Rings
If your GMAW gun whip’s O-ring is damaged where the wire feeder plugs into it or where the GTAW torch cap screws into the torch, the atmospheric air can cause problems. Again.
You know the O-ring is defective if it shows signs of:
- Blisters on its surface,
- Circumferential splits in the flattened surfaces,
- Cracks on the surface,
- Discoloration,
- Loose particles and/or scrapes on its surface,
- Pits or pocks on its surface, or
- Ragged edges.
Experts suggest that you can avoid this issue by:
- Avoiding elastomers that have been plasticized,
- Making sure the ring is the correct size,
- Making sure the material is correct for the thermal environment, and
- Using polymer backup rings.
TIG Welding Issues
If you have been working on aluminum and are experiencing porosity issues, it could be because the weld didn’t cut through the metal’s aluminum oxide layer. When this happened, the filler material mixed with the oxide that was only partially melted and created the contamination.
To avoid this issue, always make sure your TIG weld polarity is set to AC (alternating current).
By using the AC balance control on your TIG welder, you will be able to tailor the EP (electrode positive) to EN (electrode negative) ratio. Your EP portion of the cycle will blast the aluminum oxide away from your work area while the EN will melt the base metal.
Pro Tip: Brown flakes that look like pepper in your weld puddle suggests that you need to increase the EP portion of your ratio.
Be sure not to increase it too much though. It will result in the tungsten balling more than you want. If you see a shiny dot in you weld puddle, the oxide is gone, and you are ready to add filler and get down to business.
How an Inspector Finds Holes in Your Welding
Although there are various levels of porosity defects, and they aren’t always considered to be a serious defect, they can still lead to a rejected inspection.
Here are a few of the methods an inspector may use to determine if your weld is subject to porosity:
- Visual Inspection
- Dye Penetration Test (DPI)
- Soap Solution Test
Each of these processes are used to locate porosity at different levels. Here’s how they work:
1. Visual Inspection.
Ok. Yeah, duhhh… you can do that yourself. Believe it or not, some welders don’t take the time to look back at their work. Because of that, they don’t notice the significant number of holes or their size.
2. Dye Penetration Test (DPI)
Some may simply refer to this process as penetrant testing (PT). For this process, the inspector applies a strong, colored penetrating dye to the welded surface, allows it some time to absorb (if it’s going to), and then wipes it away.
Next, the inspector sprinkles a “developer” or light powder on the surface. This process draws out any of the colored dye that has absorbed into the weld. The inspector finds the colored dye with the assistance of an ultraviolet or white light depending on the type of dye that was used.
3. Soap Solution Test.
Much like when you’re testing an air hose or tire for a leak, weld porosity can be tested using a soap solution method.
When a soap solution is applied to the weld, any gasses that are leaking will cause bubbling. The amount of bubbling will depend on the amount, depth, and width of the porosity.
Other Types of Welding Defects You May Encounter
Porosity, or holes in your welds, is just one of the types of defects you may experience as you move through your welding career. Here are a few others:
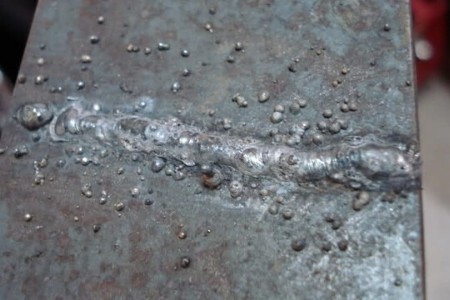
1. Spatter
Spatter happens. You are particularly susceptible to it when you are working with high-welding currents or if you have your polarity incorrectly adjusted.
You can also encounter spatter if you have your arc too long or if your gas shielding isn’t correct.
To avoid ending up with spatter,
- Increase the plate angle.
- Make sure your gas shielding is set correctly for the type of welding you’re doing.
- Reduce your arc length and welding current.
2. Cracks
This is the worst defect you can have. Cracks are not only surface defects but can be inside of your weld or can be created at the affected heat zones.
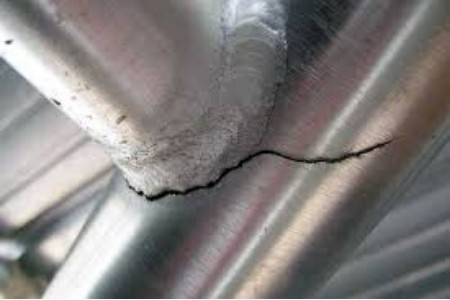
Cracks can also show up at different temperatures. The hot crack can show up or develop during the weld joint crystallization process when temperatures can rise to 18,032-degrees Fahrenheit (10,000-degrees Celsius).
Cold cracks usually show up at the end of the welding process – or several hours, or even days later when the weld has cooled down.
You can end up with cracks when you:
- Have a high sulfur or carbon content.
- Use hydrogen as your shielding while you’re welding metals with iron particles (ferrous materials).
- Are working on a metal with poor ductility.
- Are working on a joint that has so much rigidity that it doesn’t allow the metal to expand or contract.
- Are working on a project that experiences residual stress at the weld.
You can do your best to avoid the crack defect by:
- Preheating your weld area.
- Slowing down your cooling speed.
- Slowly releasing the clamps while you’re welding to increase the joint’s capacity for more welding material fill.
There’s also a different cracking defect called Necklace Cracking that can occur during electron beam welding when the molten metal doesn’t flow into the intended cavity. This defect is usually found in nickel-based alloys, stainless steel, carbon steel, and tin alloys.
If you experience this, it is usually because:
- The wrong welding technique was chosen.
- The weld was performed too fast.
Ways to avoid necklace cracking include:
- Maintaining a constant speed while welding.
- Using the right materials for the project.
- Using the correct technique for the project.
3. Undercut
When you have a groove formed in the shape of a notch between your filler material and your weld subject(s), you have an undercut. This defect reduces the fatigue strength of the weld and can end up cracking.
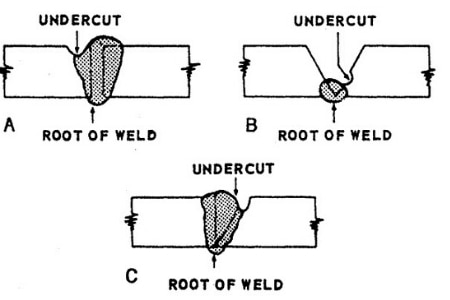
If you’re using a really high arc voltage or a large electrode, you might experience undercuts. You can also end up with this problem if you use the wrong electrode, if your angle is wrong, or if you go too fast.
To avoid this problem, you can try:
- Using a small electrode.
- Lowering the arc voltage.
- Reducing the arc length.
- Moving the electrode at a slower rate.
4. Overlap
This is the opposite problem of the undercut. Now your weld extends beyond your intended weld area and forms an angle of less than 90-degrees because the weld metal rolled.
Overlap happens when you aren’t using the right welding technique for the job. Large electrodes and high welding currents could also contribute to this issue.
To resolve this tendency, use:
- The best technique for the welding project you’re working on.
- A small electrode.
- A lower level of welding current.
5. Slag Inclusion
Collins dictionary defines “slag” as, “the fused material formed during the smelting or refining of metals by combining the flux with the impurities in the metal. It usually consists of a mixture of silicates with calcium, phosphorus, sulfur, etc.”
If you have slag in your weld, it decreases the structural integrity or performance of your welded materials. It will usually show up on the surface of the weld or between the welding turns.
If you have slag in your weld, you have probably:
- Set your current too low so that it doesn’t provide the heat needed to actually melt the metal surface.
- Gone too fast while you were welding.
- Failed to properly clean your welding surface before you started your welding process.
- Used the wrong angle for your welding rod.
To avoid having a slag issue:
- Thoroughly clean and prepare your project materials.
- Adjust your welding speed so the slag and the welding pool don’t mix with one another.
- Use the right sized electrode and hold it at the correct angle.
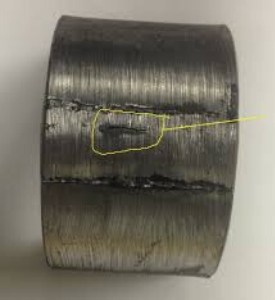
6. Incomplete Penetration
This happens when the groove of the metal is not filled completely on a butt weld and is usually a defect of inexperience. It shows up when:
- The wrong welding technique was used for the project.
- The wrong electrode size was used.
To avoid the problem,
- Provide for more deposition of the weld metal.
- Understand which technique will work best for the project.
- Use the right electrode size for the job.
7. Incomplete Fusion
If you have a gap that isn’t filled, you have experienced incomplete fusion.
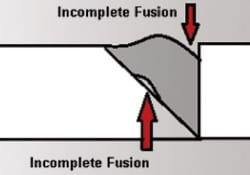
This happens when your welding material and metals solidify too soon and doesn’t fill with the intended molten material. Now you’ve ended up with this incomplete fusion gap. If you’ve experienced this gap, it’s probably because:
- The heat input was too low.
- The bead position wasn’t correct.
- The joint angle was too low.
- The weld pool was too large and ran ahead of the arc.
- The electrode was the wrong size, or the torch angle was too steep.
You can avoid this issue by:
- Positioning the electrode and torch angle so the edges of the plate melt away.
- Slowing down and increasing the welding current.
- Increasing the joint angle.
- Positioning the bead so that you can steer clear of the sharp edges with the other beads.
Reasons Welding Defects are Unacceptable
While having a conversation with a retired welding inspector, he said that welding defects aren’t just unacceptable, they can be very dangerous.
Here are a few of the things he said can happen as a result of various defects:
- External welds can be unsightly, and the cosmetics of the piece will be damaged.
- Over time, porosity can result in cracks in the weld which will weaken it and can lead to breakage. A horrific example of this can be found in the 1980 Alexander Kielland oil rig disaster. Reports suggest that the root cause was a stress crack in a faulty weld.
- Porosity can allow moisture into the weld which can freeze. When this happens, the metal expands and then contracts when it thaws. This, once again, can lead to cracking which can be disastrous.
There are several organizations with informational websites that have documents about welding standards.
Welding Organizations
Welding is a valuable skill.
Outside of trade schools, there are several associations and organizations that are involved in the craft. A few of them are:
- The American Welding Society (AWS) – This is the organization responsible for developing comprehensive standards and codes for the welding discipline.
- The American Society of Mechanical Engineers (ASME) – This group provides welding code and standard input.
- The American Society for Nondestructive Testing (ASNT) – This group gives welding code and standard suggestions.
- The American Petroleum Institute (API) – This group is also involved in providing input on the welding codes and standards.
Why Welders Wouldn’t Follow Guidelines
Several of the listed defects included that the welder didn’t choose the correct procedure for the process. With all of the guidelines associated with this profession, why would anyone do that?
Believe it or not, there are companies that don’t have copies of accurate or updated welding procedures, and not all welders keep up with the changes.
One way to stay current could be to subscribe to a trade publication. You can subscribe to a digital edition that you can receive in your inbox.
The American Welding Society also offers several magazines to help you stay current on trends and practices.
Here are some of my favorite tools & equipment´s
Thank you for reading this article. I hope it helps you find the most recent and accurate information for your welding project. Here are some tools that I use daily and hope you´ll also find helpful.
There are affiliate links, so if you do decide to use any of them, I´ll earn a small commission. But in all honesty, these are the exact tools that I use and recommend to everyone, even my own family. (NO CRAP)
To see all my of most up-to-date recommendations, check out this resource that I made for you!