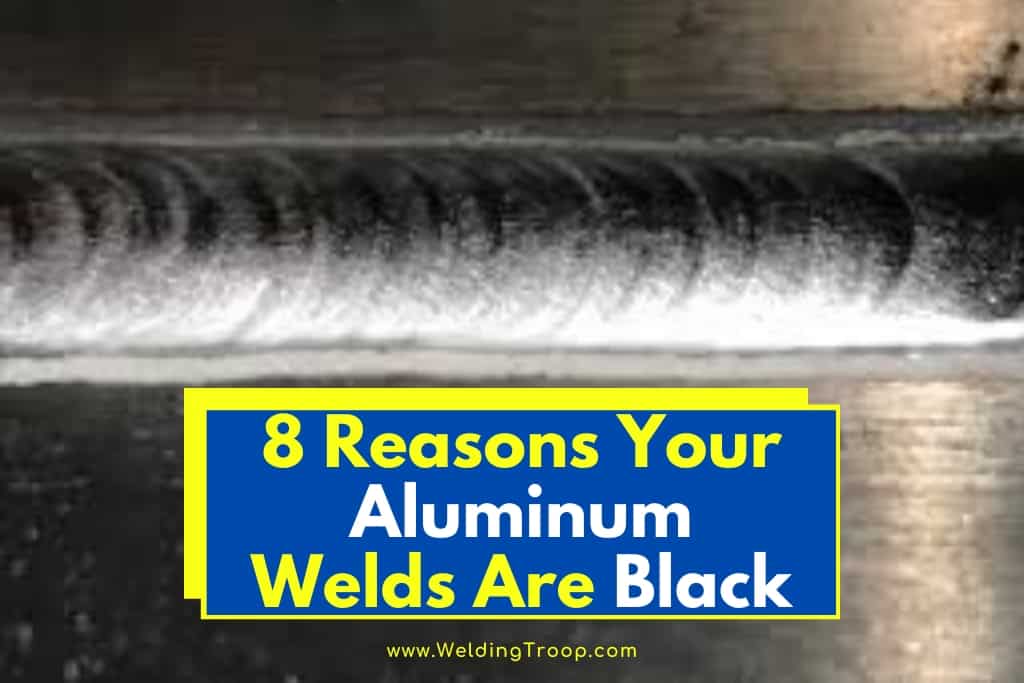
If you are the kind of person who takes pride in the finished product of your work, then finding that your aluminum welds are black can be extremely irritating, particularly if you can’t seem to fix the issue. Luckily, this is a common issue that can be solved by developing a greater skill in welding and following best practices.
So, here are 8 reasons why your aluminum welds are black:
- Contamination Due to Poor Gas Coverage
- Incorrect Polarity or Adjusting Balance
- Arc Length
- Amperage on Aluminum is Too High
- Graininess
- Fusion
- Filler Metal or Base is Dirty
- Wrong Push Gun Angle
Welding can be a delicate process with a lot of details that need to be taken into account. Furthermore, the differences between TIG (tungsten inert gas) welding and MIG (metal inert gas) welding should also be considered.
The information I have curated below expands on reasons why your aluminum welds are black, and after the list is complete, I have added further information to help clarify the welding process for you.
Table of Contents
1. Contamination Due to Poor Gas Coverage
This happens when your shielding gas is off, or there is not enough gas coming through.
There are a few things you can do in order to remedy this issue.
First, make sure that you are using the correct gas type for the type of welding you are doing. For aluminum, you will want an argon/helium mixture. Next, check the gas flow rate. It should be set at 15-20 cubic feet per hour.
You are going to get some turbulence which generates currents that suck up contaminates and cause your arc to wander if you have too much gas flow, too little also doesn’t give the weld enough coverage.
Using a gas lens could also help out with gas shielding, and checking for leaks is always good practice. You can go to a welding shop and pick up gas leak detection fluid to help you out with this. If the liquid begins to bubble, that indicates a leak.
If all else fails then your tank may have moisture and you should take it into a gas supply shop.
Related reading: Can You Weld Aluminum Without Gas? Is It Possible?
2. Incorrect Polarity or Adjusting Balance
When you are doing a TIG-weld with aluminum you should almost always use an alternating current. Using a direct current increasing the difficulty of taking off the aluminum oxide layer, which can add to contamination by mixing with the filler metal.
The electrode negative (EN) works at the base metal through melting, while you can use the electrode positive (EP) part of the AC cycle to scratch off the oxide.
Increased electrode positive takes flakes of brownish or black oxidation out of the weld puddle. But be careful. Too much EP can cause too much etching and ball the tungsten.
Remember to only begin to weld when the puddle appears to be shiny so that you know the oxide is gone and you can start adding the filler metal.
Related reading: What’s The Difference Between AC And DC Welding >> AC vs. DC
3. Arc Length
If you let the arc length increase too much this can cause a color change in the aluminum. Too long of an arc results in a heat input increase and will probably cause distortion.
You should hold the arc length consistently, this will improve your control over heat input and reduce distortion of the aluminum.
4. Amperage on the Aluminum is Too High
You can get burn-through, ill-defined or wide profile aluminum, if you set the amperage higher than it should be. The obvious fix to this is to take the amperage level down, or increase the travel speed.
5. Graininess
If you are welding at too high of a temperature than you may get some grainy distortion due to base metal dilution. You have to find that ‘goldilocks’ temperature to makes sure that grainy distortion won’t happen.
It’s always good practice to take care of any moisture or greasy, oily substances that might be contaminating the filler and base metal. You might even just be using the wrong filler metal, so be sure to check that out.
6. Fusion
If the root of your T-joint lacks fusion, a few things could be causing it. First, you may need to hold your torch too closer to the joint, you could have an improper fit-up, or you may be feeding the filler rod the wrong way.
You can increase the directional control, thus aiding penetration, by reducing the arc length. Make sure the joint or weld is not under-filled too quickly.
Also, you can get greater performance control of the arc by using inverter based power sources. This way you can focus the arc more effectively into the puddle.
Related reading: What Are the Advantages of An Inverter Welder?
7. Filler Metal or Base Is Dirty
You should have a stainless-steel brush that is meant just for cleaning aluminum so that you don’t get the aluminum contaminated from other metals.
It is best practice to always make sure that your filler and base metals are well cared for and cleaned. And don’t forget to never use a brake cleaner on your aluminum.
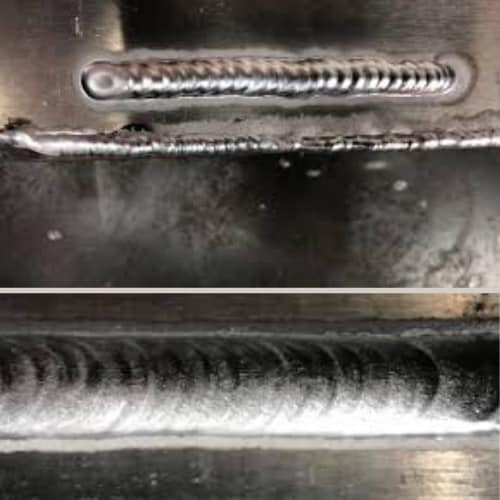
8. Wrong Gun Push Angle
Magnesium oxide is where the black soot comes from. Actually, that soot is the magnesium oxide. So, if you are using a 5356 GMAW wire, that means its magnesium content is up to 5%. If you are using a 5356 GMAW to weld 6061T6 for example, you might get that black soot.
Why?
Because 6061 has a magnesium amount of about 1%, generally speaking. This magnesium gets vaporized by the heat of the arc and black soot forms when this heat interacts with the oxides.
So, how can you remedy this issue?
To help keep gas coverage at the leading edge of the weld pool, use a gun push angle of about 15 degrees. This should reduce shield.
Weld soot is caused by the interaction of aluminum and magnesium oxide. Since magnesium and aluminum boil at a lower temperature than the temperature of the welding arc, some of the aluminum and magnesium evaporate in the weld filler metal during the welding.
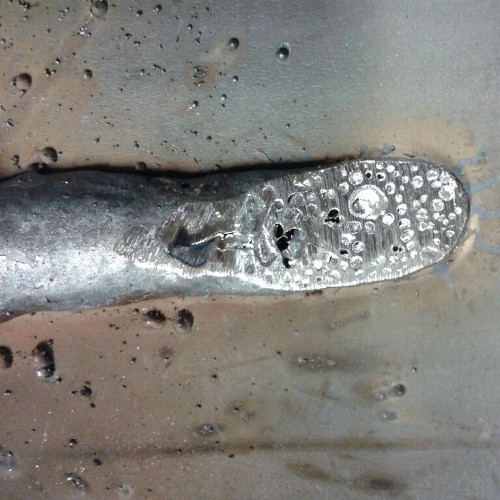
What Causes Porosity in Aluminum Welding?
There are few different ways porosity occurs in aluminum welding depending on which process you employ, and other details concerning gases, heat and cooling, and contaminants.
Porosity in MIG process aluminum welding occurs when the metal freezes, and there is still gas stuck in the weld pool, then this gas can’t escape, and creates porosity.
Because of this, it is important to keep the welding current high enough so that the droplet transfer remains stable. Turbulence often ends with gases getting stuck in the weld pool.
Another way to mitigate turbulence is to is to disallow erratic wire feeding, which may be caused by the guide liner being severely bent, an incorrect liner size, drive-roll slip, or knots in the wire.
If you are welding using the TIG process, then contamination is likely the culprit of porosity. Another likely cause is lacking proper gas shielding.
Hydrogen is the primary cause for aluminum porosity specifically because in aluminum it has a very high solubility. Hydrogen stays inside of the metal as porosity if the rate of cooling is too high.
If there are contaminants, such as oil or moisture, present on the filler wire, this may result in porosity. Oxidized layers of aluminum have a tendency to become wet and if the oxidized layer is not carefully purified just before the welding process, porosity may occur.
Related reading: 6 reasons why it is difficult to weld aluminum?
That’s why it is extremely important to make sure that the plate is clean.
Depending on the rate at which the weld pool solidifies will determine porosity. If you ramp up the welding current and/or lower the travel speed, that will slow the rate of cooling, which will mean that the gas can escape more efficiently from the weld pool. This reduces porosity.
One more thing that may cause porosity in aluminum welding is improper care of filler wires. Filler wires will collect and absorb moisture, oxidizing it, if it is left out. Therefore, they should be kept in their package whenever possible, until you are ready to use them.
If you are doing TIG welding, then be sure to clean each wire before you use it. You can do this with an acetone-soaked rag.
Can You Weld Dirty Aluminum?
If you can’t, or for some reason you haven’t, acid washed your aluminum before you begin your weld, you can take a typical grinding disc on a hand grinder and grind the aluminum a bit. This will make it ball up more clearly, but you will still get some porosity.
This is ok if you are just trying to learn and you aren’t so worried about the aesthetics of the finished product.
Make sure to keep the metal in the heat until it starts to melt, once it does, add the rod and lay into the puddle. When the puddle starts to ball up, let up on the heat, then move forward again and really let the metal heat up, then you will stick the rod in.
Whenever you are laying into the heat, start putting the rod in.
Again, if you are trying to make something pretty, I wouldn’t use this process. But, if you don’t really care about how the finished product looks and you just want it to work, then go for it, it doesn’t have to be clean.
Related reading: Can You Weld Aluminum With an Arc Welder? All You Need to Know
Why TIG Welds Go Gray
If you have ever had a TIG weld go gray and dull you have probably wondered what happened along the way for that to occur. It is likely because of surface oxidization.
People usually use TIG welding because they want to create an aesthetically pleasing product, or to meet requirements and codes. This means that the TIG process can be a little complex, and where things are complex, there is plenty of room for things to go wrong.
The gray color occurs when the metal becomes overheated after a shielding gas, like argon, is taken away. When this happens, impurities arise in the weld due to the atmosphere, which can cause a gray color.
What’s Difference Between TIG and MIG Welding?
MIG welding stands for ‘metal inert gas’, while TIG welding stands for ‘tungsten inert gas’. Each process has its own set of techniques and results, so it is important to understand which process is needed for your particular desired outcome.
Each technique transforms metal into a liquid state through melting. Once the metal is melted, both techniques also use filler material to create joints, adding new metal.
As the name implies, tungsten inert gas uses a tungsten electrode. The electrode is used to run a current through which ever metals you would like to join. Once the metals become heated through this process, they turn into liquid and you can insert your filler material into this metal liquid puddle in order to join another piece of metal to the one you are working on.
TIG process welding requires that the torch and the filler material are separated, meaning you will have to have both hands free (no texting). Yet, you don’t absolutely need filler material for a good TIG weld.
You can also employ your feet during a TIG weld. Some TIG welders use a pedal which can mediate the quantity of electricity that is being fed into the torch.
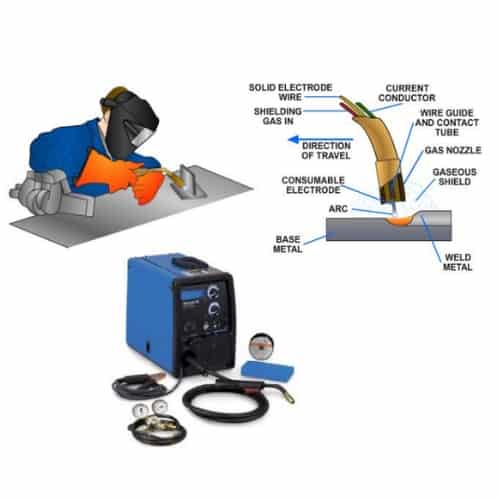
MIG, on the other hand, uses short-circuit welding and requires using a metal wire that is attached to an electrode which is responsible for melding. You feed the filler material through the torch with this wire, and to the liquid metal.
When the liquid metal creates a puddle, gas escapes the gun and shields that puddle from contaminations in the atmosphere. This protects your project from impurities.
These days MIG welding is more popular than TIG welding, and that is most likely due to the fact that MIG welding can be learned more quickly and easily.
Related reading: Can You MIG Weld Mild Steel with Pure or 100% Argon (Straight Argon)?
What are the Differences Between MIG Welding and TIG Welding?
So, what are the main differences between the MIG process and the TIG process?
- Technique – In terms of technique, MIG welding uses that wire electrode I mentioned. You must use a spool gun, which the wire electrode is fed through, to perform the weld. TIG welding, on the other hand, forces you to use both hands in order to get the filler material into the weld while you are operating a torch (which is why TIG welding is more difficult).
- Thickness of Project Materials – For thicker metals you are going to want to use MIG welding because it can work on thick metals more effectively and more quickly than TIG welding. On the flip side, TIG welding is better for metals with a thinner gauge.
- Speed – MIG welding is faster than TIG welding, so if you are working on a project that requires a quick turnaround or has a high production rate, you should use MIG. However, if you are looking to hone in for a higher level of detail, than the TIG method should be used.
- Control – TIG welding often requires more experience and skill because you must use both hands, therefore, for the amateur, it may be more difficult to control a TIG weld. On the other hand, MIG is much easier to control, so it is better for beginners.
- Cost – MIG is cheaper than TIG.
- Aesthetic of the Final Product – If you are going for a more artistic aesthetic, and you are concerned about the details of the finished project, than you should go with TIG welding. It offers a much more polished finish.
- Project Size – If you are working on a particularly large project than you should use MIG welding because it works better with thick metals. Since TIG welding working better with thin metals, it is better to use this process on smaller projects.
Welding Safety
Whether you are using MIG welding or TIG welding, there are dangers associated with welding. Let’s review what you should be doing to keep yourself save during the welding process.
You should always wear a welding helmet to protect your eyes and face from stray sparks, intense light, radiation, and the possibility of burning yourself. Don’t leave any part of the skin on your head or neck exposed. Also, don’t forget to take out your contact lenses so that they don’t gather dust!
Be careful with earplugs, you don’t want them to catch on fire, so you should be sure that they are fire resistant. However, earmuffs provide better protection.
Related reading: Personal Protective Equipment for Welders – PPE | List, and Requirements
Make sure that your gloves are fire-resistant and that you have rubber boots on so that you can’t get shocked or burned from the ground.
It’s even good to have a respirator around because of all of the oxides and fumes that are produced during the welding process.
Besides protecting yourself from the obvious dangers of heat, fire, and electricity. Make sure you take off any jewelry so you don’t accidently smelt them, and be sure to weld at an angle that sparks aren’t shooting in your direction.
Stay safe. Happy welding!
Tig Welding and Black Oxide Finish >> Check out the video below
Here are some of my favorite tools & equipment´s
Thank you for reading this article. I hope it helps you find the most recent and accurate information for your welding project. Here are some tools that I use daily and hope you´ll also find helpful.
There are affiliate links, so if you do decide to use any of them, I´ll earn a small commission. But in all honesty, these are the exact tools that I use and recommend to everyone, even my own family. (NO CRAP)
To see all my of most up-to-date recommendations, check out this resource that I made for you!