As you can probably imagine, stick welding is not a simple topic — especially when we start talking about selecting electrodes and all the different techniques you can implement. But not to worry, that’s why we are bringing you the ultimate guide to this fun and interesting topic.
In this article you´ll learn everything about:
Basic overview of stick welding terms (SMAW), the required basic equipment and how stick welding works
What about the safety of welders, the selection of electrodes, the preparation of the joint, and the setting up of equipment?
The different stick welding techniques and basic guidelines for different metals.
Table of Contents
What is Stick Welding?
If you want to get super-technical (and picky) here, then the proper term for stick welding is shielded metal arc welding or SMAW. The name “stick welding” is actually slang that came about in the community since it’s a lot easier to say than the other.
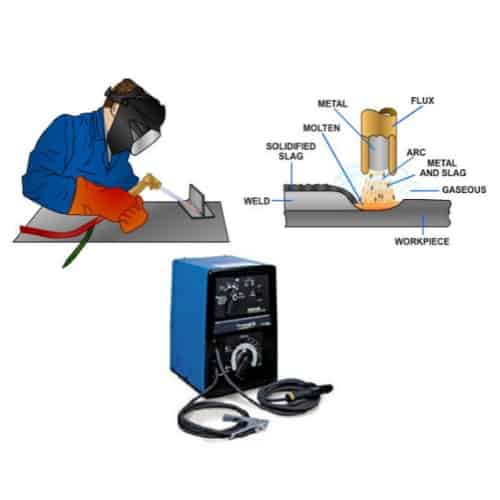
However, stick welding is the most commonly used arc welding process, making use of an electrode (sometimes called a filler rod or just a stick) and electric power to fuse metals together and fill in the joint.
The electrode’s core is made up of solid metal that is then encased in mineral compounds and powdered metal, along with a binding agent. It ensures the electric current is conducted to the arc and that enough filler metal is released for the joint.
As you might imagine, there are lots of different sizes and types of electrodes you can choose from. The one you do decide to go with will define the arc’s voltage and amperage requirements. Hence why this topic can be such a gray area — especially if you’re a beginner.
The Difference Between Stick, MIG and TIG Welding?
Mastering either one of the three main types of welding can take years, lots of effort, and buckets of equipment. So, you should probably decide which to go with before you start splashing the cash on your new workshop.
With that in mind, we’ll look at the differences here so you can figure out whether stick welding is the one for you.
Stick Welding
If you are a straight-up beginner or just want to have a bash at welding on the weekends, stick welding is definitely the one for you. Why? Because it’s the easiest method to learn (the basics can be covered in a single morning), requires less equipment, and is much cheaper than both MIG and TIG.
How Does It Work?
- The machine’s negative cable is connected to your work so the power can travel through and make an arc when the electrode attaches.
- You just need to quickly touch the base metal with an electrode and raise it slightly to create the arc.
- The electrode will melt following this action and will fuse with the base metal to create a “welding pool”.
- Once it has cooled down, the joint will be nice and sturdy.
MIG Welding
Otherwise known as metal inert gas welding, this process requires you to know a lot more about shielding gases and wire speed. Although, it’s easier to get to grips with than TIG. Usually, setting up the machine is the hardest bit since the actual welding is relatively simple.
How Does It Work?
- You utilize a spool gun to push the electrode out to make a weld pool. Here, the electrode isn’t coated (like with stick welding).
- This is why you need to use shielding gases to protect the weld pool.
TIG Welding
Depending on who you talk to, this is the hardest of them all. However, you’ll get fantastically precise and clean welds so generally, TIG is used for artwork and intricate pieces.
How Does It Work?
- The electrode here does not contain the filler material. Instead, it’s made of tungsten that has an extremely high melting point.
- You’ll have to apply the filler separately from a “filler rod”.
- In one hand, you’ll hold the torch and in the other, you’ll hold the filler. So, yep, a lot of multi-tasking here.
I recently wrote an in-depth article on this subject, have a look at it: What´s The Difference Between TIG and MIG Welding?
Stick Welding: The Equipment
As we have already mentioned, stick welding is the simplest of all three main methods. Thus, the equipment you needed is decidedly simple too.
Related reading: Top 5 Essential Arc Welding Tools & Equipment List You Need
A stick welder contains four parts (all of which are necessary):
- A constant voltage power supply (sometimes referred to as a CV power supply or simply a stick welder)
- Ground clamp
- Slag removing tools
- Stick welding electrodes (i.e. the rods to do the welding)
- Electrode holder
- Safety equipment
Now, let’s take a look at what each piece does, shall we?
Constant Voltage Power Supply
Obviously, you can’t start stick welding if you don’t have a stick welder. There are so many options available — you could even buy one that lets you perform all three welding methods! However, this will be pretty expensive so you’re better off just buying a stick welder.
We’d recommend the Amico Power Stick Welder if you’re a beginner.
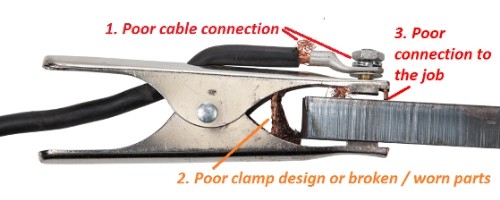
Ground Clamp
Typically, this will come with the stick welder. You need to make sure that it is secure around your workpiece and is plugged directly into the stick welder.
Slag Removing Tools
Once you’ve finished welding, you’ll want to clean off the slag. Our advice is to use a slag chip and hammer before getting out your wire brush.
Stick Welding Electrodes
You need to make sure you pick the right electrodes. But don’t worry, we’ve got an entire section about this further down to help you out with this confusing aspect.
Electrode Holder
Yup, this holds the electrode and stops you from getting some pretty major injuries.
Safety Equipment
We’re going to talk in-depth about safety equipment a bit later but for now, just know that you will need it. That’s right, it’s a non-negotiable.
I recently wrote an article on this subject, have a look at it: 30+ Must-Have Welding Tools & Accessories (Expert Poll)
So, How Much Does All of That Cost?
Just like anything, it depends on what you’re going to be using it for, the brand you decide to go with, and your budget. There’s no set in stone rule here and prices tend to fluctuate across the year anyway. Regardless, we’ll give you a little overview!
For a great entry-level stick welder, you should expect to pay around $300. Alternatively, many companies offer a monthly financing option so you don’t have to drop that relatively large lump sum in one go. We would recommend choosing the Longevity Stick Weld 140.
Of course, as you climb up the stick welder ladder, the prices go up. And when we say up we mean up — all the way to $10,000 and beyond type of up! But don’t worry, this tends to be for those who need it for huge industrial manufacturing and not Joe down the road who likes to go in his workshop on a Saturday.
Just be careful not to purchase any of those really cheap ones. Trust us, you won’t be able to make a quality joint even if you’re a world champion welder.
Related reading: Portable Welding Machine – 5 Things To Look For
How Long Will It Take Me to Learn Stick Welding?
To tell you the truth, it depends on what you want to do and how much you are willing to practice.
For general repairs around the yard, we would estimate that you could learn the basics in roughly 5 hours.
Will your welds look great? Nope. Will they be pretty rough? Yes. But will they hold together and get the job done? Absolutely!
However, if you are looking to begin a career as a welder, then you need to undertake a minimum of 500 training hours.
After that, to become an intermediate welder you must put in roughly 900 practice hours. For a profitable pipe welding career, this will be much more — about two years of specialized training.
Related reading: Fast Way To Weld Like a Pro – Even If You´re a Beginner!
What Materials Can I Work With?
Since you are now clearly very set on stick welding above the other options, we need to go over which materials you can work with here.
After you have purchased all the necessary equipment, you can get started on any of the following materials:
Although we have put aluminum on here, it really isn’t the best option. However, you can get the job done with stick welding.
You will need to make sure that your workpiece is rather thick since stick welding will ruin thin, sheet-like material. Generally, this method is fantastic for repairing tractors, working on farm equipment, power plant construction, pipe welding, and utilizing metals that are over 1/16 inches thick.
Health and Personal Protective Equipment
Stick welding is dangerous enough as it is without the added problem of not wearing the proper personal protective equipment. That’s why ensuring you have purchased (and are wearing) the right garments is essential to making sure you have fun and stay safe while doing it.
So, what exactly do you need? Let’s dive into the details.
Eye and Face Protection
When welding, the standard practice requires that you wear a combination of a helmet, goggles, hand shields, and safety glasses.
The exact eye protection you should be wearing depends on the specific task you’re performing. Since this is quite a big topic, we are only going to cover the basics here.
Related reading: How Long Does Welders Flash Burn Last? Symptoms and Treatments
Clear Lenses
These are great for protecting your eyes against impact. In this case, the impact could be caused by splashes, flying particles, or sparks.
Sometimes, you will need the safety glasses with side shields, but at other times you need goggles so they form a seal around the entire eye. It all comes down to the job at home.
Welding Shades
As most people already know, the light that gets thrown around during the welding process is incredibly bright. No wonder retinal damage is a common problem in the welding community, right?
That’s why welding shades were invented. They make use of an extremely dark filter that lets you look at the arc safely.
I recently wrote an article on this subject, have a look at it: What Do Welding Shade Number Mean? What About Safety?
OSHA (otherwise known as The Occupational Safety and Health Administration) set out a regulation infographic that allows you to easily choose the correct filter depending on the job you’re doing. To help you out, we’ve given you the basics of it below:
| Electrode Size 1/32 Inch | Arc Current | Minimum Protective Shade |
|---|---|---|
| Below 3 | Under 60 | 7 |
| 3 to 5 | 60 to 160 | 8 |
| 5 to 8 | 161 to 250 | 10 |
| Over 8 | 251 to 550 | 11 |
It should be mentioned here however that these shields rarely meet the guidelines for impact protection. You may need to wear safety glasses underneath your face shield in this instance.
Helmets
Generally, when we talk about helmets in welding, we don’t mean the bog-standard hard hat that anybody on a construction site wears.
Instead, we are talking about those with extended neckpieces that protect your entire head, face, and (you guessed it) neck.
You can find those that have auto-darkening lenses, which allow you to perform almost any welding project without needing to figure out which glasses you need. Just let the helmet do it!
Related reading: How To Choose a Welding Helmet? What To Consider?
Clothing
Again, the most appropriate clothing will vary depending on the specific job you are doing. However, you should ensure you are wearing enough material to protect you from radiation burns, sparks, and splatters. Basically, your entire body should be covered.
You should opt for dark clothes that are made from either leather, wool, or incredibly thick cotton since they won’t reflect light from the under the helmet. Plus, the materials are durable which decreases the risk of them either melting or tearing.
Another aspect we need to mention here is that you should not roll your sleeves up (regardless of how hot you get), nor should you cuff your trousers. These rolls can catch awfully hot debris that could seriously harm you.
Finally, you must don flame-resistant gloves before you start. While you can get standard leather welding gloves, your best bet is to buy gauntlets as these protect your entire arm.
How to Prepare a Joint for Stick Welding
Unfortunately, you can’t just turn on the machine and get to welding your joint. There is some preparation that you have to do to get your metal ready for the welding process.
We’ll just dive right into the details since we’re certain you don’t want to read a load of waffle!
The first thing you need to do is to make sure all the defects are removed. If you neglect this step, your weld won’t be good, no matter how hard you try.
So, remove all the mill scale, oxide, and rust. This is mostly applicable to the metal edge only but there is no harm in doing your whole piece.
All of the above should be done regardless of what type of joint you are making. However, there are specific preparation steps you need to take depending on the joint kind. With that in mind, we will take a look at each, one by one.
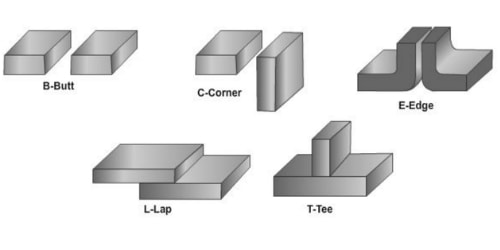
Learn More About Welding Joints here: 5 Types Of Welding Joints and Their Use – Complete Guide
Butt Joint Prep
You can prepare this type of joint in multiple ways namely, chipping, a flame, shearing, cutting, or a regular metal grinder. Usually, you will see welders opting for the grinder as it’s a less-hassle method.
For thinner metals, you will want to use a single V or single U groove joint. But, for thicker materials, you should go with a double V or a double U joint.
Edge Joint Prep
You might not be doing so many edge joints with stick welding since this type of joint is usually used on incredibly thin metals and, therefore, creates a weaker weld.
Having said this, you can perform an edge joint with thicker materials for reinforcement but generally, save it for thinner metals.
If you don’t want any bevels, then there is very little in terms of preparation that you need to do. Just clean, tack, and weld! But in some circumstances, you will need to bevel the edges to give you the best fusion.
Corner Joint Prep
You will need to decide whether you want a closed (where the metal is completely flush to each other prior to welding), half-open, or full open corner joint here.
Alternatively, you could perform a fillet weld corner joint but these tend to only be used for tanks and boxes.
Lap Joint Prep
While offset lap joints (there are plenty of images of these online if you want to have a quick refresher of what they look like) are stronger, they can be much harder to prepare. Why? Because the bevel you need to create is at an excruciatingly hard angle.
Tee Joint Prep
You need to make sure you bevel the correct edges when you’re preparing to perform a tee joint. Then, tack weld it on each side before laying the bead.
Stick Welding Electrode Designations
This is the part that some of you will have been waiting for since the beginning! Here, we are going to dive into the meanings behind electrode designations and how to select the right one for the job.
So, let’s get on with the meanings of the designations, shall we?
The designations on electrodes are the letters and numbers that are printed onto the outer coating. The most widely used ones are E6010 and E7018.
When stick welding first became a “thing”, the designation would always start with an “E”. Of course, this meant electrode. However, over the years this was dropped so you will normally just find numbers on them now.
Related reading: What is a 6011 Welding Rod Use for? What are The Advantages?
The first two digits tell you how strong the filler metal inside the electrode is. Therefore, a 7018 electrode has a minimum of 70,000 pounds of tensile strength per square inch of weld. How do we know this?
Because the first two numbers are 7 and 0! The weld is roughly twice as strong as the steel it is joining — quite amazing when you think about it really.
The final half of the designation stands for the shielding on the electrode. The bigger the number is, the more shielding and/or metal is emitted when you’re welding.
Thus, we can tell that a 7018 has a lot more coating than a 6010 electrode.
Now that you understand what the designation actually means, we can move on to discussing which ones work best for different types of metal.
Related reading: This is Why Welding Rods Need to Be Heated
Stick Steel Welding Electrode Selection
Below you can find the best electrodes for steel welding. Feel free to skip along if steel isn’t your preferred material!
| Designation | Used For | Position(s) |
|---|---|---|
| 6010 | Deep penetration, good for “muddier” materials, great for open root welds | All |
| 6011 | Deep penetration, good for “muddier” materials | All |
| 6013 | Medium penetration, must have a clean joint to work well | All |
| 7018 | Medium penetration, must be used with dirt-free metals | All |
| 7024 | Medium penetration, must have a clean joint to work well | Flat only |
The most popular ones here tend to be the 7018, 6013, and 6010. If you want a general welding electrode then the 6013 is a no brainer option!
Stick Stainless Steel Welding Electrode Selection
When you work with stainless steel, the grade of metal you are welding will play a huge part in the one you decide to pick. While there are more than two electrodes you can use, we will cover the two main ones as we’ll be here forever otherwise!
The 308L electrode is the most common one amongst welders who work with stainless steel. It can be used on 304-grade stainless steel.
Alternatively, you could use the 309L electrode which can be used when you work with regular steel. Ultimately, it is up for you to decide which one you prefer.
Related: Do Welding Electrodes Have a Shelf Life? Electrodes Expiry
Stick Aluminum Welding Electrode Selection
As we said earlier, stick welding aluminum isn’t the best option. If you want to give it a go anyway, just make sure that your workpiece is thick so it can withstand the welder metal.
You should use a 4043 electrode since you can weld in vertical, flat, and horizontal positions. Just bear in mind that you’re asking for trouble if you’re aluminum is less than ⅛ inch thick.
Stick Welding Machine Set-Up
After you have selected your electrode (which the previous section would have helped you with), it is time to move on to setting up the machine. Of course, there are lots of ways to do this but we’re just going to go over the basics for all you beginners out there.
Somewhere on your stick welder (usually on the front), you will find two sockets. Your welder and electrode holder need to be plugged in here:
- Firstly, plug the stick welder in but do not turn it on. Then push the correct end of the electrode holder into the socket that has a plus sign on it. Make sure you twist it all the way.
- After that, grab your ground clamp and make sure it is attached securely to your workpiece or your welding bench.
- Once you’ve done that, screw the other end of the table into the socket that has a minus sign next to it.
- Grab some scrap metal and listen to the crackle of the burning electrode.
- Make an arc and turn the power setting to tune into the right sound. If it resembles eggs frying in a pan then you have got it right.
The Stick Welding Techniques
Before you start actually welding, you will want to make sure you are comfortable with the various techniques by practicing on some scrap metal. This way you can sort out the position of your hands and get used to the motions involved.
1. Striking an Arc
Since this is pretty much the whole process, we’ll start by looking at striking an arc.
Firstly, make sure the electrode is properly inserted into the electrode holder. Then, turn the stick welder on.
The second step is to put the very tip of the electrode onto the metal. Then, you will need to drag it incredibly quickly across it. Imagine that you are striking a match — it’s that sort of motion that you need.
Once the arc forms, you need to raise the tip a tiny bit so you can maneuver it. If this is your first time, it’s likely that the electrode has become stuck to the metal. All you have to do in this scenario is to twist it slightly to break it off and start again.
Related reading: Do You Push or Pull when Stick Welding? Which is Right?
2. Whipping the Electrode
If you are using electrodes that don’t have a lot of flux, then you need to do this whipping technique otherwise it will get stuck in the weld.
Here, you use a back and forth motion that helps to get rid of contaminates. Bear in mind that it tends to be used on thinner materials, rather than the thicker stuff you might be using with stick welding.
3. Circles
This one is fab for beginners.
Regardless of the electrode you are using, you can do circular motions to control the speed of your movement across the join. On each circle, move forwards slightly to travel over the joint and you will have made a pretty neat weld.
4. Weaving
Weaving is generally used on wide welds since it’s easier to control. However, experienced welders like to use it with narrow joins too because they’re more adept at minimizing their movements.
So, how is it done? Let’s take a look.
- Strike an arc as always.
- Hold it to one side for a tiny bit.
- Move to the other side.
- Hold it there for a second.
- Repeat this movement until you have finished the join.
5. CLAMS
While this isn’t a technique so to speak, it is an acronym that helps you remember what goes into making a great stick weld.
The “C” stands for Current (otherwise known as amperage). Setting this too high or too low will result in a rough weld.
Related: What´s the Difference Between AC and DC Welding?
The “L” stands for the length of the arc. Try to keep it tight. This way, you won’t have to deal with it potentially going out or the electrode sticking to the plate.
The letter “A” refers to the angle of the electrode. We are about to talk about this (in the next section) since this does make a difference to the quality of the final weld.
The letter “M” stands for the manipulation of the electrode. Depending on which designation you are using, you will have to make circular motions (like we said earlier) to control the travel speed.
The letter “S” refers to the speed of travel. The rate at which you move will affect the appearance of the bead, the undercut, and the heat input.
Stick Welding Rod Angles and Positions
To be honest, as you get more experienced, any angle will do just fine. However, we are going to talk about the general rules that pretty much every beginner and/or intermediate welder tend to stick to.
Before you continue reading, here is an article I wrote about the 4 Main Welding Positions You Should Know – Complete Guide.
There will be some situations where welding at the “correct” angle will be impossible. In these cases, you have no choice but to use an angle that isn’t technically “allowed”.
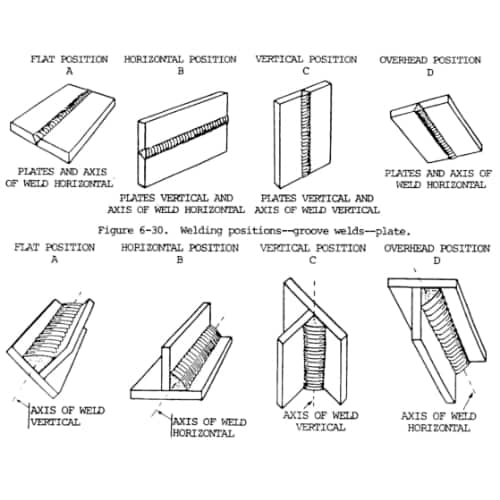
At the end of the day, it will become second nature with enough practice. Anyway, let’s get onto the standard guidelines.
Flat Welding Electrode Angle
When you are welding in the flat position, you should aim to move your electrode at about 10 to 30 degrees towards the join. If this sounds confusing, there are plenty of infographics online you can have a look at that depict it perfectly.
Vertical Welding Electrode Angle
Here, it is easier to weld upwards rather than downwards usually, but you do whatever feels best. Regardless, you should hold the electrode at 90 degrees to the metal being welded.
In other words, point it somewhere around 30 to 45 degrees to the actual join.
Horizontal Electrode Angle
Gravity causes a lot of distortion with horizontal welding positions. You might want to bevel the edges here to hopefully control the weld pool better.
Hold the electrode at 90 degrees from the weld but make sure you are leaning into the direction of travel by about 15 degrees.
Overhead Electrode Angle
Essentially, overhead welding is the same as flat welding. So, you need to make sure you are pointing your electrode in the movement direction by around 10 to 30 degrees.
Frequently Asked Questions
Can You Touch the Rod While Stick Welding?
Can you touch the rod while stick welding? No, sorry, we know that was blunt we just needed to get it out there! Please, please, please do not touch the rod while you are stick welding. You will be on the receiving end of a nasty primary (and/or) secondary electric shock which is not pleasant.
As soon as the stick welder is plugged in, the electrode will become what is known as electrically hot. If you touch it (or any of the other metal components in the stick welder), you will be subject to a shock between 115 to 600 volts. This is the primary electric shock.
The secondary one occurs if you touch a part of the electrode at the same time as you touch the metal you are working on. It is true that this is weaker than the primary shock but it still really hurts.
To avoid this, don’t let any wet clothing near your welder, nor let your skin come into contact with it.
How Thick Can a Stick Welder Weld?
If you have purchased a 225 to 300 amp stick welder then it can handle pretty much any thickness you will come across. Typically, you only need about 200 amps to stick weld so your machine will definitely be able to handle the heat (for want of a better phrase).
How thick can a stick welder weld? The previously mentioned stick welder can weld material that is under ⅜ inch thick in a single pass. However, if you are looking to weld thicker material, all you have to do is make multiple passes. This is what professional welders do!
To tell you the truth, you are better off focusing on picking out the right electrode for the task at hand since your stick welder is almost guaranteed to handle the thickness you are wanting to work with. With that in mind, we will chat a bit about the rods you should use on regular steel.
The Best Electrodes For Regular Steel
What are the best electrodes for regular steel? Welders tend to opt for one of the following electrodes when working with steel:
- 6010
- 6011
- 6013
- 7018
- 7024
As you probably know, each type of electrode has a certain set of qualities that will affect your thoughts on choosing it. To make it as easy, we have set out everything you need to know in the table below:
| Electrode Designation | Properties |
|---|---|
| 6010 | These penetrate very deeply. |
| 6011 | These penetrate deeply and are great for welding in all positions. |
| 6013 | These penetrate less than the above 6010 electrodes. |
| 7018 | These produce a fantastic-looking bead. They are better used when working with sturdier steel.s |
| 7024 | These are the easiest to use. They keep the arc length at a constant so you can drag more effectively. |
Can Stainless Steel Be Welded With a Stick Welder?
Can stainless steel be welded with a stick welder? The short answer is yes, you can weld stainless steel with a stick welder. If that was all you were looking for then you are good to go! But for those of you who want a bit more information on this matter, let’s continue.
We hear a lot of people asking this question, but it brings up an even more important one — should you weld stainless steel with a stick welder? To be honest, it depends on your level of skill, how you want the final piece to look, how thick the stainless steel is, your budget, and the timescale of the project.
If you are wanting a flawless, artistic piece then you are much better off TIG welding your project. If you are wanting the job done and dusted with speed and effectivity, then MIG welding is for you. But if you are just looking for a general weld, then you can’t go wrong with stick welding.
Don’t stress, we are going to delve into the actual pros and cons of using each method on stainless steel so you can make a properly informed decision.
The Pros and Cons of Stick Welding Stainless Steel
The Pros
- It isn’t any harder than welding steel.
- Rods run smoothly.
The Cons
- It is not great for decorative welds.
- Slag removal can be pretty dangerous as it flies off. Remember to keep your visor down until the job is done!
Pros and Cons of TIG Welding Stainless Steel
Pros
- You get a lot of control.
- The quality is amazing.
- Fantastic for decorative pieces.
- You can erase distortion as you have so much control.
Cons
- It is incredibly slow.
The Pros and Cons of MIG Welding Stainless Steel
The Pros
- Incredibly quick to do.
- It is no harder than welding steel.
- You don’t have to change your machine’s settings.
The Cons
- There can be a lot of distortion since there you do not have as much control.
- It isn’t great for producing artistic, decorative welded pieces.
What Welding Rod Is Used for Stainless Steel?
What welding rod is used for stainless steel? You should opt for a 209 or 213 shielded metal arc welding electrode when you are looking to weld stainless steel. They provide amazing strength and are fantastically durable against cracks. However, it is not always that simple (you should know that welding is a pretty comprehensive topic by now!).
To be able to choose the correct electrode for stainless steel, we first need to look at the type of stainless steel you are going to be working with. Let’s do that now.
Stainless Steel: The Types
In all honesty, there are so many types of stainless steel that we would be here forever if we tried to mention all of them. So, we will stick to the two that you are most likely to come into contact with.
The first one is 304-grade stainless steel. Without a doubt, this is the variety you see most. It is used for pretty much anything and can be welded with 308 electrodes.
Secondly, there is 316-grade stainless steel. This is generally found in food preparation zones like industrial kitchens and such. You can use 316 welding rods for this one.
The Rule for Pairing Stainless Steel with Electrodes
You need to weld using the same grade of welding rod or higher. You are likely wondering what on earth this actually means. Are we right? Thought so! Don’t worry, we are about to shed some light on the matter by providing you some examples. See below:
- It’s fine to weld 304-grade stainless steel with a 308 or 316 electrode.
- It is not fine to weld 316-grade stainless steel with a 308 electrode.
At last, it makes sense!
Do you Stick Weld Up or Down?
Do you stick weld up or down? While you can do both, experienced stick welders generally choose to weld vertically up (even though it is slower than the downwards technique) unless the material they are working on is very thin. Gravity will indeed work against you when welding vertically (in both up or down methods) but there are some tricks you can implement to help you.
Let’s take a look at them, shall we?
Get The Right Electrode
Finding an electrode with a 7018 designation is a good place to start when stick welding up. They have a sufficiently low iron powder content, which results in a weld pool that dries quickly and doesn’t drip during the process.
Alternatively, you could use a 6010 electrode. Just bear in mind that you won’t be able to employ a weaving technique here. Instead, you will need to opt for a whipping or stacking method. Not to mention that it takes far more skill than simply using a 7018 electrode. But it’s ultimately your choice.
Make a Weld Shelf
Even though you have chosen the right electrode, gravity isn’t going to go away entirely. So, you need to somehow stop your weld pool from spilling over.
This is where a weld shelf comes into play.
The trick here is to imagine your bricklaying. Yep, seems like an odd comparison but, trust us, it works. Essentially, you need to ensure that every layer below the one you are working on acts as a base.
To do this, go slowly. Create welds from the bottom of the piece upwards, making one tiny bit at a time. Try to ensure that each “shelf” is roughly 1 ½ times bigger than your electrode’s diameter. This way, it will freeze in time to hold your next weld in place.
Is Stick Welding Electrode Positive or Negative?
Polarity of stick welding, is stick welding positive or negative? Unfortunately, there isn’t really a straightforward answer here. It is about understanding polarity because there are so many factors that come into play when deciding whether you should be stick welding with a positive or negative electrode setting. So, we will talk about polarity here to help you figure out which you should be using.
AC and DC
AC (or alternating current) and DC (or direct current) describe the electrical current that the welder ignites (so to speak) and the electrode conducts.
As you have probably already gathered, choosing the correct setting for your electrode will affect how your weld turns out. Therefore, as we briefly mentioned, you need to understand polarity to answer your initial question.
Read What´s the Difference Between AC and DC Welding to learn more.
You will hear the terms “reverse” and “straight” uttered among experienced welders which simply mean “electrode positive” and “electrode negative” polarity.
This polarity (a word you may well be sick of by the end of this) comes from the positive and negative poles of the electrical circuit made by the welder and your electrode.
Direct current travels in a single direction, which offers consistent polarity, whereas alternating current travels in a single direction 50% of the time and the opposite direction the other 50%. This results in a changing polarity.
Generally speaking, electrode positive polarity gives you a deeper weld penetration and electrode negative polarity gives you a quicker electrode melt-off.
However, there are other factors that play into how well the aforementioned “rule” applies. For instance, certain electrode coatings can change the effect. Typically, you should use a mild-steel electrode covered with high-cellulose for positive polarity welding. But again, this doesn’t always apply.
So, Which Do I Need?
Usually, the electrode manufacturer’s packaging will tell you exactly which polarity to use. Alongside this, your stick welder should have each of the terminals marked so you can see how to utilize it properly. If yours doesn’t, then it might have a switch that allows you to easily change the polarity.
How Much Do Stick Welders Make a Year?
The average yearly salary for welders across the whole of the United States of America is just over $40,000. In fact, this is higher than most other industries in the country! Being a welder is pretty lucrative if money is what you are looking for (you should probably be doing it for the love of the craft, of course).
It is incredibly unlikely that you will start off in a stick welding position that pays $40,000 a year. If you do, then congratulations, you are an anomaly.
How much do stick welders make a year? You should expect to be paid around $15 to $19 per hour, meaning that your annual makings will be roughly $31,000.
However, it should be noted that it is not an easy job. It is likely that you will be in pretty uncomfortable working environments. Plus, the hours can generally be quite long when compared with a 9 to 5 “desk job”. Not to mention the early mornings and the intense heat that you will be subjected to every single day.
Highest Paying States
The states that tend to pay the highest salary for stick welders are Wyoming, Alaska, Washington, Hawaii, Colorado, North Dakota, and New Mexico. These tend to be pipe welding jobs that are required to move oil from one region to the next, which is why these states pay welders in between $50,000 and $67,000. It all depends on what sort of welding you are looking to do.
STICK WELDING 101: Getting Started with SMAW >> Check out the video below:
References
https://www.weldingtipsandtricks.com/stick-welding-techniques.html
https://www.praxairusa.com/about-us/frequently-asked-questions/what-is-stick-welding
https://www.industrialmetalsupply.com/blog/what-metals-can-be-welded/
https://www.ishn.com/articles/108490-know-your-welding-personal-protective-equipment-ppe
https://www.arcweldingservices.co.uk/the-ppe-required-for-the-welding-process
https://www.instructables.com/id/How-To-Stick-Weld-Basic-Guide/
Here are some of my favorite tools & equipment´s
Thank you for reading this article. I hope it helps you find the most recent and accurate information for your welding project. Here are some tools that I use daily and hope you´ll also find helpful.
There are affiliate links, so if you do decide to use any of them, I´ll earn a small commission. But in all honesty, these are the exact tools that I use and recommend to everyone, even my own family. (NO CRAP)
To see all my of most up-to-date recommendations, check out this resource that I made for you!