It might surprise you just how many industries need to make use of welding joints. There is a pretty limitless number of applications from household projects, to vehicle manufacturing and so much more.
While this is all great in one sense, you need to know which types of welding joints to use for which job. This can present a lot of hassle (especially to beginner welders).
Luckily, you have stumbled upon us! We are going to give you all the information you need to become an expert in weld joints and their uses.
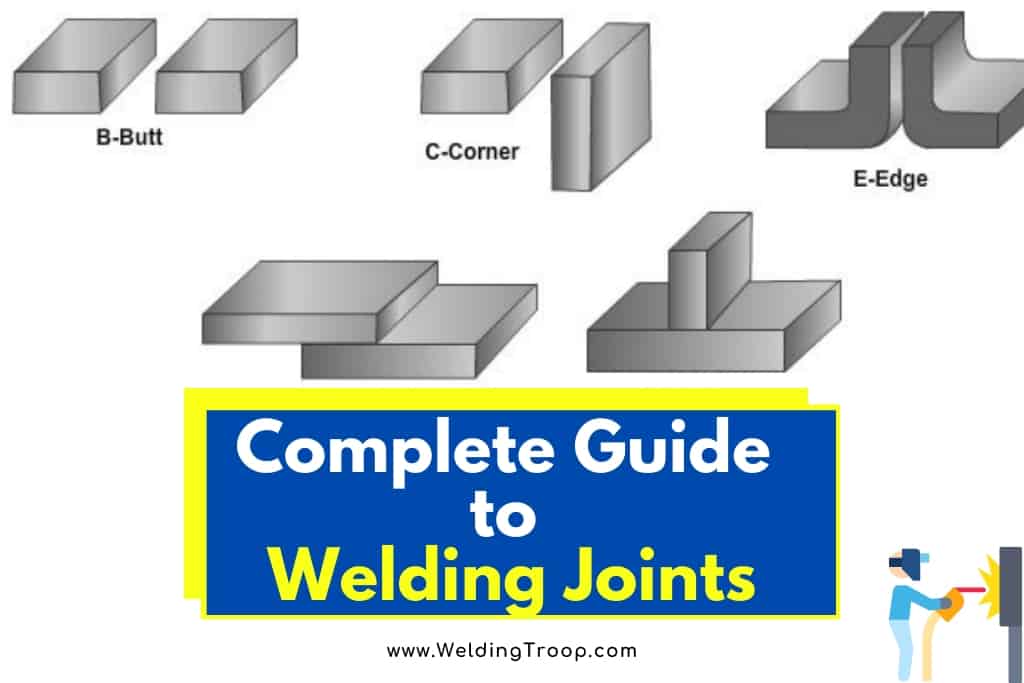
How many basic types of joints are there in welding? There are only 5 basic weld joints out there. They can, however, be used in combinations. In the list below you can find them:
- Tee Joint or T joint
- Edge joint
- Corner Joint
- Lap Joint
- Butt Joint
Table of Contents
What Are Welding Joints?
So, what actually are weld joints? Although it seems pretty obvious — and to tell you the truth, it is — we’re going to be diving into the specifics.
What are welding joints? Welding joints is the procedure of connecting a couple of pieces of metal (or plastic) at an edge or a point.
Numerous factors come into play here including the shape of the materials, and certain geometrical aspects.
Another critical consideration you will need to make before making the weld to fuse the pieces together is what welding style to use. Plus, which type of joint is necessary.
Each type of joint can be joined by many different types of welds. The figure below shows the most common types of welds joints made
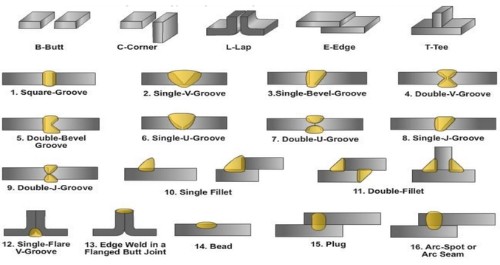
Once you know all of this, you can finally create the welding joint.
Right, let’s move on now to the types of welding joints. We know you’re itching to get started!
The 5 Types of Welding Joints
We mentioned briefly that one of the factors you need to consider before actually welding a joint is the type of join. That’s exactly what we’re going to be discussing now so buckle up! It’s about to get interesting.
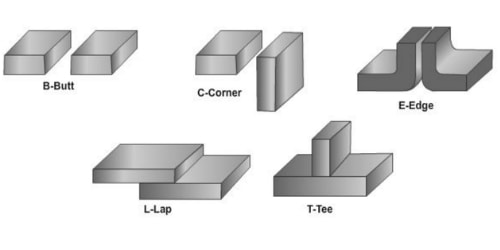
The figure below shows the five basic weld joints.
1. Tee Joint Welding
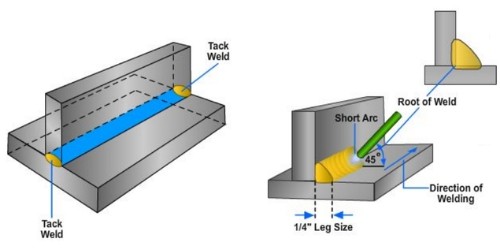
As you might have already imagined, the desired result is a ‘T’ shape. This is achieved by ensuring two metal pieces cross at 90 degrees. Therefore, the edges of the components will meet at the centre of the plate or specimen.
Sometimes, tee joints or T joints can be formed by a tube that you weld onto a base plate.
When Would You Use a Tee Joint?
This type of welded joint is typically used when you need to attach something (like a pipe) to a base plate (as we mentioned above).
When using these in real-life applications, you should ensure you’re careful to get the proper penetration amount into the bottom material.
You can use the following welding style to make a tee joint:
- Plug weld
- Fillet weld
- Bevel groove weld
- Flare bevel groove weld
- J-groove weld
- Melt-through weld
- Slot weld
Since we haven’t discussed welding styles yet, we’ll go through each of these in turn. This way, you’ll be fully clued-up when you next have to tackle welding joints.
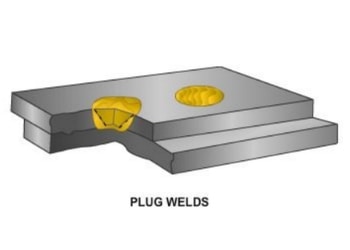
Plug Weld
Plug welding is a style used when spot welding can’t be done. Most of the time, rally car builders love to use this since a spot welder can’t fit into the crevices.
So, How’s It Done?
Let’s talk through the process. If you’ve done spot welding before, you won’t need this as much as complete beginners so feel free to skip.
- Drill 7.5mm holes in the top metal. Space them roughly 25 to 40mm apart. If you’re working with thick metal, you will want to drill larger holes. But this is something you can work up to.
- Clamp this sheet to the back sheet.
- Put the welding torch in position. The wire should be in the hole’s center, touching the back sheet.
- Arc against the back sheet.
- Point the torch straight into the hole.
- Start welding.
- Do not move the welder until the hole is almost completely full.
- Once you have reached this point, move the welder outwards in circular motions until it’s complete.
While you don’t necessarily need a specific plug welding clamp, it’s incredibly useful. It holds the two metal plates together but still allows your torch in so you can work productively.
This especially applies when you’re performing a tee joint with this technique.
Read next: Yes, You can weld with a Blowtorch! – Here´s how!
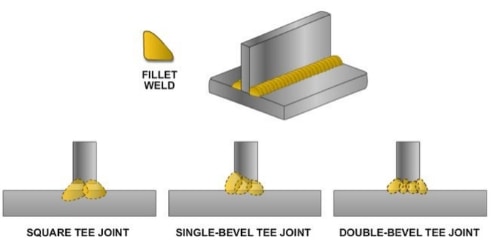
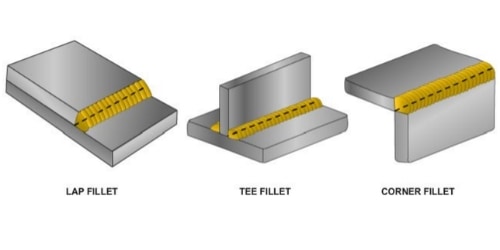
Fillet Weld
Fillet weld tee joints are used mainly in buildings and bridgework. Normally, they include plate girders, stiffener, endplates, and bracing connections.
Since they’re the most common style (in arc-welding) used when performing a tee joint, you may have done his hundreds of times without even knowing.
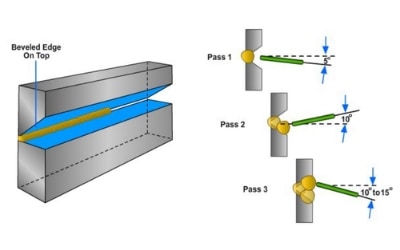
Bevel Groove Weld
This can be created when attempting a tee joint fairly easily. But why would you bother with a bevel groove weld? Isn’t that just more work?
In a sense, yes. However, the bevel groove style ensures the tee joint is incredibly strong.
So, How Does It Work?
The vertical plate (i.e. the “stem” of the “T” shape) will be bevelled either on the right side or the left side. If you do it correctly, you should see a diagonally ascending gap from the base plate to the vertical plate.
This allows the join to be amazingly durable and less likely to crack under pressure.
Flare Bevel Groove Weld
Flare bevel groove weld tends to be used when you’re trying to create a corner joint (which we’re going to talk about later). Having said that, they are used for tee joints too — particularly when you are attaching a round bar to a flat base plate.
So, How Does It Work?
When you place the round bar onto your base plate, you will see that there are definite gaps between the two materials.
In basic terms, performing a flare bevel groove weld means filling in these two gaps. Why? To strongly adhere the two pieces together.
J-Groove Weld
Do you remember earlier when we discussed bevel groove welds? Well, the J-groove weld is incredibly similar.
So, How Does It Work?
As you will have done with the bevel groove weld, the vertical piece will be the one that is shaped. In this case, the aforementioned shaping should be curved.
Remember that when you’re doing bevel groove welds, the bevel is a straight, diagonal line. However, J-grooves require a curve near the end of the otherwise straight diagonal line.
Then, you have to fill in the somewhat oddly shaped diagonal gap.
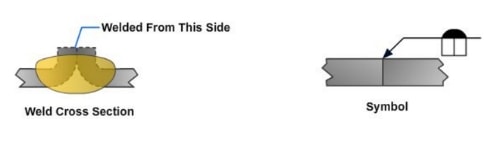
Melt-Through Weld
This style of welding visibly strengthens the root of a welded joint (in this case, a tee joint). Here, the weld metal needs to go through beyond the back plate and be welded from the underside too.
So, How Does It Work?
When you’re performing this method on a tee joint, you will weld through the back so the metal melts through into the vertical plate.
Slot Weld
For slot welds in tee joints, the base plate is the area that is manipulated. It will have a cutout section that is fractionally bigger than the vertical plate.
So, How Does It Work?
Once the base plate is prepared, you will slot the vertical plate into it.
Then, you fill the gaps in similarly to how a plug weld is formed. However, you won’t always have to fill it up completely — this is worked out on a project-by-project basis.
Okay, are you ready to tackle the second type of welding joint now? Fantastic! Let’s crack on then.
How many basic types of joints are there in welding? How do you Weld a Joint? >> Check out the video below:
2. Edge Joint Welding
Edge joints are usually used when two pieces of sheet metal have flanging edges. Other applications tend to be in places where a weld is the only way to attach pieces that are next to each other.
Typically, the metal parts will be side-by-side and then welded on the same edge.
It’s not a very strong joint because the weld metal doesn’t go through the entire joint.
When Would You Use an Edge Joint?
Because of the aforementioned weakness, edge joints are only used in mufflers or for joining thin pieces of sheet metal.
You can add filler metal to increase the strength but there are other joints to use when you need super-strong joints.
There are 7 welding styles you can use to create an edge joint. Specifically:
- Bevel groove weld
- Square groove weld
- J-groove weld
- V-groove weld
- Edge flange weld
- U-groove weld
- Corner-flange weld
We have already discussed the bevel groove and J-groove welding styles in the tee joint section. So, we’ll briefly touch on the others now.
Square Groove Weld
The square groove weld is simple. Plus, it provides extra strength (but this isn’t really noticed when used as an edge joint).
There isn’t any spacing between the pieces here and is more commonly used when you’re doing gas or arc welding.
Of course, you can play around with the thickness of the weld. But, if you’re looking for a pretty seamless edge, you can’t go too far with this.
V-Groove Weld
If both edges of your piece are bevelled on each side, then you will have to perform a V-groove weld.
What do we mean?
When your material is standing on its base, does it look like a house with a pointy roof? Yes? Then when you place the tip of the “roof” onto the second’s piece roof tip, the only way to join them is by doing a V-groove weld.
Here, you’ll need to fill in the top and the bottom to secure the pieces.
Edge Flange Weld
If both the metal pieces you are planning to edge join are flanged, then an edge flange weld will be your new best friend.
Simply place the two straight edges together (with the flanges flaring out on either side) and weld the join.
That was easy, wasn’t it?
U-Groove Weld
Think back to the V-groove. You had pieces with pointy roofs, right? Well, imagine the diagonal sides were dented inwards and, when the two pieces are put together, semi-circles are formed. This is a U-groove.
Similarly to the aforementioned V-groove, you’ll need to weld the top and the bottom to secure it.
Corner-Flange Weld
A corner-flange weld must be used when one piece is a rectangle (i.e. no edges that flange) and one with a flanged edge.
Here, you would connect the straight side of the flange piece to the flat metal so the tops are aligned. Then, you’ll weld the corners to secure the two sheets.
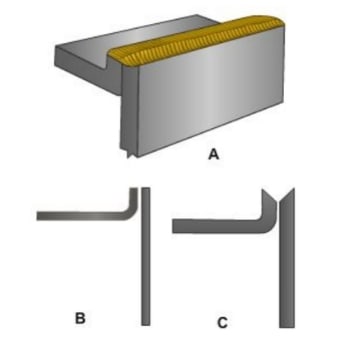
3. Corner Joint Welding
The sheet metal sector loves this type of joint.
It is used when welding on the outside of the adjoining metal pieces. If you have placed the pieces correctly (at right angles), the finished item will create an L shape.
When Would You Use a Corner Joint?
Usually, this type of joint is used when making rectangular frames or building boxes.
The following 9 styles can be used for corner joint welding:
- Fillet weld
- Edge weld
- Spot weld
- Corner-flange weld
- Square groove weld
- V-groove weld
- U-groove weld
- J-groove weld
- Bevel-groove weld
We’ve already looked at all of these so take a gander at our previous conversation if you need a refresher.
4. Lap Joint Welding
If you need to join two pieces of metal that are different thicknesses, a lap joint is the one for you. As you may have gathered by the name, the metal parts are overlapped to create the lap joint.

You can choose whether to weld on one side or both, depending on how strong you need the join to be.
When Would You Use a Lap Joint?
This type of weld joint is usually used in the following applications:
- Temporary frame making
- Cabinet making (for creating the frame)
- Table making
- And similar endeavours
You can use any of the following 6 styles to make a lap joint:
- Spot weld
- Bevel groove weld
- J-groove weld
- Flare bevel groove weld
- Plug weld
- Slot weld
Yep, we’ve covered all of these! You can find everything you need to know in the tee joint or edge joint section.
5. Butt Joint Welding
For a butt joint welding, two pieces will be sat next to each other in a parallel position. It’s the most recognized form of welding for many domestic and industrial applications.
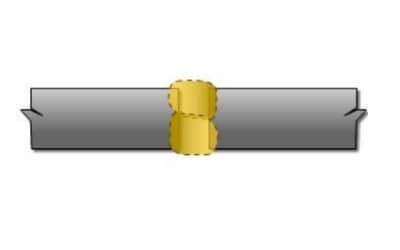
When Would You Use a Butt Joint?
Generally, this kind of welded joint is used when joining flanges, valves, certain equipment, pipes, tubes, and other fittings.
There are 7 styles to pick from when it comes to making butt joints. Have a look below:
- Bevel groove weld
- J-groove weld
- U-groove weld
- V-groove weld
- Square groove weld
- Flare V-groove weld
- Flare bevel groove weld
We’ll briefly look at the flare V-groove weld as we haven’t yet discussed this.
Flare V-Groove Weld
This is just a flare bevel groove weld but when both the pieces are cylindrical. Here, the pieces are placed lengthways on top of each other and you’ll weld on both sides to strengthen the join.
I recently wrote an article about the 4 main welding positions, have a look at it.
How Do I Test Different Types of Welding Joints?
At times, you may well want to test the durability and strength of your welding joints. This may be more prominent in industries like automobile manufacturing but this isn’t always the case. Making sure you produce a high-quality item isn’t restricted to certain sectors.
Related reading: Physical Weld Testing – Ultimate Guide: Destructive & Non-destructive
There are many ways to test welding joints; some are easier than others. Since we don’t want to bore you, we’re going to be talking about just 4 of the main one’s today.
Let’s get into the details.
Bend Tests
This is the most popular test and it’s used to test the skill and integrity of you, the welder. To tell you the truth, it’s common because it is quick and simple to do. No advanced tools are needed so basically any welder can perform a bend test.
What’s the theory behind it? Well, it works on the philosophy that a welded joint should withstand a specific amount of pressure before it breaks or cracks.
There are various versions of bend tests: the guided bend test, back bend, and the free bend. We’ll take a look at each of these in turn.
Guided Bend Test
This version is used to test the quality of the root and face of the welded joint. Typically, your piece will be bent to 180 degrees.
Depending on whether you’re examining the face or root, the piece will be held at different points.
You will need a jig to perform a guided bend test properly.
Back Bend Test
The back bend test option determines the quality of the metal used and the penetration degree into the butt joint.
The items used are akin to those of the free test which you can find below if you’re not familiar with everything included there.
Your piece will have to be bent exactly 90 degrees without breaking for it to pass this requirement. However, you won’t see many folks performing this as it has been outdone by the guided bend test.
Free Bend Test
This type of bend test has been invented to examine the ductility of the metal in a welded joint.
To do it correctly, you will need to hold and bend your piece at certain intervals. The ends will be bent approximately 30 degrees, a third of the way into the middle. This ensures that all the bends happen inside the weld.
You will then place your piece into a specialised machine which will place lots of compressive force onto it. It won’t stop until cracks appear. That’s when you know how ductile your welded joint is.
Nick Break Tests
To do a nick break test, you will need to break the welded joint and take a look at the pieces that fractured. What could you possibly gain from this, we hear you ask? Well, you can establish how many gas pockets are there, porosity, and the fusion degree.
You should place your piece between two support systems which then apply pressure. After that, you need a hammer to give it a short, sharp hit. Undoubtedly, this will fracture your piece. All that’s left to do after that is to examine the parts for defects.
Related reading: 11 Common Welding Defects and How to Prevent Them
Acid Etch Tests
This kind of test helps you to figure out the soundness of your weld.
Firstly, you will have to slice a cross-section out of the joint. That cut part will be put into an etching solution.
By “etching solution” we mean iodine, potassium iodide, or nitric acid.
The solution will eventually react with the metal to show you where the piece’s flaws lie. Also, it will allow you to see where the boundary between the base and weld metal is placed.
Nondestructive Weld Tests
So far, every test we’ve looked at has been destructive. In other words, your piece is broken by the end of the examination. However, this final one ensures your specimen stays intact after the fact.
This will simply test the integrity of the material you have used.
Unfortunately, it’s a very technical, advanced type of testing that requires extremely specialist equipment. Methods of this include radiography, visual tests, liquid penetration inspection, magnetic particle testing, and much more.
Frequently Asked Questions
Here are a few common questions people often have about weld joint types:
Are Welding Joints Permanent?
Are welding joints permanent? Yes, when you make a welding joint, it will be there permanently.
Since the metals are melted at such a high temperature, filled to create a weld pool, and then cooled, there’s almost no way to break the connection.
Although, you should note that the joint is going to be far less durable than the in-tact pieces connected to it. Does this make sense? Excellent!
What Are The Strongest Welding Joint?
What are the strongest welding joints? professional welders will tell that tee joint or corner joints are the strongest because of a proper penetration while using an arc welder.
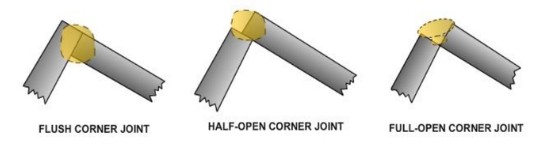
However, it all depends on the materials really but we’re going to assume you’re using some pretty heavy-duty material. So, if that is the case, you will want to use an open weld corner joint.
Here, an L-shape will be achieved by placing the pieces next to each other, allowing a small gap in between. The weld is used to fill in the corner and the gap.
What Is The Hardest Metal To Weld?
Specially for beginners, aluminum is considered the hardest metal to weld.
It is very difficult to determine the melting temperature of aluminum because it is mixed with many other metals.
For more info, how to weld aluminum, read this article.
If you are interested in welding gear or tools, then just follow the link to our recommendation page where you can see all welding accessories we love and use (NO CRAP)
The Bottom Line
Welding can be a complicated activity if you let all this information overwhelm you. But it doesn’t have to be that way! Keep coming back here when you need a refresher. We’re always happy to help you with any queries on five basic weld joints and lots more.
Safe and happy welding everyone!
References
https://en.wikipedia.org/wiki/Welding_joint#Square_butt_joints
https://www.weldersuniverse.com/welding_joints.html
https://www.steelconstruction.info/Welding
https://www.thefabricator.com/glossary/guided-bend-test
https://www.mig-welding.co.uk/plug-weld.htm
Welding Joints: Joining Angle Iron at 90 Degrees using an easy Cope Joint >> Check out the video below: