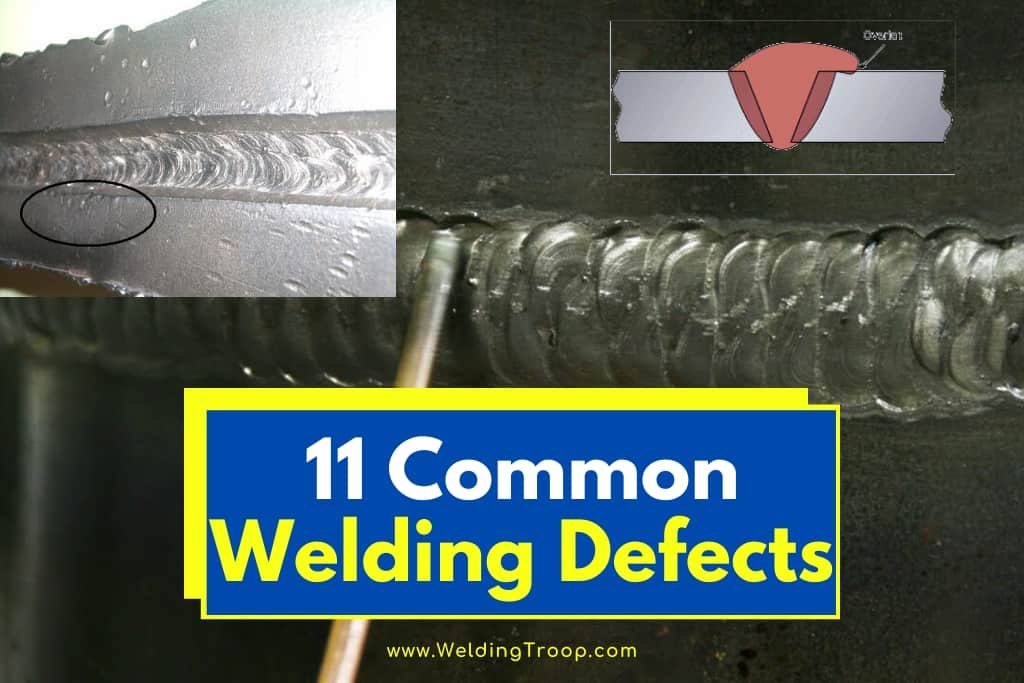
Those who are experts at welding make it look easy. Welding does come with quite the learning curve. As you may have already found out, there are many defects that arise during the welding process.
What are the common welding defects? We have identified 11 common welding defects:
- Porosity
- Inclusions
- Undercutting
- Poor Joint Penetration
- Burn-Through
- Overlap
- Craters
- Spatter
- Incomplete Fusion
- Arc Strike Discontinuities
- Excessive Reinforcement
Fortunately, all of these defects are simple to prevent from occurring if you follow the guidelines presented in this article. A major key to avoiding defects in welding is selecting the right equipment. Hopefully, this article can help point you in the right direction for welding equipment selection.
Table of Contents
Discontinuities vs. Defects
The term “discontinuities” and the term “defect” are not to be confused when welding. All defects are discontinuities, but not all discontinuities are defects. A discontinuity is a disruption in the weld bead that may not necessarily compromise the structural integrity of the weld.
Welding codes do provide a little room for error, as long as the integrity of the weld is not being compromised. However, discontinuities certainly have the potential to become defects. At the very least, it is important to understand how discontinuities can escalate into defects. Most welding defects are easily preventable. You will find the many of them can be prevented if the operator follows the right technique.
Related reading: The 8 Strongest Types of Welds
1. Porosity
Porosity is marked by the occurrence of gas bubbles within the weld. The bubbles arise when gases enter the weld pool. These bubbles are permanent and cannot be effectively removed when the weld pool has cooled down. Porosity goes beyond being just an aesthetic issue.
Excessive porosity weakens the weld, even to the extent that the welded joint may collapse. Construction codes take porosity seriously, as should local fabrication shops. The hollow bubbles compromise the strength of the weld bead. Fortunately, there are a host of simple preventive measures that can be taken to prevent excessive porosity from occurring.
How Do You Prevent Excessive Porosity in Welding?
Efforts to prevent excessive porosity begin with keeping everything clean. A leading cause of porosity is contamination, whether it is from the surrounding air at the weld site or the surface of the base metal. The first step to preventing porosity is controlling the flow of air within your shop or project area.
Drafty shop or project area conditions will, unfortunately, provide a steady supply of air to the weld zone. This can be the result of an open door, wind, and weather conditions or air being emitted from machinery. Be mindful of airflow when you are picking a spot for your welding equipment. You certainly want ventilation to carry away welding fumes, but you do not need an unregulated supply of air bubbles.
Before you continue reading, here is an article we wrote about the Purpose Does Flux Serve in Welding Aluminum?
It is also critical that you clean the base metal before starting the welding process. Impurities in the base metal can contribute to excess porosity and cracking in the metal. Possible impurities in base metals include dirt, debris, dust, grease, and rust.
Cleaning the base weld can involve the use of a stiff brush and an angle grinder. You will need to use an angle grinder to grind off the galvanizing layer of a galvanized steel piece in order to prevent issues that may arise due to excess porosity in the weld. Not only that, but galvanizing layers release a lot of fumes when they are welded. These fumes are not necessarily toxic in the long term, but they can cause flu-like symptoms for several days.
The way that you strike the arc is an additional risk factor for excess porosity in the weld. If the arc you strike is too long, then porosity will begin to become a problem. There are two ways to strike an arc in stick (SMAW) welding:
- You either perform a quick strike or scrape along the base metal
- Or you do a quick singular (vertical) strike
Regardless of the striking method used, one of the keys to preventing excess porosity in the weld is to not let the striking arc become too long.
That is why it is so important to take whatever means necessary to reduce porosity in your welds. These ten tips can help you do just that, welding more strongly and smartly in the process.
Here are 10 effective ways to avoid weld porosity:
1. A Bad Angle
One of the most surprising things for new welders is often what a big difference a slight tweak to your angle of attack while welding can make. You want to make sure that the tip of your welder is kept at a 15-degree angle relative to the metal that you are welding. This angle allows for optimum interaction between the welding arc and the metal in many cases. Welding at a “bad angle” can thus cause inadequate welds to form, which may in turn be poor as well as porous.
2. Keeping Things Clean
There is no denying that welding can be a bit of a messy habit. It’s a sweaty, spark-inducing, metal-melting hobby and it can produce quite a mess. That said, some approaches to welding can be messier than others, and the more you can keep that mess under control, the better.
That is due in no small part to the fact that messiness is yet another thing that can increase the chances of porous weld.
That said, the cleanliness of the surface itself can also make a big difference in this regard. Welding with dirty surfaces can cause particulates to get into the welded metal, which in turn is yet one more cause of that dreaded porosity. You thus want to clean the surface on which you will be working beforehand. Investing in a few wipes and wiping down the surface beforehand can save you a lot of pain and porous heartache afterward.
You also want to make sure that your welding tools are similarly clean at the time of welding.
3. Problems with Your MIG Hose
Without question, your MIG hose is one of the most important components to the entire welding process. If things go wrong here, you can bet that they’ll go wrong with the weld itself and that’s certainly true when it comes to pinched hoses. If your hose has been pinched at a certain point, it can produce an unequal welding stream, which in turn can increase the chances of porosity occurring.
It is therefore important to make sure that your hose is not pinched or in any way impeded during the welding process.
Related reading: When Welding, What Color is the Oxygen Hose?
4. Gas Flow
The same holds true for your gas flow. If your hose is pinched or other aspects of your welding tools are impeded, it can lead to interruptions in the gas flow, which in turn can cause poorer welds that are porous in nature. Needless to say, if you run out of gas during the welding process, you’re in big trouble.
This isn’t the only gas-related thing that can cause porosity, however. You also need to take care to keep track of your gas shield and the flow of gas therefrom. Of particular importance is the power of the gas flow. The more powerful the gas flow is, the greater the chances that it may become unstable, which in turn can lead to all manner of contaminants mingling with the weld puddle. This causes welding impurities, which in turn cause porosity.
You obviously want to avoid all of that so it is therefore of the utmost importance to make sure that you are using the right flow rate for every type of weld and each application. If you are uncertain what the proper flow rate is for the job in question, check with the provider of your welding machine.
Related reading: Can You Weld Aluminum Without Gas? Is It Possible?
5. The State of Your Equipment
This should go without saying, but you naturally want to make sure that you are never welding with poor equipment. There are many reasons for this, not the least of which being the potential hazard to your health. Welding means working with incredibly hot materials so it is of the utmost importance that the materials handling all of that are up to the task. The tiniest scratch, crack, or other imperfection can lead to calamitous mishaps.
What’s more, it can also cause poor and porous welding, which is why you’ll want to make sure to check the integrity of your tips, hoses, and other aspects of your welding equipment before beginning a project. In addition to tips, you’ll also want to make sure that the wiring has not become frayed and that the feed tension is not lacking.
6. The Distance of the Gun From the Workpiece
Just as the angle at which you weld can have a profound impact on the quality of the welding, so too can the distance at which you hold the gun from your workpiece. Your MIG welding gun should be somewhere between 1/4″ and 1/2” away from the surface, with 3/4″ away being the maximum allowable distance while still expecting a quality weld in most cases. If you are an inch away or more, chances are that you are doing something incorrectly, which will lead to porous brittle welds.
7. Clogging Problems
Obviously, when you are working with a welding gun, a clog is the last thing you want to have to deal with. Not only is it absolutely no fun to have to try and unclog the gun itself but the instability that clogs can introduce into the welding process are yet one more way that porosity can be caused. Clogs can also lead to splattering, which can lead to still more problems.
In the event that you have a clog in your MIG hose, tip, or elsewhere down the line, you need to stop everything and clear it out. Make sure that in doing so, you do not introduce any of the pinching or damage mentioned in previous categories.
8. Broken Regulators
Your MIG welding regular is a vital piece of equipment. It helps make sure that everything is kept at the appropriate temperature and pressure level. When dealing with temperatures and pressure this high as well as welding materials as sensitive as you may be working with, you need to make sure that everything is handled with the utmost precision and this means making sure that your regulators are in good working condition.
As such, it should come as no surprise that broken regulators are yet another issue that lands on our list of ways to cause porous welds. When you do not track the quality of the weld accurately via regulation, all manner of porosity-causing impurities can get into the mix, to say nothing of the problems created by too much or too little pressure.
A good, quick way to check the regulator is to return to the inch-away distance limit mentioned above. With a safe pressure setting selected, hold your hand an inch away, pull the trigger, and see if the nozzle emits a properly regulated stream of air. If not, you have an issue.
9. Maintaining Positive Workspace Conditions
This is where the magic happens, so you need to make sure that everything is kept in good condition in your workshop. This means that the temperature should be neither too hot nor too cold. It also means that you should not have any outside wind sources blowing into the area as this may disrupt the flow emitted by your nozzle.
10. High-Quality Materials
Last but not least, there is the quality of the materials themselves. While it is true that great artists can make art from the tools at their disposal, a lack thereof can also hamper the effort. What’s more, degraded materials or surroundings can lead to problems with even the finest art: The Last Supper by Leonardo da Vinci has suffered degradation over the centuries due to humidity and the condition of the paint.
You thus want to make sure that you are using the highest-quality welding materials possible. Screen them beforehand to detect any impurities or porosity.
When done properly, welding can produce incredibly strong joints, sculptures, and other features that can last for years. That said, all it takes is a little porosity to undermine the quality of your welding and cause fatal damage to it. Thankfully, by following these basic precautions, you can prevent many of the most common causes of porosity and ensure the integrity and viability of your weld.
Related reading: Do welders Really need their Own equipment? – Equipment List
2. Inclusions
Inclusions happen when nonmetallic materials such as slag and oxides become trapped between the base metal and the weld, the different beads of a weld, or in the weld metal itself. Inclusions can lead to the weakening of the weld, even to the point of failure.
Keeping the base metal clean is the best way to prevent inclusions. Not every piece of metal that you are about to weld will be clean. In fact, many pieces will require some degree of preparation prior to welding. The degree of preparation required will largely depend upon the welding technique and application.
Impurities that will often need to be cleaned include:
- Heavy Mill Scale
- Rust
- Corrosion
- Preexisting slags from previous welds
3. Undercutting
Undercutting in welding involves the occurrence of a groove at the toe of a weld (the point at which the base metal meets the face of the weld). This occurs when the digging arc of the electrode leaves a pit in the base metal that will not be fully filled with the appropriate filler material.
Risk factors for undercutting include:
- An arc length that is too long
- Incorrect weld angle
- A travel speed that is too fast or too slow
- Operating with too much current
- The maximum width of the weave
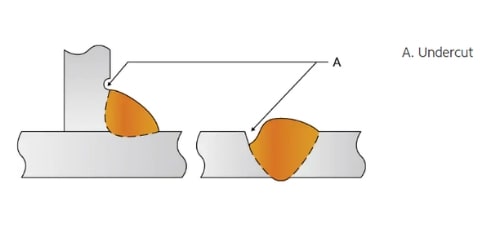
Holding the electrode/welding rod too far from the weld pool will often lead to the occurrence of undercutting. The recommended arc length will depend upon the welding technique utilized. As an example, the arc length should be roughly equivalent to the diameter of the metal portion of an electrode in SMAW (stick) welding.
Related reading: How to Prevent Undercut in Stick Welding: 12 Golden Tips
Never Weld Out of Balance
Avoid welding defects by making sure that you are in a position that is comfortable and balanced while you are working. Welding out of balance is a safety hazard and will most certainly contribute to the welding defects described here. Fortunately, there exist many pieces of equipment that will help you keep your workpiece balanced.
Begin by selecting a welding table that will make your life much easier. The Eastwood Adjustable Welding Table has adjustable legs, three different slots for clamps, and a 14 gauge steel tabletop that can be fixed in 3 different angled positions. It is also one of the more affordable adjustable welding tables on the market. Whichever adjustable welding table you decide to go with will be a worthwhile investment, you will save yourself a lot of headaches in the end.
There are a number of welding clamps on the market, often necessary for you to secure the workpiece. Take, for example, the Strong Hand Tools Light Duty Utility Clamp. Tools like these are instrumental in ensuring that your workpiece does not shift during the welding process.
4. Poor Joint Penetration
Another common defect that is easily preventable is poor joint penetration or the lack of joint penetration. This defect occurs when the arc from the welding rod is not able to dig deep enough to lay down a weld that is of the required thickness. Welds with this defect will fail and fall apart, oftentimes immediately.
This defect is often the result of improper welding equipment selection, as is the case with many welding defects. Poor joint penetration can also often be traced back to not using the right techniques. Success in welding is the result of being able to make adjustments to your approach based on site-specific conditions.
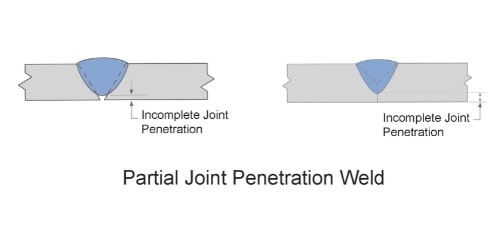
Let’s say that a piece with a bunch of rust or mill scale came into your shop. You obviously would not want to use the same materials and techniques that you would for a clean steel plate. You would want to select equipment that is known for being able to work well with dirty or rusty metals, such as MIG welding.
The digging capabilities of the arc are impacted by the direction and speed of travel of the welding rod. Incorrect placement of the weld bead is a common issue for operators, particularly beginners who may not be able to always adjust accordingly to conditions specific to their workpiece.
Before you continue reading, here is an article we wrote about the topic: Do You Push or Pull when Stick Welding? | Which is Right?
Make Sure That You Can See What You Are Doing
A good first step towards avoiding misplaced weld beads is being able to make sure that you can actually see what you are doing. I remember being shocked at realizing how bad my eyesight actually was the first time I put on a pair of glasses. In the same way, you may not even realize how much better you would be able to see the workpiece if you got yourself a better welding helmet.
Auto-darkening welding helmets, such as this one for MIG/TIG/MAG welding, will vastly improve your ability to see your workpiece over welding helmets that have a lens of a fixed shade. Some advanced welding helmets are actually solar-powered and have enhanced viewing slots, such as is the case with this auto-darkening welding helmet.
Related reading: How To Choose A Welding Helmet: What To Consider
Welding with The Wrong Current
Incomplete penetration can also be the result of welding with the wrong amperage setting. Consistent success in welding requires a knowledge of the right current settings for the job at hand. The electrical circuit in a welder has a positive and negative pole. Polarity has a significant impact on the digging ability of the welding rod.
Welders operate using either alternating current (AC) or direct current (DC). If alternating current is being supplied to the welding electrode, then the equipment will be moving between both the positive and negative poles, hence the term “alternating.” However, in direct current, the welder is only supplying the electrode with the current of either positive or negative polarity.
You will often hear the terms “straight” and “reverse” polarity in welding applications:
- Straight polarity: electrode-negative polarity
- Reverse Polarity: electrode-positive polarity
Using reverse polarity will result in deeper penetration while using straight polarity will lead to the quicker deposition of filler materials and faster melt-off. Neither polarity is more advantageous than the other, but you will need to be aware of which polarity you are set at since differing applications will call for differing polarity settings.
The penetrating depth of the electrode in arc welders with constant current output is largely influenced by the current settings on the welder, measured in “amps,” or amperage. As welding current increases in amps, the penetration also increases.
In welders using constant voltage, the current is actually influenced by the wire feed speed. One type of constant voltage welding is GMAW (also known as MIG) welding. If you are welding with a constant voltage welder, you will change the current by adjusting the wire feed speed.
If you are having issues with the digging ability of the welding rod, you may want to consider adjusting the current or wire feed speed on the welder. You may also consider welding rod selection. For example, in stick welding, the E6010 and E6011 are known for having deeply digging arcs.
Related reading: What’s The Difference Between AC And DC Welding >> AC vs. DC
5. Burn-Through
Burn-through occurs when the weld metal/filler material completely penetrates through the weld metal. This defect is of particular concern when welding materials less than ⅛ inch in thickness, roughly equivalent to 12-gauge. Prevent burn-through by controlling heat exposure in the weld.
If you are welding from a vertical position, then it is recommended that you start from the top of the weld site and work your way down (Vertical Down). This method is especially effective when welding thin materials using a GMAW (MIG) welder. The vertical down position is such an effective way to weld thin materials that some operators will even choose it over the flat position, even in situations in which they would be able to weld from the flat position.
Lowering both the voltage and the wire feed speed will also help prevent burn-through. If the voltage and wire feed speed are too high, then the heat exposure to the weld site will likely be too much. You will need to be mindful of this when welding thin materials. Special attention is required when welding aluminum, which is amongst the most vulnerable of materials when it comes to burn-through.
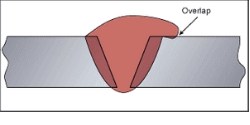
6. Overlap
Overlap occurs when the face of the weld extends past the toe of the weld. The filler material is unable to fuse to the base material as it flows over the extent of the weld joint and then cools down.
The best preventative measure against the overlap welding defect is to ensure proper welding technique. Overlap can be prevented if the operator is holding the welding rod at the correct angle and traveling at a moderate speed. Welding too slowly can cause overlap to occur.
7. Craters
Craters are a common welding defect that occurs during the welding of aluminum. They form at the end of the weld bead. If craters are not taken care of, then they will lead to the creation of stress points that will eventually cause cracking to occur within the weld.
Correctly terminating the weld bead will prevent craters from occurring. Craters typically occur when the welding process is stopped before a pass is completed. According to Fabricating & Metalworking, you can also prevent craters from appearing by making sure that you are filling in the areas between tack welds and the weld bead.
Even if craters do occur, they are generally repairable in the event that there are no cracks in the weld bead. Just simply fill in the crater after starting an arc strike from a point just beyond the crater(s) and working back over the crater.
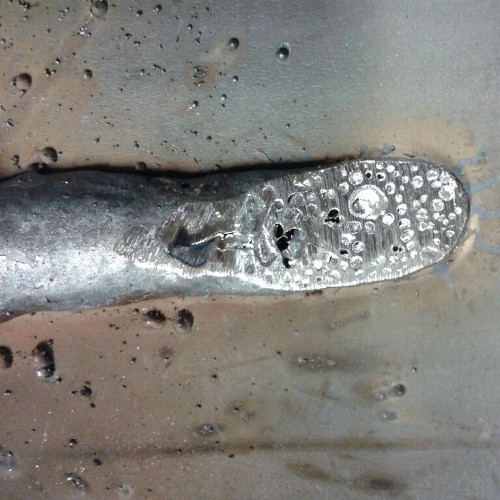
8. Spatter
Spatter is defined as droplets of weld metal that are expelled from the molten weld pool. These droplets then cool and solidly along the sides of the weld bead. Spatter is primarily an aesthetic issue. Excess spatter can lead to other problems, though, as the vigorous cleaning efforts to remove the spatter can actually compromise the integrity of the workpiece.
Potential sources of excess spatter include wire feed speed, a voltage that is too high and incorrect polarity choice. Another potential source of excess spatter can be a result of poor shielding gas coverage or selection at the weld site.
Spatter can often be an issue in GMAW (MIG) welding. Preventing excess spatter in GMAW welding begins with the selection of the shielding gas for the welding process. Shielding gases contain some mixture of Argon and Carbon Dioxide. In some cases, pure Carbon Dioxide is used. Using more Argon in the shielding gas mixture will result in less spatter during the welding of steel.
The removal of spatter is important to the aesthetics and integrity of the weld. There are many tools that can be used to safely remove slag from the weld piece:
Removing spatter may take some time and effort. Some welding applications naturally produce more spatter. For example, flux core welding with a shielding gas is known for being a welding process that can produce a lot of spatter, depending upon the specific equipment and settings being utilized. TIG (Tungsten Inert Gas) Welding, on the other hand, is well known for being a welding process that does not produce spatter.
Related reading: The Problem with Weld Spatter – and How to Stop It
9. Incomplete Fusion
Fusion in welding refers to the joining of two or more separate pieces of metal into one continuous piece. In other words, this is the general purpose of the welding process. Failure to undergo complete fusion can be the result of two different types of deficiencies.
Incomplete fusion manifests itself in one of the following forms:
- Interpass Cold Pass:
- The filler metal is unable to fuse adequately to a layer of weld metal that was previously deposited
- Lack of sidewall fusion:
- The weld metal is unable to adequately fuse to the joint face
There are many steps that should be taken to ensure that fusion between two or more pieces of metal is complete. Be sure to always clean slag after performing a weld. Leaving slag can contribute to structural discontinuities like incomplete fusion.
Like many other welding deformities listed here, incomplete fusion is commonly a result of improper technique. Improper travel speed and welding angle will impede your ability to fully fuse separate pieces of metal together. It is also of utmost importance that you select the right welding process for the given application.
One example of selecting the wrong welding process would be using GMAW (MIG) welding to try to weld together pieces of thick metals. The strength of the MIG welding process is its ability to weld together a large variety of thinner metals. However, if you use the same techniques to weld thicker metals, then you are destined to run into issues with incomplete fusion.
Related reading: 9 Different Types of Welding Processes & Their Advantages
10. Localized Discontinuities from Arc Strike
Sometimes welding operators will run into a defect in which they will start their arc strike in an area other than the weld joint. This causes local discontinuities to occur in the area of the arc strike area. This can eventually lead to cracking and harmful fatigue failure in the weld bead.
Even if you are extra careful about the way you strike the arc, you may still run into issues related to improper arc strike locations. The arc strike issues may be a result of the improper grounding of the workpiece. Properly grounding your welding equipment will help keep you safe and will ensure that equipment performs as expected.
How to Ground Your Workpiece
The majority of welding machines are grounded through electrical connections through a third grounding wire. Take, for example, the instructions from the owner’s manual for the Forney Easy Weld Welder. The welder comes with an attached ground clamp, as most welders do.
Attach the ground clamp to clean, bare metal. Make sure that it is in a location that will remain dry. The location should also be free of any clutter. The metal being clamped onto should not contain any rust, paint or other coatings.
If you encounter any issues, the solution may involve placing the grounding clamp on the workpiece. One such issue that may be encountered includes arc strike discontinuities. When it comes to properly grounding the workpiece, you are really just looking for a clean, bare piece of metal near the welder.
Related reading: Should Welding Tables Be Grounded?
What Do I Do If My Electrode Becomes Stuck?
Another common cause of arc strike is the reaction operators have to their electrode becoming stuck. The natural reaction for dealing with a welding electrode that has become stuck is to wiggle it back and forth and try to free it from the workpiece.
Panic is certainly not the ideal reaction to your electrode becoming stuck. If your electrode becomes stuck to the workpiece, the best solution will be to disconnect the electrode from the electrode holder. Then let the electrode cool off before safely removing it from the piece while wearing safety gloves.
Related reading: Do Welding Electrodes Have a Shelf Life?| Electrodes Expiry
11. Excessive Reinforcement
Excessive reinforcement is pretty simple to describe. It involves the deposition of too much filler material. There is not always a correlation between weld thickness and quality. Laying down too much filler material is a great way to ruin a workpiece. If you add too much filler material, you will likely have to grind out the weld and start out all over again.
The AWS (American Welding Society, in its D1.1 Structural Welding Code, states that weld reinforcement must be at least the thickness of the base metal and can be ⅛” inch above the base metal at the thickest. The welds you perform in your shop may not have to meet this stringent code, but it gives you a good idea of the range of weld thickness that is allowable without threatening the structural integrity of the workpiece.
Before you continue reading, here is an article we wrote about 5 Reasons Your Welds Keep Breaking – How To Fix
How to Inspect Welds
A good way to enhance your welding abilities is to gain a fuller understanding of what a quality weld looks like. There are many tools that will help you measure the weld. One of the most versatile tools for inspecting welds is the weld gauge.
Weld gauges include this fillet weld gauge and this weld reinforcement gauge. These tools can be used to measure many different types of welds. You can easily measure the weld reinforcement to get a good idea of what a quality weld looks like.
At the very least, it is recommended that every welding shop has a tape measure. A tape measure is a critical tool for being able to know to calculate how much of a weld you need to deposit, particularly if you are out in the field.
WELDING DEFECTS!! Porosity, Arc Strikes, Undercut >> Check out the video below
Here are some of my favorite tools & equipment´s
Thank you for reading this article. I hope it helps you find the most recent and accurate information for your welding project. Here are some tools that I use daily and hope you´ll also find helpful.
There are affiliate links, so if you do decide to use any of them, I´ll earn a small commission. But in all honesty, these are the exact tools that I use and recommend to everyone, even my own family. (NO CRAP)
To see all my of most up-to-date recommendations, check out this resource that I made for you!