As you probably already know, welding is the process of fusing two or more pieces together with heat. There are many types of welding that we talk about in the Frequently Asked Welding Questions section down below. But, to begin with, we’re going to talk about the 4 main welding positions as these affect lots of factors.
As a welder, you need to be aware of the following 4 main welding positions, this is especially important if you are planning to undertake a welding qualification test:
- Flat position
- Horizontal position
- Vertical position
- Overhead position
Table of Contents
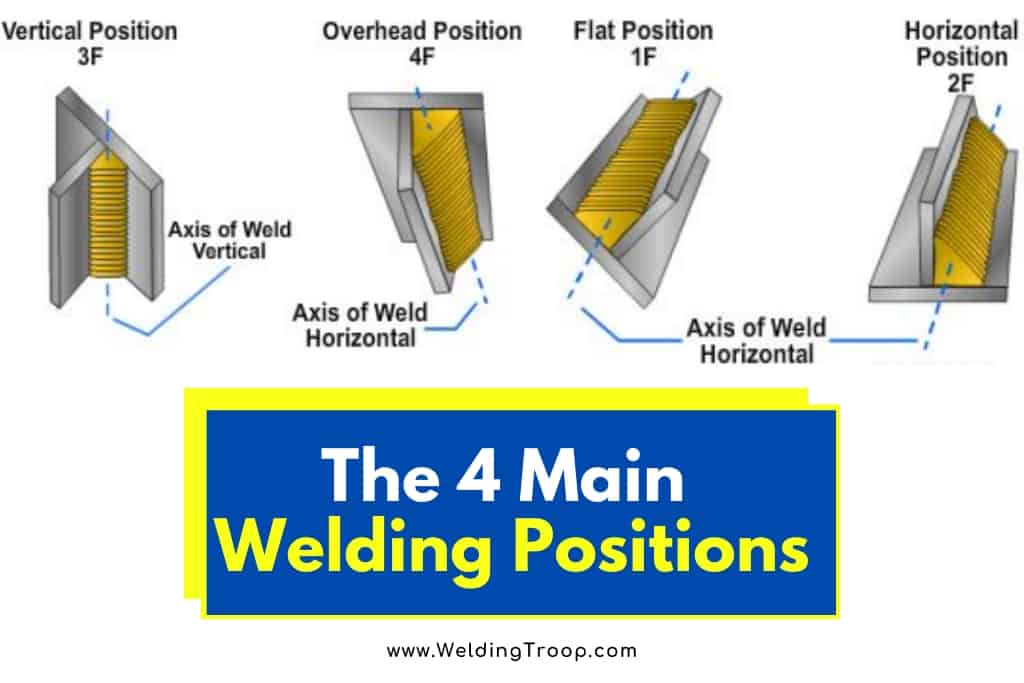
The 4 Main Welding Positions
The flow of the molten metal will change depending on the position you adopt. When it is flat, gravity pulls the molten metal down into the joining. This results in a quicker, and much easier welding process.
Horizontal welding is pretty tricky. Why? Because the melted metal flows down onto the base plate. You’ll definitely need to practice this one before a qualification test.
Vertical welding is achieved by aiming the torch at the bottom and working your way up to the top. You have to start from the top sometimes, but we’ll discuss that in more detail later.
The overhead welding position is by far the hardest one. The molten metal flows down due to gravity, so it’s significantly more difficult to control. Much like the horizontal position, you will need to practice a huge amount to achieve perfect quality welds.
Even though there is a lot to learn, you are lucky since you’ve stumbled upon us. We’re going to tell you everything you need to know about each of the welding positions we’ve just mentioned.
Let’s get into the specifics, shall we?
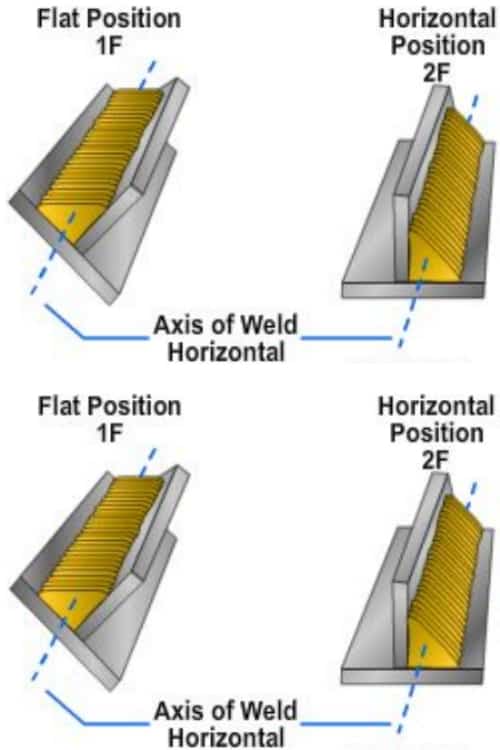
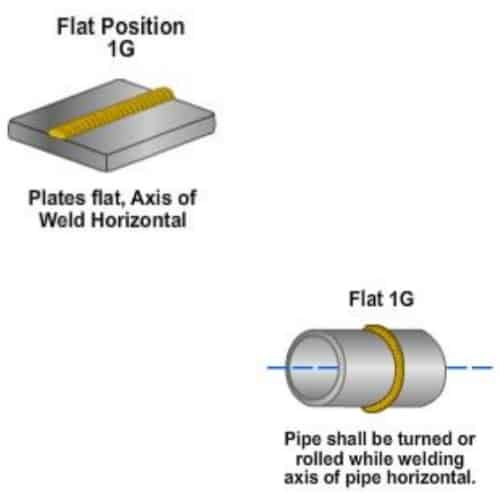
1. Flat Welding Position (1F or 1G Symbol)
Since the flat welding position is the easiest (like we mentioned above), we’re going to start here.
Some welders refer to this as the down hand position so don’t get confused by the change in terms. To do this correctly, you need to weld from the top joint area. This way, the molten metal is drawn down by gravity into the joint. Again, the result is a quick and easy weld.
You might be wondering, “what is with the 1F and 1G categories at the top?”. Well, let’s talk about it.
An architect’s blueprints use these codes (called welding symbols) to make it easier for you, the welder, to make the project. The number represents the position and the letter represents the type of weld.
I recently wrote an article about the “5 Types of Welding Joints and Their Use” – read this article.
Take a look at the following table for a clear view of what each specific number means.
| Number | Position | Variations | Variation Meaning |
|---|---|---|---|
| 1 | Flat | 1F | Fillet weld made in the flat position |
| 1G | Groove weld made in the flat position | ||
| 2 | Horizontal | 2F | Fillet weld made in the horizontal position |
| 2G | Groove weld made in the horizontal position | ||
| 3 | Vertical | 3F | Fillet weld made in the vertical position |
| 3G | Groove weld made in the vertical position | ||
| 4 | Overhead | 4F | Fillet weld made in the overhead position |
| 4G | Groove weld made in the overhead position |
So, as you can clearly see from the above table, 1F means a fillet weld made in the flat position and 1G means a groove weld made in the flat position.
If you are unfamiliar with types of welding joints, we have written a comprehensive guide on all the topics so you might want to read that before continuing with this one.
You would use the flat welding position if you are going to weld a flat piece placed on a workbench.
How to Read Welding Symbols >> Check out the video below
2. Horizontal Welding Position (2F or 2G Symbol)
When compared to the flat welding position, the horizontal welding position is trickier. You will need more skill than the average welder to do a horizontal weld really well.
It is categorized as an out of position welding movement.
As you can now infer, 2F is a horizontal fillet weld position. Here, you will be welding on the horizontal top side that is laying against an almost vertical surface. In doing this, you need to hold the torch at a 45-degree angle for best results.
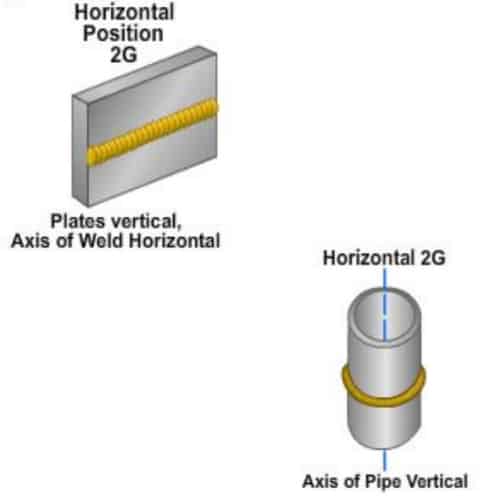
2G, on the other hand, is a horizontal groove weld position. You will put the weld axis in a horizontal plane. It doesn’t have to be exactly horizontal but approximately is good enough. The weld face should be in a vertical plane (or nearly vertical).
Typically, this position would be used when you’re welding on a wall from left to right (or right to left of course).
3. Vertical Welding Position (3F or 3G Symbol)
In this position, the weld and the plate lie vertically (at least approximately vertically). Here, the gravity draws the molten metal down which is why many novice welders experience pile up. But there is a way to ensure this doesn’t happen! You just have to use an upward or downhill position.
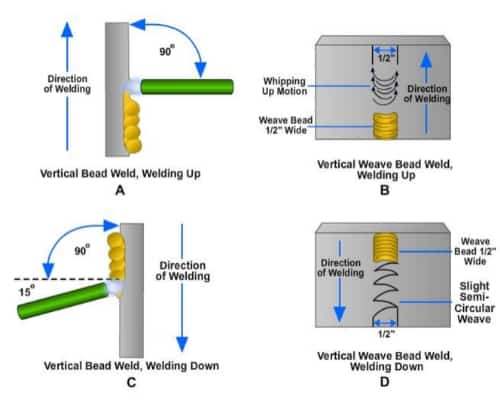
When you are in an upward vertical placement, the flame should be pointing in an up direction. To do this, simply hold the torch at a 45-degree angle from the plate. Thus, you can use metal lower down to work against gravity.
When you have no choice but to hold a downhill position, you will have to work with kinetic force from the arc, as well as the metal from higher parts.
Usually, this position is used when you’re welding onto a wall in an upwards or downwards process. There is a huge difference in welding up and welding down so typically, pro welders will refer to “vertical up” and “vertical down”.
4. Overhead Welding Position (4F or 4G Symbol)
We thought we would save the most complication position for last! Why is it so difficult? Well, you are working from the underside of the joint.
Since gravity has a bigger chance of taking control here, metal tends to drip onto the base plate. Don’t stress too much though, you can combat it. How? Ensure the molten metal puddle is as small as possible.
If the puddle increases drastically, immediately take the flame away. Hopefully, the metal will solidify and it won’t drop onto the base plate.
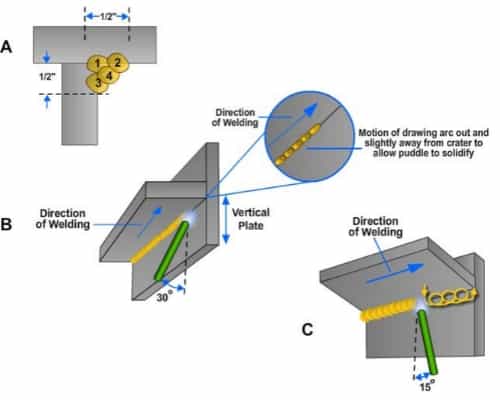
As long as you have enough filler metal in place, your puddle should remain an acceptable size. When done correctly and by experienced personnel, the metal won’t fall. The best advice we can give you is to melt both edges of the joint with your torch, this further supports the liquid metal.
Generally, you will use overhead welding when you’re working on a ceiling.
The positions we have just covered — flat, horizontal, vertical, and overhead — are the basic ones. But, they don’t include pipe welding positions. So, we are going to take a look at these now.
Pipe Welding Positions
Pipes are used in so many different situations, so the exact welding position you use will be figured out on a project-by-project basis.
Usually, the position in pipe welding tends to be fixed. However, there are exceptions to this rule. Sometimes, they can be rolled or flat too.
Anyway, without further ado, let’s get started.
Horizontal Pipe Rolled Weld
To do this correctly, there is a certain procedure to follow. Otherwise, you might get confused and mess up (resulting in the whole project failing). Don’t worry, we’re going to tell you how to do it.
Line the joint up and tack the weld to hold it in position. Alternatively, you can use steel bridge clamps to keep the piece secure while you work. Just bear in mind that you’ll need to mount the pie on rollers before you stick the piece in a clamp.

Then, you will start welding a third of the way around the first quarter of the pipe’s circumference. You should weld upwards to the “north-east” point. Once you have reached that position, rotate the pipe in a clockwise direction until the weld’s stopping point is back at the starting position. Again, you will need to weld upwards to the north-east point.
One thing to note here is that you need to make sure that the torch is held between the two points we mentioned above. The pipe should be the only element that is rotated.
The position of the torch here is pretty similar to a vertical weld. However, when you approach the north-east point, the weld will symbolize a flat position (almost). So, you’ll need to adjust the rod and torch to effectively adapt to the change.
Our advice is to ensure you stop just before you come back to the starting point. This allows you to reheat the starting point so everything is an equal temperature. Then, a seamless attachment will be formed.
Horizontal Pipe Fixed Position Weld
Unsurprisingly, horizontal pip fixed position welding is similar to the above except the pipe does not rotate.
So, we will have a look at how to do this effectively. Ready? We sure are!
Once you have tack welded, you need to correctly orient them. There should be 4 in total, lying at the north-east, south-east, south-west, and north-west points. Of course, these are approximate so don’t fret too much about it. But, you do need to be careful since the pipe can’t be moved once you begin to weld.
The actual welding can be completed in 4 pretty easy steps (4 seems to be the magic number today!).
Firstly, you should begin at the south point and weld in an upwards direction to the east point. Then you need to return to the boom and weld upwards to the west position. After that, go back to the east point and weld upwards to the north point. Finally, return to the west point and weld upwards to the north point. Here, you can overlap the bead.
For those who want to weld downwards, however, you can do it in two stages. If you’re interested, then stay with us, but if you’d rather skip to the next welding position, feel free to do that instead.
So, downward welding. Here are the steps:
Begin at the north point and work your way down one side of the circle. After that, go back up to the north position and work your way down the other side. Make sure you join it at the south point when you get there.
This method is best used when you’re arc welding because you can do it very quickly. In fact, it’s three times faster than the upward method we previously discussed!
Having said this, you would usually only use the downward method for joining low carbon or low alloy steel pipes. Plus, the number of passes you make depends on the thickness. Take a look at the following table to find out more.
| Pipe Thickness | Number of Passes |
|---|---|
| Under ⅜ of an inch | 1 |
| ⅜ to ⅝ of an inch | 2 |
| ⅝ to ⅞ of an inch | 3 |
| ⅞ to 1 ⅛ of an inch | 4 |
Vertical Pipe Fixed Position Weld
When pipes are in a vertical position, you should opt for the backhand welding method. You will start at the tack point and continue around the circumference of the pipe.
Yep, that’s all there is to it!
Multipass Arc Welding
Filler Beads
There are some things you need to watch out for when it comes to filler beads.
Firstly, you must take great care to ensure that they are correctly penetrating the root beads (we talk about root beads in the next section). Why? Because this will make sure any causal is taken away.
Secondly, you need to decide how many filler beads you will actually need. Regardless of what you are doing, you are more than likely to need at least one.
Root Beads
When you are using a lineup clamp, make sure the root bead begins in the pit of the groove. While doing so, take care to build the root bead inside the pipe; try not to let it seep out of the sides. This could take a bit of practice but you’ll get there eventually!
Finish Beads
Finish beads, as you can gather by the name, are put over the filler beads to finish it off. Shocker, right?
Typically, these beads will be roughly ⅝ of an inch wide. In terms of placement, you can view diagrams online that depict this properly. However, we’d suggest they appear 1/16 of an inch over the outer pipe.
Aluminum Pipe Welding
The game changes quite a bit when it comes to aluminum pipe welding. There are specific joints that are used which generally require you to undertake combination processes.
Related reading: How to Easily Weld Aluminum
Pipe Welding Symbols
Do you remember when we talked about the numbers and letters involved in welding symbols? We covered the numbers 1 to 4. Well, there are two more we need to discuss — 5 and 6. These are specifically related to pipe welding, which is why we’ve waited until now to share them with you.
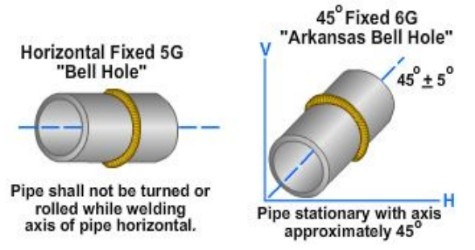
The number 5 is a welding position where the pipe is lying horizontally. This could be when a pipe is sticking out of a wall, for example. Therefore, the weld has to be put around the pipe. Here, the pipe does not rotate at all. Thus, the position is constantly changing.
Number 6 is incredibly similar to 5 but the pipe is sat diagonally (at a 45-degree angle).
Okay, now let’s move on to your frequently asked welding questions. We get a lot of them, but we’re just going to answer three of the most common ones today.
What Type of Welding Should I Be Doing?
There are so many different types of welding that you can focus on. It all depends on what you want to achieve.
Below, you can find each one briefly explained so you can decide which is right for you.
Arc Welding
This type is pretty popular thanks to its cost-effective procedure. The machine you use will emit an electric pulse that flows through the material.
So, why is it called arc welding? The flowing current can sometimes look like an arch.
Electroslag Welding
You would use electroslag welding when you want to join steel plates. Basically, it’s good for any thick material. Usually, you would use it in a vertical position because it was invented specifically for this.
Flux-Cored Welding
The inventor of flux-cored welding wanted to bring people a stick welding alternative.
If you need to get done quickly, this is the one for you as it’s an automatic method. You’ll find that a lot of construction staff will use it to get the job done faster.
Gas Metal Arc Welding
Again, this is an automatic welding procedure.
You will use a welding gun which systematically draws the weld metal through itself. It even emits a gas “shield” that protects your piece from the forces of nature.
If you’ve got a lot of welding to do, this will save you a boatload of time.
Gas Tungsten-Arc Welding
Since it’s difficult and time-consuming, it isn’t used by many welders these days. You need an insane amount of skill and concentration to do it correctly.
Having said this, the outcome is an incredibly high-quality piece.
MIG Welding (Metal Inert Gas Welding)
The gas element here protects your piece from elements such as oxygen, which can damage your materials. Because of this, the welder can progress relatively quickly.
The greatest thing about this type of welding is that you don’t need a huge amount of skill to operate the machine. Although, it should be noted that you can’t do this type of welding outside!
Plasma Arc Welding
This is similar to gas tungsten-arc welding, which we talked about earlier. It’s a very precise form of welding so it requires even more concentration than the aforementioned GTAW.
Shielded-Metal Arc Welding
More commonly, it’s called stick welding and is the most popular welding process nowadays. It’s cheap and simple to do. However, the results aren’t as high-quality as other methods.
Submerged Arc Welding
This process is designed specifically for metals that contain a lot of iron like stainless steel. You can find semi-automatic or completely automatic devices which considerably speeds up the process.
TIG Welding (Tungsten Inert Gas Welding)
Essentially, this is just a different type of MIG welding. Instead of using a metal electrode, it uses a tungsten current. While there are other differences, this is the main one.
What Safe Practices Should I Adopt When I’m Welding?
We have found that the busier a welder is, the more he or she neglects the safest and best practices. Of course, this makes a lot of sense but it is vital that you rehearse these regularly. This keeps both you, your family, and others safe.
You should truly understand the consequences of careless behavior. For example, if you forget to put on personal protective equipment, you might end up with burns, incurring electrical shock, or coming into contact with radiated light.
Aside from this, you need to keep other factors in mind like cleaning solutions, explosions, fume emissions, and noise.
Remember, safety is key. Taking the necessary and advised precautions will ensure you avoid all possible accidents.
Related reading:30+ Must-Have Welding Tools and Accessories (Expert Poll)
What Is An All Position Welding Rod or Wire?
Wires made for flat and horizontal welding positions are optimized this way. The weld pool they tend to make is pretty big but it’s relatively easy to keep under control.
Rods made for vertical or overhead welds have a modified shielding covered. This makes the molten metal run slower so it doesn’t just fall onto the floor or base plate immediately.
All Position welding rods or wires, however, usually contain a special freezing flux. This means they are great when you use flat or horizontal positions. But, they can also adhere to surfaces quickly so the metal doesn’t drip onto the base plate when working overhead or vertically.
The Bottom Line
Welding, as you’ll know by now if you didn’t before, is a very complicated activity. However, if you follow our guides and gain hands-on experience in a safe environment, you’ll get to where you want to be.
Happy and safe welding everyone!
References
The Four Main Welding Positions
https://ahpwelds.com/articles/do-you-know-how-position-your-welding-equipment