
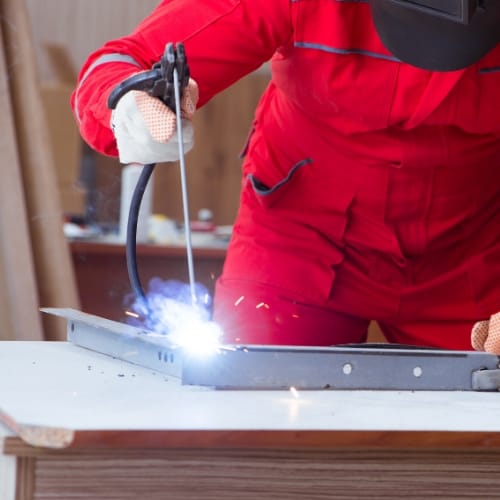
As a new welder, it can be hard to know whether you should be pushing or pulling your welding pool. It can be hard to keep track of what types of welding require which strategy. When using a stick welder, should you push, or should you pull? Why does it even make a difference?
Should You push or pull when stick welding? You want to pull a stick welder. The reason is to avoid pushing slag into the welding pool and getting it stuck. If slag gets mixed into the welding pool, it will weaken the strength and integrity of the final weld. You want to weld in a way that leaves the slag behind to be removed later.
It may seem difficult to remember which way you need to weld with different welding technologies. However, it’s easier than it may initially appear. Let’s go through some ways that you can keep it straight and what the difference is anyways.
Table of Contents
Push or Pull-in Stick Welding?
The general rule to remember is, “If there is slag, you must drag.” Any welding process which leaves slag behind will require you to pull.
Stick welding, flux-cored arc welding, electroslag welding, shielded metal arc welding, and submerged arc welding all produce slag and therefore require the weld to be pulled rather than pushed.
Slag is the nonmetallic byproduct of the welding process. Flux on the outside of the electrode used to create the arc evaporates into a gas when the arc is produced.
This gas is an intentional byproduct used to protect the weld from absorbing contaminating elements in the air. As the weld cools, the gas solidifies into a hard layer, and this is the slag which is removed at the end of the welding process.
The slag is chipped away after the weld is completed and cooled. Pushing a weld which produces slag will cause the slag to get pushed into the weld pool where it will become stuck and will reduce the strength of your welds.
Anything other than metal mixed into the weld pool will decrease the strength and integrity of the final weld. This is called porosity, which refers to the absorption of nonmetallic substances into the weld metal. These additions cause the weld to become porous and fragile.
Keep your welds free of defects and imperfections by using the proper technique.
MIG welding and TIG welding are both popular forms of welding which produce no slag layer. As a result, with these processes, welders have the option to either push or pull.
Be aware that any advice you may hear to simply do what is most comfortable doesn’t apply to processes like stick welding, which do produce slag. It’s not a matter of preference; you must pull your welds when stick welding.
What’s the Difference Between Push and Pull?
If you aren’t a particularly experienced welder, you may be wondering what the difference even is between pushing and pulling a weld. The distinction is simple and has everything to do with which side of the weld pool you’re working from.
In all welding processes, you’re going to build what’s called a weld pool, or a small puddle of molten metal, which you’ll move across the surface you’re welding to join the two pieces together.
When pushing a weld, you weld from behind the weld pool and push the entire pool forward as you weld. When pulling a weld, you weld in front of the weld pool and allow the poll to fill in behind you as you weld.
Most welders push weld from right to left and pull weld from left to right. Reverse this if you are left-handed.
Advantages of Pushing/Pulling
Although pushing and pulling welds yields similar results, there are some small advantages for one or the other. Let’s take a look at them
Push Welding Advantages
- Your weld puddle will be flatter and wider, which will tie into more of the base metal.
- Can look more aesthetically pleasing because the weld is flatter. Depending on your level of skill with each style, it may be hard to tell the difference, though.
- When welding with an inert gas process, push welding can help you to see what you’re doing better and ensure that the weld pool remains shielded.
Pull Welding Advantages
- Your weld penetrates deeper into the base metal.
- Weld is stronger, and well hold the pieces of base metal together more firmly.
How to Stick Weld
Stick welding requires more skill to perform well than some other processes. However, stick welding remains popular due to the low cost to entry. Stick welders are significantly cheaper than most other types of welders.
Related reading: How Long Does it Take to Learn Welding?
Stick welders also have a great degree of versatility, allowing welders to operate in the field and outdoors. Gas insert process do not allow for there to be any wind during operation.
Stick welding allows welders to operate on-site. Stick welding is one of the few processes which can create a strong bond on rusty or dirty metals, making it even better for field work.
I recently wrote an in-depth article about Stick Welding: Ultimate SMAW Guide, have a look at it.
Stick welders are relatively small and portable machines that do not require a separate gas tank because they produce their own shielding gas as you weld. Stick welding is commonly used in a range of industries, but especially those that need things welded or repair in the field or on the go.
Pulling your weld is an essential part of stick welding, but it isn’t the entire story. There’s lots of things that go into getting a stick weld right. Here’s a quick overview of how to approach the process.
1. Attach a ground clamp – Attach the ground to any unpainted metalsurface. This will allow the welder to complete a circuit and create your welding arc.
2. Select the correct rod – There are tons of different rods for stick welding. Which is correct for your project will depend on what type of metal your welding and the thickness of the metal. Once you’ve selected the correct rod, place the electrode in the stinger, and ensure that the connective ends are in contact with each other.
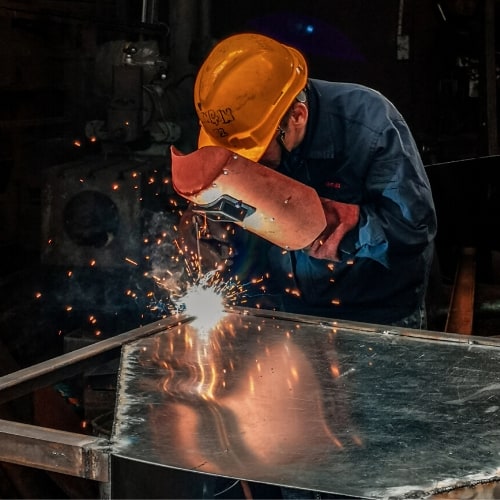
3. Put on safety gear – You need to be covered head to toe in protective gear. Ensure that you’ve got the proper mask, gloves, shoes, and coat. Welding processes that produce slag tend to kick up a larger amount of spatter. Be careful.
4. Switch on the welder – Flip the switch and get the machine going.
5. Weld – Hold the stinger in your dominant hand a few inches from the weld. Tap the tip against the metal and then instantly pull back to create the welding arc.
Start on the left side and make your way slowly over to the right. Stick welding requires you to move your hand at a consistent speed to get a good weld.
You need to keep the stinger at between a 15° and a 30° angle to the vertical while welding.
6. Clean the weld – If you did it right, all the slag should be on the outside of the weld. Chip off the large pieces and then use a metal brush to finish the weld.
Components of a stick welding system
The welding machine
All arc welding systems require electricity to supply the power needed to generate and maintain the welding arc. Welding machines deliver the energy to the electrode holder in the form of alternating current (AC) or direct current (DC).
They also regulate the supply of energy so that the welder can operate safely and without interruption.
Amperage is an important variable in the power equation (in other words, the higher the amps, the hotter the arc), and this is adjustable through the welding machine.
This is an essential feature because different welding temperatures will be needed, depending on the thickness of the metal pieces and the type of metal that is being welded.
I recently wrote an in-depth article about Stick Welding: Ultimate SMAW Guide, have a look at it.
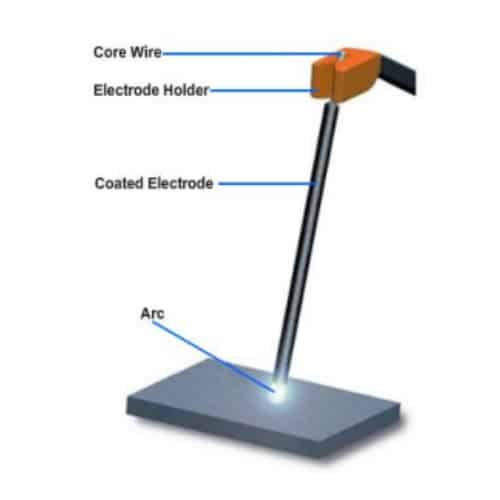
The electrode holder
This is the hand-held device that the welder uses to guide and manipulate the electrode (hence, the arc) during welding. A lead wire that comes out of the end of the electrode holder is connected to either the negative (-) or positive (+) terminal on the welding machine.
Typically, the working end of the electrode holder has a sturdy clamp that firmly grips the electrode.
Depending on the polarity, electrical current either flows in the direction of the electrode to the workpiece (straight polarity) or from the workpiece to the electrode (reverse polarity).
Electrode holders are commonly referred to as stingers in the welding trade.
The electrode
This is the “stick” in stick welding. The electrode is a long, thin rod that consists of two parts:
- The core is the innermost portion of the electrode, and it is typically a thin wire produced from carbon steel, stainless steel, or in some cases, aluminum. The electrode wire is consumable, meaning that as it creates and maintains the arc between itself and the base metal, it is also melting and combining with the molten pool that the arc has created.
In this sense, the electrode wire is serving as a filler metal that is being added to the weld pool (this is known as a deposition). When this pool (also called a puddle) cools and hardens, the result is the finished weld. Because they are consumable, electrodes must be changed when their length becomes too short.
- The flux (also known as the electrode coating) is a solid coating encasing the electrode core. Coating materials will vary with the particular welding application, but common elements include iron powder and various forms of sodium and potassium.
Electrode coatings serve two vital purposes, the first of which is to create a small shield of oxygen-free gas immediately around the arc and the weld pool. This gaseous shield prevents the molten metal from oxidizing as it cools, which is critical because oxidation is a form of corrosion that weakens the metal.
The other purpose of the coating is to create slag, which is a layer of melted flux that solidifies over the newly-made weld. While the weld cools, the slag serves as a protective shield, preventing oxidation and also absorbing any internal contaminants from the molten weld puddle. Slag must be mechanically removed, either by chipping at it with a screwdriver or hammer or using a wire brush.
Related reading: Do Welding Electrodes Have a Shelf Life?| Electrodes Expiry
The grounding clamp
The key to arc welding is the creation and manipulation of a high-energy electrical arc. The grounding clamp is attached to the workpiece, and its lead wire is connected to the welding machine. This completes the electrical circuit and allows the arc to be maintained between the electrode wire and the base metal.
How Can You Tell if You Are Using Flux?
To know if you are using flux, you need to understand a little more about welding processes. Welding requires intense heat to melt metal and join pieces together. The intense heat makes the metal much more chemically active. The molten metal in a weld puddle will react with oxygen and nitrogen in the air, causing corrosion and weakening the weld. The solution to this problem is to shield the hot weld bead from the air temporarily.
Each welding process uses a different method to shield the weld. TIG and MIG welding use shield gasses – a steady flow of a non-reactive gas over the weld bead. The shield gas keeps oxygen and nitrogen away from the weld for the crucial few seconds while the bead is hot.
Arc welding – also called stick welding – uses a different process. The welding rod is composed of two substances, a filler metal that melts into the weld and forms the bead, and a flux.
The flux reacts to the heat to produce shield gas and slag. The gas and the slag left on the weld bead both protect the weld from oxidation until it can cool.
This is where the pull comes in. The slag ejected from the filler rod with the arc is pushed back over the bead you have already laid down. The slag hardens over the bead and protects it until you are done welding and knock the slag off.
If you pushed the rod, the slag would be ejected into the weld puddle, causing contamination and making your joint brittle and weak.
Think It Through First
Welding is most comfortable when you think about your weld before you lay a bead. Part of getting a nice, even bead is keeping a consistent arc length and stick angle. Think about the position of your electrode and how it will change as it moves across the joint.
Make sure that you can see the electrode and the bead as you move across the joint. A good rule of thumb is that a drag weld should move toward your welding hand, while a push weld should move away from the welding hand.
That is, a right-handed welder should drag from left to right and push from right to left.
You can even rehearse the weld before you crack an arc. Hold the electrode holder and stick and move them along the joint with the power off.
Make sure you can reach all parts of the joint, and you won’t get into a strange position as you finish the joint. If you can’t do it with no power, you will probably mess up the weld joint when you do it for real.
Cracking an Arc Without Sticking
Welders joke that arc welding is called stick welding for how likely the rod is to stick to the piece your welding. Pulling the electrode as you crack an arc can reduce sticking.
As you scratch the electrode tip across the work surface, pulling the stick helps you lift it off the surface to establish an arc. Pushing the electrode can force it into the base metal, making sticking more likely.
The best technique for scratch starting your arc is to drag the electrode lightly over the surface and pull up slightly as it moves. Hold the rod just slightly off vertical – ten to fifteen degrees is plenty. This helps you create an electric circuit, establish an arc, and start welding without sticking.
Ten to fifteen degrees can be hard to picture – most of us don’t walk around with a protractor in our pocket to measure, either. Here’s an easy way to get the proper angle. Remember that the angle between vertical and horizontal is 90 degrees – that’s your reference point. Here are the steps:
- Hold the rod straight up and down above the flat table. That’s 90 degrees.
- Keep the tip in place but tilt the top halfway between vertical and horizontal. That’s 45 degrees.
- Go halfway between 45 and 90 degrees – now you’re at 22.5 degrees
- Half the angle one more time. The midpoint between 22.5 and vertical gives you 11.25 degrees – perfect for welding. Hold the stick there, turn on the welder, and scratch an arc.
You probably will not hit precisely eleven and a quarter degrees with this method, but you will be close enough. This method puts you close enough to start an arc and get the weld going. You can correct it from there as you work.
Know When to Stop Pulling
There are a few special situations when you will be better served to push the rod instead of pulling it. They do not come up often, but it’s good to know about them before you encounter one. You can switch up your technique and still get a good weld.
Welding Uphill
When the weld joint is vertical, and the work direction goes from bottom to top, you need to practice what welders call welding uphill. This is a case where you should push rather than pull the stick.
If you drag the stick on an uphill weld, gravity will work with the flux to pull slag into the weld bead. To prevent this, you angle the stick upward and push the bead instead of pulling it.
To weld uphill, start at the base of the weld joint and angle the stick down slightly. Crack an arc and slowly work your way up the joint. Travel speed becomes extra-important for welding uphill. Move too fast, and you will get a weak weld.
Travel too slow, and your puddle will run back down the joint and make a mess. Uphill arc welding is a difficult skill to master and takes lots of practice. You’ll have to make a lot of ugly joints before you can get this right.
Deep Penetration
If you need to weld metal thicker than your machine is rated for, changing the stick angle can help. Holding the rod vertical instead of at an angle can help you get more penetration.
It does not give you a huge boost, but if you need to punch the bead through an extra sixteenth inch or so, a vertical rod can help. Alternately, you can make multiple passes to make sure the weld penetrates all the way into the joint.
PUSH vs. PULL MIG Welding >> Check out the video below
Go Weld Something
There are three layers to learn welding. The first is technical information, including welder settings, rod choices, and detailed technique descriptions. You should know that the proper way to arc weld involves pulling the rod while holding it at ten to fifteen degrees off vertical.
The second layer is the simplified sayings that welders use. They boil down the technical stuff into things you can remember when you are suited up, it’s a hundred degrees in the shop, and you think you might melt. If there is slag, you need to drag. That’s simple enough to remember in the shop.
The third layer is the feel of welding. At some point, you will stop trying to remember things and just weld. The technical stuff will be engraved on your brain, your body will get the feel of a proper arc, and you will be able to lay pretty beads without a second thought.
The only way to get to that layer is to weld a lot. Draw up a project, head to your shop, and crack an arc. That’s the only way to become a welder.
Recommended Reading
Can You Weld Over a Braze? 4 Reasons Why You Shouldn’t
What To Do When Your Welder Won’t Spark? 4 Easy Steps
Here are some of my favorite tools & equipment´s
Thank you for reading this article. I hope it helps you find the most recent and accurate information for your welding project. Here are some tools that I use daily and hope you´ll also find helpful.
There are affiliate links, so if you do decide to use any of them, I´ll earn a small commission. But in all honesty, these are the exact tools that I use and recommend to everyone, even my own family. (NO CRAP)
To see all my of most up-to-date recommendations, check out this resource that I made for you!