Have you ever wondered what welding testing methods are? Well, we got you covered.
The first thing to note is that there are two main types of physical weld testing: destructive and non-destructive. But that’s all we’re going to tell you, for now, you have to read on to find out more!
Welding testing methods are essential in ensuring the quality and integrity of welds. Non-destructive testing (NDT) is often used to examine weld integrity.
Various techniques are available for NDT, including liquid penetrant testing, radiography, magnetic particle testing, eddy current testing, and ultrasonic testing. Ultrasonic testing is preferred because it is efficient, fast, and capable of detecting any cracks, voids, or warps. However, there are limitations to each method.
The basic method of checking the quality of a weld is to inspect it visually for any flaws like cracks, beads, bends, or craters.
Table of Contents
Destructive Physical Weld Testing Methods
Destructive weld testing methods refer to the practices that break the piece under examination. They are put under intense stress until they can’t stand it any longer.
Generally, any microscopic, corrosive, and chemical tests are held at a laboratory. The rest can be done in your workshop.
Acid Etch Test
Acid etch testing is deemed pretty common by the majority of welding inspectors. Although it may not be your favorite way to test your welded joints. Why? Because you’re dealing with corrosive substances. Plus, you’ve got to ensure you store them safely.
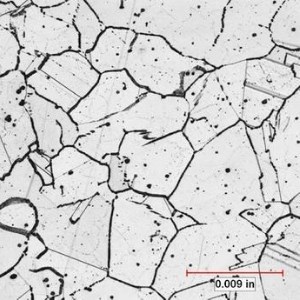
These days, however, the acids used are formulated specifically for dissolving slag inclusions to test the boundaries between welds and the edges of the base metal. In fancy terms, it tests the topographical anatomy of your weld. This would be impossible to determine based on visual tests.
The process is what puts welders off. It’s rather… trying.
You must carefully apply a nitric acid solution or hydrochloric substance to your welded specimen. Then, you’ll cut the cross-sectional sample away and submerge it in acid. Since it’s so corrosive, the solution will essentially “nibble” into the test piece. Then, the boundaries of your piece will be highlighted, slag inclusion will have dissolved, and gas pockets will be brought to light. In short, any defects become super-recognizable.
This testing type is fantastic for determining the soundness and integrity of your joints. Any weld boundaries that appear on your acid etch examination highlights just how quickly your piece would crack in the “real world”. Not to mention that any porosity problems, hairline fractures, bad fusion, and other degradation will pop up on these tests too.
Guided Bend Test
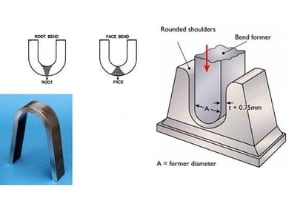
Guided bend tests are lovely and simple. Plus, they’re relatively inexpensive to carry out. Typically, they are used to discover the soundness and the ductility of your welded piece. Since it’s best if the equipment and the specimen are straightforward, guided bend yet are generally used for butt-welded joints.
All bend tests (free bend and back bend included) require their subject to be bent in three places, to a certain angle. The over-stretching of the joint will ensure any defects in the piece will become apparent incredibly quickly.
For now, we are going to focus on guided bend tests before we move onto the other two.
In this type of bend, you need to wrap the piece around a former. The diameter should be specified before the examination starts so you know exactly what you’re looking for.
Of course, a jig is used here to aid you in this endeavor. Usually, these will have a male and female former, but some represent a plumber’s pipe bender.
Once you have correctly attached your specimen to the jig, the strain will be applied to your piece. The specific force used here is determined by the former’s diameter and the subject’s thickness. Sometimes, you will need to bend your piece to a 180-degree angle but in other cases, it will be 90 or 120 degrees.
After the test is over, you need to take a look at your weld piece. Any defects are guaranteed to show up on the tension face. Many guidelines state that any damage that is over 3mm is grounds for rejection.
Free Bend Test
While you won’t find free bend tests required on welding qualifications, it’s still a great one to do in your workshop. It is an easy way to discover the ductility of the metal you put into a welded joint.
So, how is it done? Great question, let’s get into it!
Firstly, you will need to clamp your test piece into a vice and measure lengthwise across the specimen, making marks as you go. Then, you should take a hammer and bang it into an “initial bend”. All that’s left now is to make the final bend. To do this, simply put the entire specimen into the vice completely and your last bend shall be formed. It should be noted that this vice must be capable of exerting a larger force than the one needed for the initial bend.
Once all of this is complete, you need to measure the distance between the marks you made earlier. But you’re not quite done yet. For the test to be fully finished, you need to find the elongation percentage. To do this, minus the initial distance from the final one. Divide the total by the first distance and multiply that by 100.
As we said earlier, this is not a requirement for welding qualifications. You might be wondering why. Well, the parameters of these tests are incredibly hard to control. In laymen’s terms, you can’t make it a fair test because so many of the variables are unknown. That’s what guided bend examinations are preferred.
Read also >> The Process of 4G Weld Testing – How To Pass 4G Welding Test?
Read also >> What is a 2G Weld Test? – Difference To The 2G Pipe Welding Test
Read also >> How to Test a Welding Transformer in 10 Steps
Back Bend Test
The final bend test is the back bend version. This one is used to figure out the quality of the metal, plus the penetration of it into the root of your welded butt joint.
You would use a back bend test to examine similar pieces to the free bend test that we just discussed. However, you need to manipulate them with the weld’s root on the side of the tension.
Regardless of the type of joint you are working with, every tested specimen needs to bend to 90 degrees without splitting, cracking, or coming apart.
To be honest, the back bend test has been almost entirely replaced by the guided bend variety (much like the free bend one). Why is this? Well, even though you know that it needs to bend to 90 degrees, nothing else can be measured (since you aren’t clamping anything at specific points).
Nick Break Test
This method of weld testing (often referred to as fracture testing) is handy for figuring out the inside quality of the metal you have utilized. It will make defects such as slag inclusions, degraded fusion, oxidized metal, gas pockets, and burned metal come to light. If you can’t see any of these once the test is over then congratulations! You are an A-plus welder, my friend.
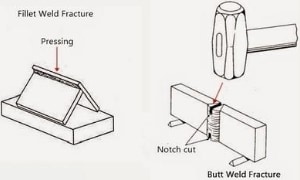
Bear in mind that depending on the joint type, the method below will change slightly.
Before you can begin the nick break exam though, you need to flame-cut the test piece. Usually, the item should be a butt weld or fillet weld sample, as these are best suited for nick break tests.
After you have done that, saw a ¼ inch cut at the center of every middle edge. Then, put the piece on two supports. Make sure these are steel though, otherwise, you’ll damage them! Next, take a hammer and break your specimen. You will need to strike right where you cut the metal.
Upon breaking, the exposed weld metal needs to have no gas pockets bigger than a sixteenth of an inch, be fused, and contain no slag inclusions. Another important aspect you should be aware of when inspecting your piece is that there shouldn’t be over six pores per square inch. If there are more than that, your specimen would fail.
Tensile Strength Test
For your butt welding technique to be approved, you will usually have to put it through a tensile strength test. Consider this a rich man’s guided bend testing method.
Normally, they make use of a cross joint, square, or rectangular cross-section sample of your piece. This ensures every part of your specimen is examined. What do we mean by every part, we hear you ask? Well, we’re talking about the parent metals, weld metal, and the HAZs (heat affected zones).
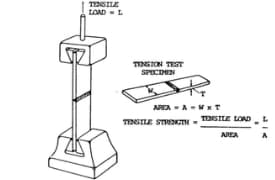
If you are using this method to test a flat plate butt weld, you won’t face many problems. However, if you’re testing a sample of a pipe butt joint, the curving structure can taint the results.
To carry out this procedure, you need to measure the thickness and area of the cross-section beforehand. Then securely place it into a device that puts a lot of pull onto it — yes, enough to break your sample. Here, the machine’s gauge will tell you the load in pounds (only the breaking point load is saved).
The final stage is to calculate the “tensile strength”, otherwise referred to as stress in pounds per square inch. Trust us, it isn’t as hard as it seems. Just divide the breaking load by the initial area of the cross-section. Usually, your sample should be able to withstand more than 90% of the base metal’s strength.
Non-Destructive Weld Testing Methods
With this type of testing, the aim is to examine the quality of your weld, without damaging your piece. Sometimes, welders will refer to this as NDT, NDE (non-destructive examination), or NDI (non-destructive inspection).
Hydrostatic Test
Mainly, hydrostatic testing is used when determining the integrity of brand-new or recently changed piping systems. It’s incredibly important since it tends to be the last exam that happens before it is rolled out into real-world applications.
Since hydrostatic tests are so crucial, the procedure is followed to the letter.
Let’s bullet point this so it’s easier to understand:
- Test pieces are put under pressure 1.5x higher than the pressure it has been designed to withstand
- All joints must be accessed (no paint, insulation, or backfill)
- All vents will be open before the test so air is removed before the pressure is applied
- Any equipment that isn’t required to be tested will be disconnected or blocked
- Spring supports will be removed or restricted
- The test is done after hot work has finished
- Any x-ray testing is done before the hydrostatic examination
- Your test pack will be given to you before you conduct the exam
- All testing equipment should retain the necessary certifications
- Control valves are removed
- Rotating parts aren’t subject to pressure tests
- Gauges need to be fit at low and high points in large systems
- It will be filled from the low point
- The system will be fully vented afterward
- The pressure during the test will be applied for 10 minutes and increased steadily throughout
- You need to check the entire system for leaks
- After leaks have been patched, hydrostatic testing will have to be performed again
Magnetic Particle Test
People who have been in the industry for years typically refer to magnetic particle testing as MT or MPI (magnetic particle inspection). It allows you to spot any flaws towards the surface of ferromagnetic substances. Essentially, it just checks for surface errors.
It is amazingly effective for checking surface breakage, cracking, cold lap, the presence of sidewall fusion, and more. However, it only works for magnetic materials (hence the name).
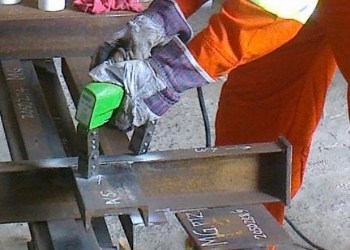
While there are numerous techniques here, the most common utilizes a handheld electromagnetic yoke magnet. Other equipment is used too including white paint (a strippable variety) and magnetic ink.
How is it done? The answer is probably simpler than you think.
Once you have placed the piece on the white background, you’re ready to get started. Firstly, you will magnetize the part using the magnet. If there are any surface defects here, the magnetic force lines will turn wobbly around them. Basically, any abnormalities will be as clear as day. The ink is applied afterward to give you an even clearer picture of what is going on at the surface level.
It can be fantastic for those on a budget. Even though it might sound expensive, you can find relatively cheap solutions that allow you to perform MPI flawlessly. Not to mention that it gives you incredibly quick results. Plus, you can examine materials that are pretty oddly shaped!
The downside here though is that you must be working with ferromagnetic materials for it to work. You might not be doing this. In which case, you’ll have to settle for another weld testing method. Don’t worry, you can find them all here!
Magnetic Particle Testing >> Check out the video below:
X-Ray Test
Arguably, X-ray testing (or radiographic inspection) is the best, versatile, and widely used non-destructive test procedure. Mainly, it is used for figuring out the soundness of the welds. And no, we don’t mean externally — we mean internally.
It relies on X-rays passing straight through the metal to submit photographic evidence of the transferred radiant energy. They easily depict abnormalities within the welds since all materials absorb specific amounts of the aforementioned radiant energy.
But clearly, these rays don’t just come from thin air. Something has to happen for them to be produced, right? Absolutely!
Generators emit extreme voltages to an X-ray tube. This results in the X-ray’s wavelength shortening to give off insane amounts of power which, ultimately, penetrates through the metal. When this happens, not all of this energy will come through to the other side of the material. The amount that does, depends on all sorts of factors (like its atomic number, thickness, and more). Generally speaking, thick areas absorb far more radiant energy. Therefore, their radiograph images will appear lighter.
This process allows you to “see inside” the material you work with.
This seems like a foolproof exercise, doesn’t it? Well, if the image isn’t sharp and clear, you won’t actually be able to read it well. Thus, spoiling the entire test. So, to combat this, a device known as an IQI (Image Quality Indicator) is used. This handy little guy ensures you get a quality radiograph image!
Gamma Ray Test
To be completely honest with you, this non-destructive weld testing method is very similar to the X-ray version we just talked about. Regardless of this fact, we’re going to talk about it.
This one can be done by mobile professionals or at a specific laboratory. But for now, we are going to focus on the abilities of the mobile gamma ray testers. Why? Because it is pretty amazing!
These guys have gone through years of training to be able to bring you onsite gamma-ray examination methods. The process is wonderfully clever. Each technician tester drives a darkroom truck, which is used to bring your gamma-ray dreams to life.
They will place your test piece into their decked-out van. And, after that, the magic begins.
Here, a capsule full of radium sulfate will emit gamma rays into your piece. The advantage of this over X-rays is that they are much shorter which allows them to test ridiculously thick specimens. As you might imagine though, highly-dense materials will take the technicians much longer to examine.
At the end of the day, X-rays are usually used. They are cheaper and more people are qualified to conduct them. But nothing can get as portable and convenient as gamma-ray testing.
Fluorescent Penetrant Test
Usually, people refer to this as simply “the dye test” (it’s far catchier, right?). Anyway, this is a fantastic method to use if you want to make leaks, cracks, pores and other defects to show up.
This examination procedure uses fluorescent paints or dyes that have intense penetration capabilities. And, while it can be used for any material, it is better left to those that aren’t magnetic.
There are three methods you can use to apply the dye to the surface of your specimen (once you’ve cleaned and dried it). Either dip, spray or brush it on. Remember to take off any excess material with a wet crag or sandblaster.
Once you are over that hurdle, you must put a dry developer over the top. Then, place your treated specimen under black light to watch as any defects illuminate in brilliant fluorescent colors.
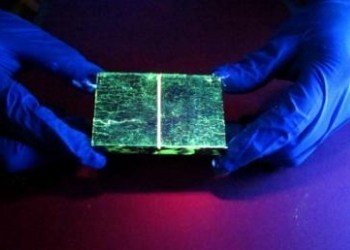
Alternatively, you can use neon dye that appears in normal light to make it even less complicated. Whatever floats your boat, we suppose! Personally, this is one of our favorites. But there are disadvantages to the dye examination method including the fact that you could miss defects that are below the surface. Plus, you won’t be able to use dye or paint testing on porous materials.
With all that being said, we believe the pros largely outway the cons. Why? Because you need little to no training, it’s uncomplicated and cheap. What more could you ask for?
Hardness Testing
In weld testing, the term hardness relates to the material’s ability to resist indentation. It is generally done as a non-destructive type of test in a lab. However, you won’t find hardness exams performed in workshops.

The purpose of such tests is to control the qualities of items used for certain reasons in the “real-world”. But there isn’t just one hardness test. There are numerous methods, so, we’re going to take a look at each one in turn.
Ready?
File Test
By far, this is the easiest hardness test you can perform. All you need is a bit of elbow grease and a file. Simply run the file over your test sample (give it a good rub). This way, you can determine whether the metal you’ve just filed is softer or harder than the file.
Hardness Testing Machines
Aside from the file test, you can purchase a machine that automatically performs hardness exams. Each device type has been developed to perform one function, but you can easily use more than one kind on the metal.
Since there are so many types, we are only going to look at the most common ones. Generally, the Rockwell and Brinell are used in labs by scientists determining a metal’s hardness.
Let’s get into the details.
Brinell Hardness Tester
Here, you should secure your test piece onto the machine’s anvil. You will quickly realize that a steel ball is attached. This will act as the localized pressure factor of the test because 6620 pounds (3003 kilograms) will automatically be exerted onto the ball — and therefore, your test piece. It stays this way for roughly 30 seconds before it’s released.
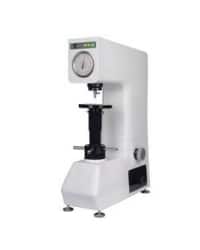
After all of that somewhat lengthy process, you need to measure the diameter of the dent made. It sounds weird considering your first thought was probably to measure the depth of the dent. However, if you want to make use of Brinell’s numbers, you must measure the diameter.
There is a pretty confusing formula you can use to get the numbers. But, you are better off finding a chart online to convert your findings for you.
Rockwell Hardness Tester
This machine is akin to the Brinell version that we just talked about. The difference is that it applies a lesser force on a smaller ball.
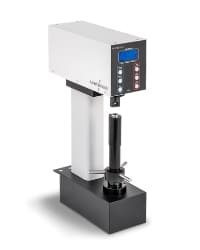
You will be pleased to know that you do measure the depth with this one. Not to mention that you won’t need to go gallivanting to find conversion charts. Why? Because there is a dial attached to the device! Just like the Brinell machine, the data is shown as “Rockwell Numbers” which are valued in many welding codes and guidelines.
Magnaflux Test
Judging by the name, you might assume that this non-destructive examination method is fast. And you would be right! It uses magnetization and ferromagnetic particles to highlight surface and near-surface defects on steel and the associated alloys.
Essentially, it is like using an extremely powerful magnifying glass to test the quality of your welds. Having said that, there is zero glass involved so… a non-glass mirror?
Anyway, moving on!
It utilizes a magnetic field, as well as various ferromagnetic powders. As soon as the aforementioned ferromagnetic particles hit the magnetized field, they get attracted to the poles. There, all of them will be held very tightly. This allows you to see exactly where and what defects your piece has.
Electromagnetic Testing
Charmingly, electromagnetic testing is often called eddy current testing. Don’t ask us why we think it’s charming, we just do! Obviously, the name does have a reason, but, to be honest, we don´t know the reason.
The principle behind this examination technique is that electric current travels through a conductor. You won’t see this used throughout the entire welding industry but it is great for bars, fillets, and welded pipes.
To do this, you will need to produce an electric charge that will penetrate the material. Afterward, you will have to remember to measure the current changes and physical differences that occurred during the exam.
Of course, you can tell how many discontinuities there are in your piece with this test. But more than that, you will be able to see how the dimensions and resistivity respectively change. In all honesty, resistivity is dependant on so many factors (purity, crystal orientation, heat, hardness, etc) that it will be extremely difficult to track down which material property promoted this.
Okay, cool, but how does it work? You’re in for a treat because we are about to tell you.
One way you can acquire eddy currents in your test subject is to make your specimen the center of an induction coil. Then, you need to measure the resistive component or the inductive component. But don’t worry, nowadays there are electronic devices that do this for you. Can’t go wrong with that, right?
Before we move on, let’s bullet point the steps you should take to conduct this type of test. Deal? Here they are:
- Your specimen will be put into a coil’s field which is housing the alternating current
- The coil might be a “coil” shape but it could also be rectangular, a probe or even tubular
- The eddy current will make its own field (it opposes the first magnetic field brought by the coil)
- The magnetic fields are affected by the eddy current’s presence
- If there are defects or damages in your work, the eddy current will distort
- You need to measure this change to get your results
Acoustic Emission Testing
Acoustic emission testing, commonly referred to as AE testing looks for and keeps an eye on ultrasonic stress waves. This is done when the material is under stress and it distorts or changes shape because of it.
The cool bit is how it works.
You need to place tiny sensors onto your specimen first of all. After that, it is pretty much down to the sensors and digital record-keeping. But of course, we’ll explain all of that.
These little gadgets change stress waves into electrical impulses. The signals get sent to a computer straight away for the data to be read. Remember though, there will only be stress waves when there is something to stimulate it. That’s why you need to exert force, ramp up the temperature, or pile more loads on top.
There will come a point where you will notice that the release of energy is extremely high. Why? Because the external stimulus keeps adding more and more pressure and strain to the situation.
Think of acoustic emission testing like little ripples that happen inside your specimen. It measures the said ripples.
Ferrite Testing
The last weld testing method we have to talk to you about today is ferrite testing. Have you heard of it? You may well have done, but we’ll go through it for you in lots of detail now.
This method is known for being incredibly quick and almost 100% accurate when trying to determine the amount of ferrite in certain metals. Oh, and did we mention it is pretty cost-effective too?
It lets you know whether the treatment you have placed onto the metal is at its best for the job at hand. You can’t do this test in your workshop however, you have to ask a specialist to do it for you — but that’s the same for a lot of things.

Plus, it lets you know whether you have any damaging components inside your materials. This typically prevents the part from performing as well as it could.
Frequently Asked Questions
Here are a few common questions people often have about physical weld testing:
Why is NDT (Non-Destructive Testing) required?
Why is NDT required? The simple reason NDT is required is to check the weld of your object, without damaging it. Welding needs to be able to withstand a lot of force, and stresses, so it is vital that the weld is durable enough to support its contents. It is essential that the weld is of the best quality, so it will meet the minimum standards.
Your weld needs to be able to resist and endure multiple forces, depending on what it is you are welding will determine which method of Non-Destructive Testing is required. For example, if you were welding a fuel tank, you would use Liquid Penetrant Inspection; this allows you to check for any gaps or errors without any harm or destruction to your weld.

When it comes to welding, as the molten puddles start cooling down and solidifying, the weld can lose some of its quality. This can be caused by a wrong set-up process, equipment error, moisture, but most commonly due to human error.
So the weld could have been top quality, but once it cools down, it can comprise that quality, so it is crucial to test the weld once it has set. Non-Destructive Testing is the most used method compared to Destructive Testing.
NDT is best because the weld won’t be affected or damaged in the process of being tested, but it is still just as reliable as Destructive Testing. Therefore quality testing isn’t compromised, and your weld won’t be impaired during the testing.
It is necessary to test your weld to prove the quality of your work; this is because welding is highly dependent on factors that are controlled by humans. Testing your weld will ensure the quality is suitable and appropriate for duty and will withstand elements to an outstanding quality.
Related reading: 5 Types of Welding Joints and Their Use
Which NDT method is best?
When it comes to Non-Destructive Testing methods, concluding which method is overall the best is quite tricky. Which method is best depends on what weld you are wanting to test.
Another factor in enabling which method is best is if the person who is carrying out the NDT is qualified. The certainty of results depends on the inspectors’ knowledge and ability. To gain good and trustworthy results from Non-Destructive Testing, the person testing the weld needs to be competent, highly trained, and experienced within the NDT method they are using.
There are numerous Non-Destructive Testing methods, so to whittle it down to just one method as the best is impossible. Even comparing the methods is difficult, because each Non-Destructive Testing method has been created purely for its purpose. All NDT methods are unique and different, so it is unlikely that you will be able to use just one type of NDT for all welding testing.
When you are trying to decide which Non-Destructive Testing method to use, you should take into consideration all of the factors. What is your weld being used for? What will it need to hold? Where is the weld going to be, inside, outside, or in water? All of these are questions you will need to ask before settling for an NDT method. There is no ‘one size fits all’ in the Non-Destructive Testing world.

It may not be obvious straight away which Non-Destructive method will suit your weld best. If this is the case, you should add up all of the factors, and consider each dynamic of what your weld is being used for. Then look at the different NDT methods, and choose which one will suit your object best.
You will need to be knowledgeable enough in the NDT method to ensure you are able to inspect your weld so that it meets the minimum required standards.
What is the purpose of inspection in welding?
What is the purpose of inspection in welding? Well, if the weld turns out to be faulty once in use, depending on what it is being used for, it can cause detrimental damage, delay work affecting time frames, and can potentially cause injury to other people. It is essential that your welded item is inspected once it is finished. This is because the object needs to be welded to a certain specification.
Welded items need to be able to withstand a high amount of force and hold out against numerous natural elements, including heat, rain, and wind, depending on what it’s being used for.
To be able to ensure the welded structure is safe, liable, and can perform up to satisfactory performance, it must undergo a testing performance, also known as an inspection. The test needs to be carried out by someone who knows what they are doing, ensuring an adequate inspection procedure is enforced and that the welding is of high spec quality.
Welding is responsible for holding up large structures, so the welding quality must be absolutely perfect and capable of withstanding a lot of pressure. Whether those pressures are by the natural elements, machinery, or human interaction, the welded structure needs to be secure enough to last.
There are two ways of testing and inspecting welding, Non-Destructive Testing, and Destructive Testing. Non-Destructive Testing is when the welding is tested, but no damage or destruction is caused. In contrast, Destructive Testing is the opposite.
So, the purpose of inspection welding is to ensure that the welded object or structure is welded to the finest, most excellent, and outstanding quality possible. The inspection provides a guarantee that the welding is as safe as can be. This ensures confidence and certainty that the welding is secure and strong enough to do what it’s meant to.
How can I test my weld at home?
How can I test my weld at home? When testing your welding, it is always best to have it tested by a professional that is qualified and is skilled in welding. However, If you are welding for your own use, then there are a few ways to test it at home:
- Visual Testing method
- look at the distribution of the weld
- No Slag
- No impurities or imperfections
- Super tight weld
- Test for leaking
- Test the strength of the weld
Testing your weld requires some equipment to ensure that the weld is up to satisfactory quality. So, if you are testing your welding from home, you should use visual testing to determine the quality of your weld.
To test your weld at home, you will need to follow a few simple steps. Firstly you will need to look at the distribution of the weld; you will need to make sure that the weld material is distributed evenly between both pieces of the material.
You will need to ensure that there isn’t any waste, such as slag; when your weld is solidified, the slag should easily peel off of your object. Any other waste will need to be removed and cleaned, and your weld should be free of any residue.
The surface of your weld shouldn’t have any impurities or imperfections; if it has, it may not be s strong as it should be. If your weld surface has porous holes on it, it will cause weakness. Porosity indicates that the metal base that has been welded was dirty, or the metal had an oxide coating.
Your weld should be super tight; there shouldn’t be any gaps, if your weld has gaps or doesn’t appear tight, it indicates that there was a problem with the weld. If your weld isn’t tight or appears to have a gap, it can lead to issues in the future and indicate that the weld isn’t of high-quality.
If you are welding a structure or item that is required to hold liquid, it is vital that there aren’t any leaks. If there is, there is a major problem. The way to test for leaking is to fill the structure with water, and if there is a leak, it means there is a problem with the welding, and it isn’t secure enough to hold the water.
To test the strength of your weld, you should apply the amount of pressure it should withstand by using weights or something of the same weight, before putting your structure to use. It’s best to test the weight before using the weld to ensure no damage is done if the weld isn’t strong enough.
Does grinding a weld weaken it?
Does grinding a weld weaken it? If the weld has been executed to a high standard, and is of excellent quality, grinding the weld will not weaken it. Although that being said, if you can avoid grinding the weld, you should, especially if the weld hasn’t been welded to the highest quality.
If the welded structure needs to be aesthetically pleasing, pristine and requires the weld to be grinded, it won’t harm your structure. Such as jewelry or a car panel, these need to be smooth and flat, so the grinding of the weld is necessary, and it won’t weaken the weld if grinded properly, using the correct equipment and skill.
When grinding down the weld, you should be super careful not to grind the parent material. This is because if you grind too much of the parent material and the welding, the welded structure can lose some of its strength and can weaken over time.
The Bottom Line
Weld testing is key. You probably already understood that, but now you know exactly how to go about it, with a method that suits you.
References:
https://www.twi-global.com/technical-knowledge/job-knowledge/bend-testing-073
https://www.twi-global.com/technical-knowledge/faqs/acoustic-emission-testing
Here are some of my favorite tools & equipment´s
Thank you for reading this article. I hope it helps you find the most recent and accurate information for your welding project. Here are some tools that I use daily and hope you´ll also find helpful.
There are affiliate links, so if you do decide to use any of them, I´ll earn a small commission. But in all honesty, these are the exact tools that I use and recommend to everyone, even my own family. (NO CRAP)
To see all my of most up-to-date recommendations, check out this resource that I made for you!
